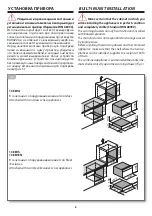
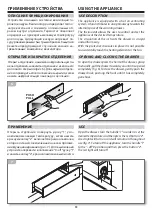
background image

8

УСТАНОВКА ПРИБОРА 

Убедиться в превосходном состоянии и 

устойчивости элемента мебели, в который будет 
устанавливаться прибор (Норматив DIN 68930). 

Изготовитель гарантирует соответствующее функ-
ционирование  отделения  для  подогрева  пищи 
только в сочетании с оборудованием производства 
BARAZZA и не отвечает за возможный ущерб, вы-
званный несоответствующим использованием.
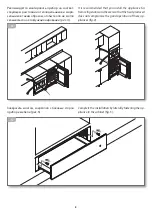
Перед началом монтажа прибора для подогрева 
пищи  и  связанного  с  ним  устройства,  убедиться, 
что полка элемента мебели, в который они встра-
иваются,  может  выдержать  вес  обоих  устройств. 
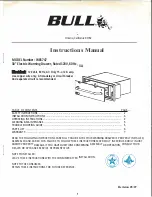
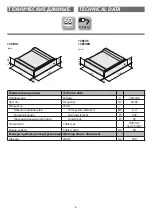
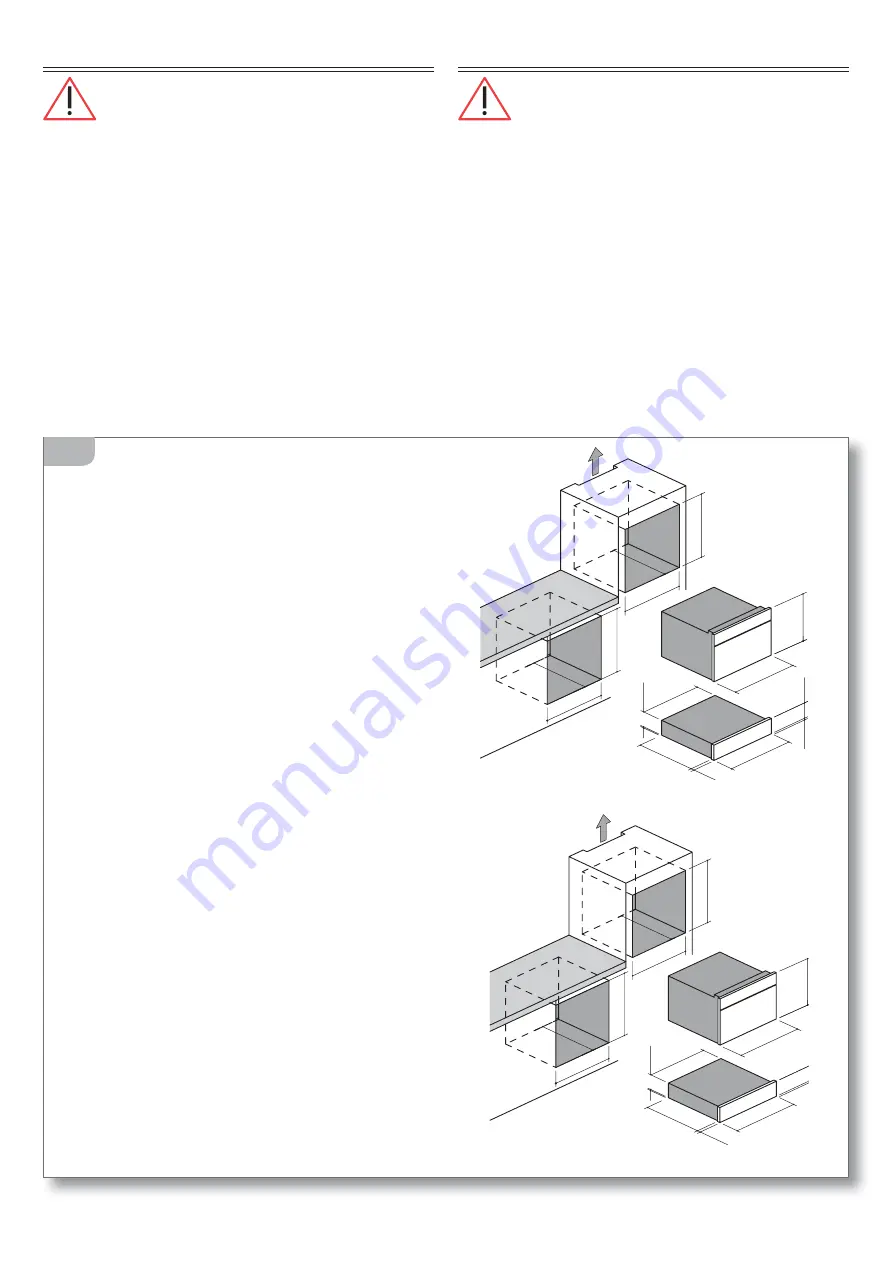
Комбинированное  устройство  позиционируется 
без промежуточных поверхностей непосредствен-
но сверху встроенного отделения для подогрева 
пищи 

(рис. 3)

.

3

BUILT-IN UNIT INSTALLATION

Make certain that the cabinet in which you 

will be installing the appliance is in perfect condition 
and completely stable (Standard DIN 68930).

The warming drawer can only be attached and installed 
with Barazza products.

The manufacturer is not responsible for damage caused 
by improper use.
Before installing the warming drawer and the combined 
appliance, make sure that the shelf where the two ap-
pliances will be installed, supports the weight of both 
of them.
The combined appliance is positioned without interme-
diate shelves directly upon the warming drawer (fig. 3).

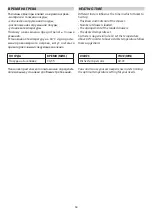
В сочетании с оборудованием линии Icon Glass

Attached with Icon Glass series appliances

В сочетании с оборудованием линии Icon Steel 
/Exclusive

Attached with Icon Steel/Exclusive series appliances

595

3

560

560

595

560 mi

n

560 

min

555

596

12

2

18

138

22

54

5

455

596

595

3

560

560

595

560 mi

n

560 

min

555

596

12

5

16

138

23

54

5

455

596

1CEEVG

1CEEVEN

1CEEVS

Summary of Contents for 1CEEVEN

Page 1: ...0 1CEEVG 1CEEVS 1CEEVEN 1CEEVG 1CEEVS 1CEEVEN...

Page 2: ...3 23 Themanufacturerreservestherighttomakeanychanges deemed suitable to the product without prior notice The drawings installation diagrams and tables contained in this manual are approximate and for...

Page 3: ...ction to the power mains 7 Built in unit installation 8 USAGE 10 Safety warnings 10 Before starting 12 Understanding the appliance 12 Useful information 12 Using the appliance 13 Use description 13 Op...

Page 4: ...Hz 50 60 Power Total power absorbed kW 0 4 Heating element W 400 Tangential W 30 Cable type H05VV 2 3x0 75 mm2 Cable length cm 90 Warming drawer dimensions Width cm 59 6 60 60 L 90cm mm 138 3 122 18...

Page 5: ...entions on the appliance extraordinary maintenance etc must be carried out by qualified personnel only as specified in this booklet The connection systems and installation rooms must be suitable and s...

Page 6: ...ne etc unattended as they are a potential hazard for children and animals danger of suffocation Movetheappliancetotheinstallationlocationbylifting it from the sides and not from the frontal of extract...

Page 7: ...e replaced by the manufacturer or its service agent or a similarty qualified person in order to avoid hazard The isolating switch must be located in a position which is accessible even after the appli...

Page 8: ...thewarmingdrawerandthecombined appliance make sure that the shelf where the two ap pliances will be installed supports the weight of both of them Thecombinedapplianceispositionedwithoutinterme diate s...

Page 9: ...ou install the appliance far fromrefrigeratorsandfreezerssothattheheatproduced does not compromise the good operation of these ap pliances fig 4 Complete the installation by laterally fastening the ap...

Page 10: ...thorizedServiceCentreand report the data indicated on the data plate This appliance is not suited for use by persons including children with physical sensorial or mental difficultiesorlackingproperexp...

Page 11: ...ouldbetakentoavoidtouchingheatingelements inside the warming drawer Burn hazard Accessible parts will become hot when in use To avoid burns and scalds children should be kept away Theinsideoftheapplia...

Page 12: ...DE IN ITALY 120 USEFUL INFORMATION The warming drawer must be empty when turned on for the first time and it should be set at maximum temperature for about 120 min utes During this time the warming dr...

Page 13: ...ce it is not possible to accidentally touch the heating element or the fan OPENING AND CLOSING THE DRAWER To open the drawer press the front of the drawer grasp thehandle pullthedrawertowardsyouuntili...

Page 14: ...FS PG ESBXFST MPBEFE t 5IF BSSBOHFNFOU PG UIF MPBEFE ESBXFST t 5IF EFTJSFE UFNQFSBUF TFU So there is no general rule To set the temperature above60 Cinordertohaveastabletemperature follow these sugges...

Page 15: ...danger the safety of people animals and property as well as cause damage to the appliance which is not covered by the Warranty A variation in the colouring of the warming drawer cavity interior does n...

Page 16: ...n the event of technical problems or for any other needs you may have Proceduretofollowifyourapplianceismalfunctioning Before contacting your nearest Service Centre do the following t DIFDL UIBU UIF B...

Page 17: ......

Page 18: ...18 Note...

Page 19: ......

Page 20: ...Barazza srl 31025 Sarano di S Lucia di Piave TV ITALIA Via Risorgimento 14 T 39 0438 62888F 39 0438 64901 info barazzasrl it barazzasrl it Progetto grafico Artlinea cod CSVI_00_7 rev 00 07 2021...

Reviews: