background image

21

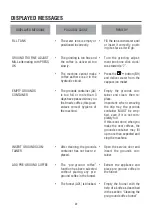
DISPLAYED MESSAGE

POSSIBLE CAUSE 

REMEDY

DESCALE

• 

The  machine  must  be  de-
scaled. 

• 

The  descaling  procedure 
described in the “Descaling” 
section needs to be perfor-
med as soon as possible.

LESS COFFEE 

• 

Too  much  coffee  has  been 
used.

• 

Select  a  milder  taste  or 
reduce the quantity of pre-
ground  coffee,  then  make 
the coffee again.

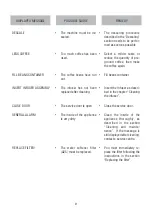
FILL BEANS CONTAINER

• 

The  coffee  beans  have  run 
out.

• 

Fill beans container

INSERT INFUSER ASSEMBLY

• 

The  infuser  has  not  been 
replaced after cleaning. 

• 

Insert the infuser as descri-
bed in the chapter “Cleaning 
the infuser”. 

CLOSE DOOR 

• 

The service door is open

• 

Close the service door.

GENERAL ALARM 

• 

The inside of the appliance 
is very dirty.

• 

Clean  the  inside  of  the 
appliance  thoroughly,  as 
described  in  the  section 
“Cleaning  and  mainte-
nance”.  If  the  message  is 
still displayed after cleaning, 
contact a service centre.

REPLACE FILTER! 

• 

The  water  softener  filter 
(A25) must be replaced. 

• 

You  must  immediately  re-
place the filter following the 
instructions  in  the  section 
“Replacing the filter”.

Summary of Contents for 1CFEVG

Page 1: ...Instruction manual 1CFEVG 1CFEVS 1CFEVEN 1CFEVN...

Page 2: ...USTING THE COFFEE MILL 12 MAKING ESPRESSO COFFEE WITH PRE GROUND COFFEE INSTEAD OF BEANS 12 DELIVERING HOT WATER 13 MAKING CAPPUCCINO USING THE STEAM FUNCTION 13 CLEANING AND MAINTENANCE 14 Cleaning t...

Page 3: ...er information you should consult Customer Services by calling the number given on the Customer Service sheet If your country is not among those listed on the sheet call the number given in the guaran...

Page 4: ...d For european markets only This appliance can be used by children aged from 8 years and above if they have been given supervision or instruction con cerning use of the appliance in a safe way and if...

Page 5: ...f the cabi net Do not leave the machine pulled out of the cabi net when it is being used Do not leave the machine pulled out of the cabinet when it is not needed In stall the machine according to the...

Page 6: ...elements plastic bags polystyrene foam etc should be kept out of reach of chil dren as they are a safety hazard Do not install the appliance in rooms where the temperature may drop to 0 C or lower th...

Page 7: ...t be firmly fixed to the wall with com mercially available brackets Important Important all installation or maintenance ope rations must be performed with the appliance disconnected from the mains ele...

Page 8: ...the coffee beans container The appliance must be earthed in compliance with legislation Electrical connections must be performed by a qualified electrician in compliance with the ma nufacturer s inst...

Page 9: ...g 4 Open the lid and fill the container with coffee beans then close the lid and push the appliance in Important To prevent malfunction never introduce pre ground coffee freeze dried coffee caramelise...

Page 10: ...ss the button B6 to enter the menu 2 Press the button B7 until UNIN STALL FILTER is displayed 3 Press the button B9 The appliance automatically resets to READY status TURNING ON AND HEATING UP Each ti...

Page 11: ...to fill and then empty the cup to be used for the coffee so as to preheat it Unless preheated do not use excessively thick cups as they will absorb too much heat Preheat the cups by rinsing them with...

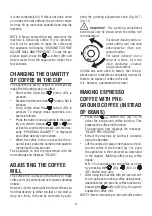
Page 12: ...adjusting initially However if after making the first few coffees you find that delivery is either too fast or too slow a drop at a time this can be corrected by adju sting the grinding adjustment kn...

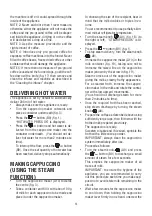
Page 13: ...lk for each cappuccino to be made and place it under the cappuccino maker In choosing the size of the recipient bear in mind that the milk doubles or triples in vo lume You are recommended to use part...

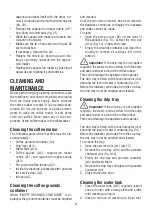
Page 14: ...nd cleaned Until the grounds container has been cleaned the appliance continues to display the message and coffee cannot be made To clean Open the service door A2 on the front of the appliance fig 13...

Page 15: ...ner fig 26 Cleaning the infuser The infuser A5 must be cleaned at least once a month Important The infuser A5 must not be removed when the appliance is on Do not at tempt to use force to remove the in...

Page 16: ...ance displays START TIME 00 00 Press the button B8 to set the au to start time If you hold the button down the time is changed rapidly Press the button B9 to confirm Press once and the appliance di sp...

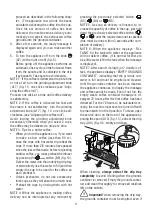
Page 17: ...ck under the cappuccino maker Press the button Hot water flows out of the cappuccino maker spout into the container below and the appliance displays RINSING When the water tank is empty the appliance...

Page 18: ...e original values the default va lues can be reset as follows Press the button B6 then press the button B7 repeatedly until the ap pliance displays RESET TO DEFAULT NO Press the button B8 and the ap p...

Page 19: ...ng the fuse cover the plug must NOT be used until a replacement fuse cover can be obtained from your nearest electrical dealer The co lour of the correct replacement fuse cover is that as marked on th...

Page 20: ...e you first made coffee this guar antees correct hygiene of the machine Empty the grounds con tainer and clean then re place Important when removing the drip tray the grounds container MUST be emp tie...

Page 21: ...ERT INFUSER ASSEMBLY The infuser has not been replaced after cleaning Insert the infuser as descri bed in the chapter Cleaning the infuser CLOSE DOOR The service door is open Close the service door GE...

Page 22: ...essing the button B8 fig 12 The coffee is not creamy enough The coffee is ground too coarsely Wrong type of coffee Turn the grinding adjust ment knob one click anti clockwise towards 1 while the coffe...

Page 23: ...of the spouts The spouts are blocked Clean the spouts with a to othpick fig 23 The coffee does not come out of the spouts but from around the service door A2 The holes in the spouts are clogged with...

Page 24: ...dd the coffee and the brandy stirring constantly Serve in chilled te acups or Ballon glasses Irish cofee Ingredients serves 3 2 spoons of sugar 1 spoon of water 9 teaspoons of whipping cream 6 spoon o...

Page 25: ...5713231342_00 _0621 HYHaaH ZYS HYHUV KP 3 JPH KP 7PH L 0 30 PH 9PZVYNPTLU V PUMV IHYHaaHZYS P IHYHaaHZYS P...

Reviews: