background image

9

 SUSTITUCIÓN DEL CABLE DE ALIMENTACIÓN

  En caso necesario, el cable de alimentación 

puede sustituirse por otro del mismo tipo


(véase 

“Datos técnicos”, pág. 4)


que cumpla las normas 

vigentes en el país de instalación.

  Si el equipo ya está conectado, desconéc-

telo de la alimentación eléctrica.

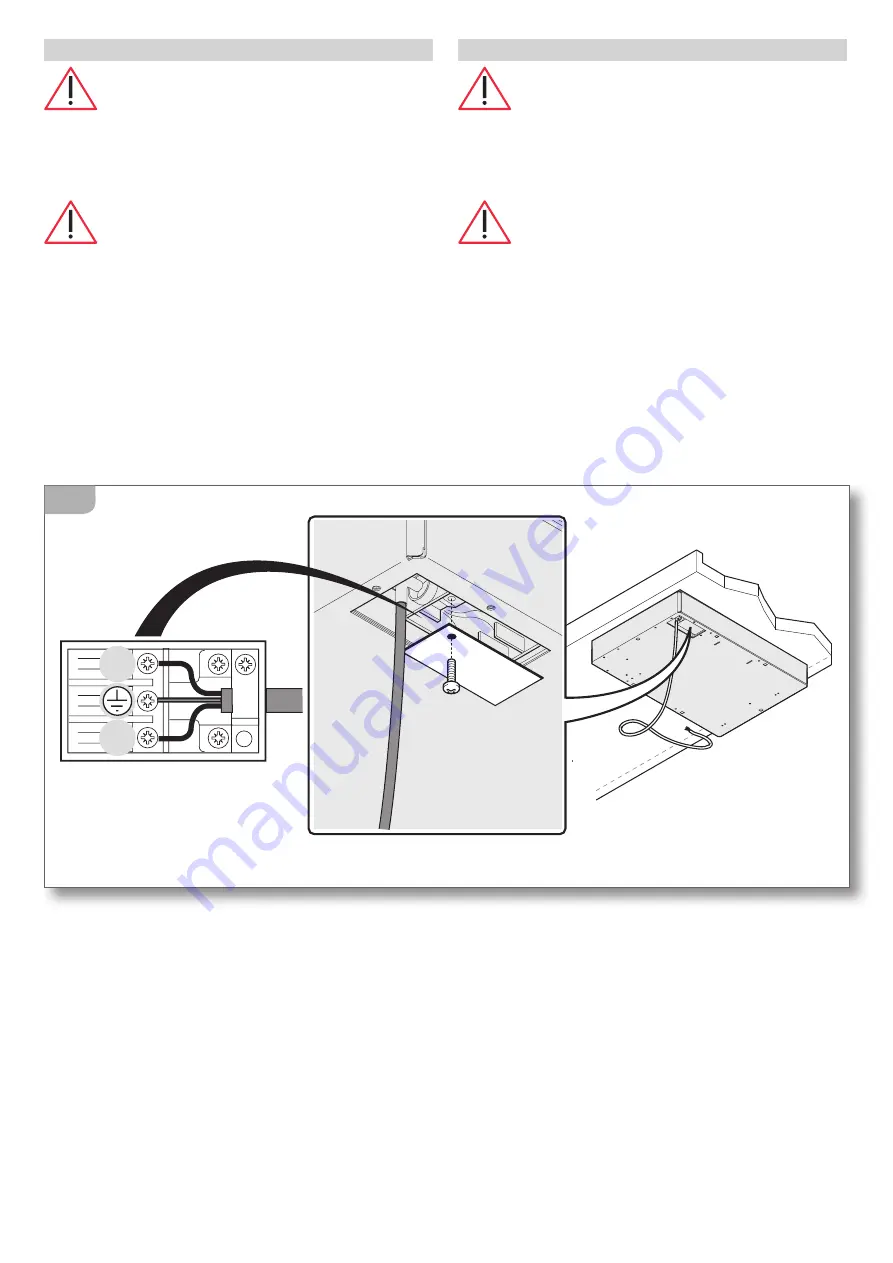
Para acceder a las conexiones eléctricas, desmonte la 
tapa de la regleta de bornes desenroscando el tornillo 
que la sujeta 

(fig. 4)

.

Desconecte el cable antiguo de los bornes y extráigalo; 
conecte el nuevo cable (únicamente de tipo H05V2V2-
F) a los bornes correspondientes, N - L - Tierra. 
Sujete  el  nuevo  cable  con  el  sujetacable  previsto 
y  vuelva  a  cerrar  la  regleta  de  bornes  colocando  la 
tapa en su sitio.

N

L

4

 POWER CORD REPLACEMENT

  If necessary, the power cord can be replaced 

with an identical type 

(see “Technical data” on page 

4)   

in  compliance  with  current  regulations  in  the 

country where the appliance is installed.

  If the appliance is already connected, discon-

nect the electrical power.

To access the electrical connections, remove the cover 
from  the  terminal  board  by  unscrewing  the  screws 

(figure 4)

Disconnect the old cord from the terminal board and 
remove it; connect the new cord (only the H05V2V2-F


type) into the respective terminals N - L - Earth.  
Cover the new cord with the appropriate cord holder and 
re-close the terminal, replacing its cover.

Summary of Contents for B Free Series

Page 1: ...1PBF036TK 00 PBF036TK 00 taste of design B_Free Teppanyaki Manual de instalación y uso Installation and use manual ...

Page 2: ...l de la manera que considere oportuna sin obligación de previo aviso Los dibujos los esquemas de instalación y las tablas contenidas en el manual deben considerarse indicativos y únicamente a título informativo Las instalaciones de acometida del edificio deben cumplir las normas nacionales vigentes Se prohíbe la copia la reproducción total o parcial de los conteni dos y la transmisión de este manu...

Page 3: ...antenimiento ordinario 19 Limpieza 19 Periodos de inactividad 20 Eliminación al final de la vida útil 21 Asistencia postventa 21 DESCRIPTION PAGE TECHNICAL DATA 4 INSTALLATION 5 Safety warnings 5 Checks and handling 6 Disposal of the packaging 6 Installation site choice 7 Connection to the power mains 8 Built in unit installation 10 USAGE 12 Safety warnings 12 Before starting 14 Understanding the ...

Page 4: ...2V2 F 3x1 5 mm2 Longitud del cable Cable length cm 90 Medidas del equipo Appliance dimensions Anchura Width cm 36 Profundidad Depth cm 51 Altura del borde Edge height cm 0 6 Altura de la cubierta Enclosure height cm 6 8 51 6 8 36 cm 36 36 Insulating class 1 1 L 90cm En los equipos realizados según especificaciones especiales las dimensiones totales varían With custom made models dimensions vary ...

Page 5: ...DVERTENCIAS DE SEGURIDAD Lea detenidamente este manual de instrucciones antes de la instalación y o el uso del equipo y consérvelo en un lugar accesible a todos los usuarios para futuras consultas en caso de traspaso o venta del equipo asegúrese de entregar también este manual al nuevo usuario para que pueda conocer sus procedimientos de instalación y uso así como las medidas de seguridad Lainstal...

Page 6: ...uter packaging film instructions bag expanded polystyrene impact protections REVISIÓN Y DESPLAZAMIENTO Tras desembalar el equipo quitando todos los mate riales de embalaje y las películas de protección de las superficies compruebe si se perciben desperfectos evidentes de ser así no comience la instalación y acuda a su vendedor antes de 8 días comunicando los datos indicados en la placa de caracter...

Page 7: ...respectoaparedeslateralesoposteriores Los equipos deben mantenerse a una determinada distancia de las paredes fig 2 C A min 3 5 cm B min 4 5 cm C min 56 cm A B 2 INSTALLATION SITE CHOICE Installation site characteristics The appliances must be placed in suitable interior loca tionswithamaximumtemperatureof25 Candmaximum humidity of 60 the locations must satisfy the safety standards in force in the...

Page 8: ... indicadas en la placa de características coincidan con las de la instalación de alimentación El equipo incluye de serie un cable de alimentación H05V2V2 F de90cmdelargo alquesedeberáaplicar unenchufecapazdesoportar16A queasuvezdeberá conectarse a una toma de corriente fig 3a También se puede conectar el cable directamente a la red de distribución fig 3b en este caso deberá instalarseundispositivo...

Page 9: ...Sujete el nuevo cable con el sujetacable previsto y vuelva a cerrar la regleta de bornes colocando la tapa en su sitio N L 4 POWER CORD REPLACEMENT Ifnecessary thepowercordcanbereplaced withanidenticaltype see Technicaldata onpage 4 in compliance with current regulations in the country where the appliance is installed Iftheapplianceisalreadyconnected discon nect the electrical power To access the ...

Page 10: ... del otro considerando una distancia intermedia mínima de 2 cm entre ellos fig 6 490 340 40 340 mm 360 360 20 6 BUILT IN UNIT INSTALLATION Make certain that the cabinet in which you willbeinstallingtheapplianceisinperfectcondition and completely stable Standard DIN 68930 Prepareanembeddedholewithmeasurementsasspecified infigure5 iftheapplianceistobeinstalledaboveanoven it is also necessary to prov...

Page 11: ...fig 7 det 3 1 2 G 3 G 1 OK 7 En los equipos realizados según especi ficaciones especiales el sistema de fijación es personalizado Place a protective sponge seal on the work surface ensuring that it is not positioned under the edges of the appliance figure 7 part 1 Subsequently arrangetheapplianceabovetheembed dedhole figure7 part2 secureitusingthescrewsand brackets provided figure 7 part 3 With cu...

Page 12: ...uperficie de apoyo Peligro de incendio Nocoloquenuncaobjetossensiblesalcaloroinflama bles ej agarradores de cacerolas persianas botellas de bebidas alcohólicas etc cerca del equipo USAGE SAFETY WARNINGS FOR SAFE AND CORRECT USE This appliance has been designed and manufac turedexclusivelyforcookingfood Anyotheruseisconsid eredimproperandthuspotentiallyhazardousforpeople animals and property Furthe...

Page 13: ...namiento Durante las operaciones de cocción adopte todas las precauciones posibles para no rayar la plancha de cocina The area surrounding the appliance may be come very hot so take precautions when posi tioning power outlets other household appli ances electrical cables hoses and any heat sensitive or flammable materials in this area FOR COOKING Burn hazard During operation and for a few minutes ...

Page 14: ... ya coci nados incluso dentro de cacerolas Leyenda 1 placa de características 2 pletina de fijación 3 plancha de cocina 4 mando de regulación de la temperatura 5 pilotodefuncionamientoconectadoaltermostato cuando se apaga indica que se ha alcanzado la temperatura deseada 6 piloto de funcionamiento general indica que el equipo está encendido 7 mandodeseleccióndelazonadecocción cocción en toda la pl...

Page 15: ...Alimento C Pescado 170 C 180 C Verdura fruta 200 C Carnes cerdo buey ternera 180 C 200 C Carnes cordero aves 150 C 180 C USING THE APPLIANCE Afterselectingwhethertocooksolelyonthebackgrillingzone or the entire grilling zone rotate the knob 7 to the desired position figure 9 part 1 Illuminationoftheindicatorlight 6 indicatesthattheappliance is being powered If you choose to only use the back grilli...

Page 16: ...cionamiento y durante algunos minutos tras el uso algunas partes del equipo alcanzan tempe raturas muy altas No entre en contacto con estas partes sin llevar puestas protecciones personales adecuadas Wait a few minutes until the grill heats up well subse quently with the help of a spatula spread fats or oils across the grill surface and place the food to be cooked on this surface Relativetothefood...

Page 17: ...ar los alimentos directamente sobre la plancha sino cocinar los trozos ya separados en pequeñas porciones fig 11 10 SOME COOKING SUGGESTIONS If you choose to only use the back grilling zone you can take advantage of the front grilling zone which will also be hot to keep already cooked food hot Thegrillsurfaceremainshotevenafterbeingswitched off in order to save energy you can therefore switch the ...

Page 18: ...tacto con el equipo podrían atacar las superficies forman do antiestéticas marcas que en cualquier caso no afectan al funcionamiento del equipo MANTENIMIENTO SAFETY WARNINGS Always disconnect the appliance from the powersupplyandremovetheconnectionplugfrom the socket before carrying out any cleaning opera tions or when the appliance will not be used for an extended period Regularlycheckthattheelec...

Page 19: ...vea la temperatura indicada en la serigrafía fig 12 luego vuelva a poner el mando en la posición de 0 apagado 19 5 4 4 1 2 12 MAINTENANCE SCHEDULE No regular maintenance is required for the hotplates except cleaning CLEANING Stainless steel surfaces use a soft cloth lightly dampened in neutral detergent or warm vinegar follow the manufacturer s instructions on the use of the cleaning products Knob...

Page 20: ...as indicaciones del capítulo correspondiente desconecte el enchufe de alimentación eléctrica Remove withthehelpofaspatula thelargerresidues select utensils with rounded edges in order to avoid scratching the grill surface subsequently wet the grill surface with a little water mixed with washing up detergent and leave it to soak for a few minutes in order to remove the encrustations Do not use dete...

Page 21: ...riginales el uso de componentes distintos de los suministrados por el Fabricante anula la Garantía y puede ocasionar daños a las personas y al propio equipo END OF LIFE DISPOSAL Thecrossedbinsymbolontheproductindi cates that the waste arising from electrical and electronic equipment WEEE must be handled separately from undifferentiated waste sothatitcanundergospecialopera tions for re use or speci...

Page 22: ...Notas Notes ...

Page 23: ......

Page 24: ...to grafico Artlinea cod PBFT6 rev 02 11 2017 Barazza srl 31025 Sarano di S Lucia di Piave TV ITALIA Via Risorgimento 14 Tel 39 0438 62888 Fax 39 0438 64901 info barazzasrl it www barazzasrl it taste of design ...

Reviews: