background image

15

ПРИМЕНЕНИЕ УСТРОЙСТВА

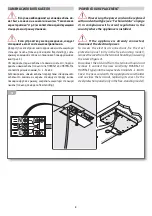
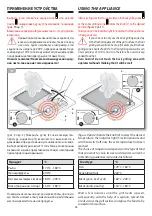
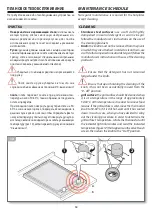
Выбрать,  если  готовить  в  задней  зоне    или  на  всей 

плите  , поворачивая ручку (7) в желаемое положение 
(

рис. 9 пар. 1)

.

Включение индикатора (6) указывает на то, что устройство 
включено.

При выборе использования только задней части, 
в связи с непрерывностью плиты, также и перед-
няя  часть  будет  нагреваться  (например,  если 

задняя часть нагрета до 200°C, передняя нагревается до 
температуры 100°C) и поэтому может использоваться для 
поддерживания температуры уже готовых блюд. 

Опасность ожогов! Не касаться голыми руками перед-
ней части, так как она тоже нагревается!
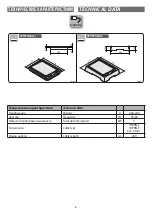
7

6

5

4

1

4

1

2

9

(

рис.  9  пар.  2) 

Повернуть  ручку  (4)  на  желаемую  тем-

пературу,  индикатор  (5)  включается  и  выключается  в 
дальнейшем при достижении установленного значения.
Выбор температуры зависит от типа блюда, его величины 
и влажности: далее представлена таблица с некоторыми 
ориентировочными данными.
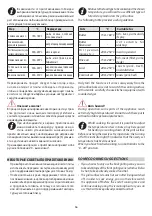
Продукт

°C

Рыба

170°C - 180°C

Овощи/фрукты

200°C

Мясо (свинина, говядина, телятина) 180°C - 200°C

Мясо (баранина, птица)

150°C - 180°C

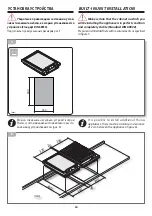
Подождать несколько минут до нагрева плиты, при помо-
щи лопатки смазать плиту животным или растительным 
маслом и разместить на неё продукты.
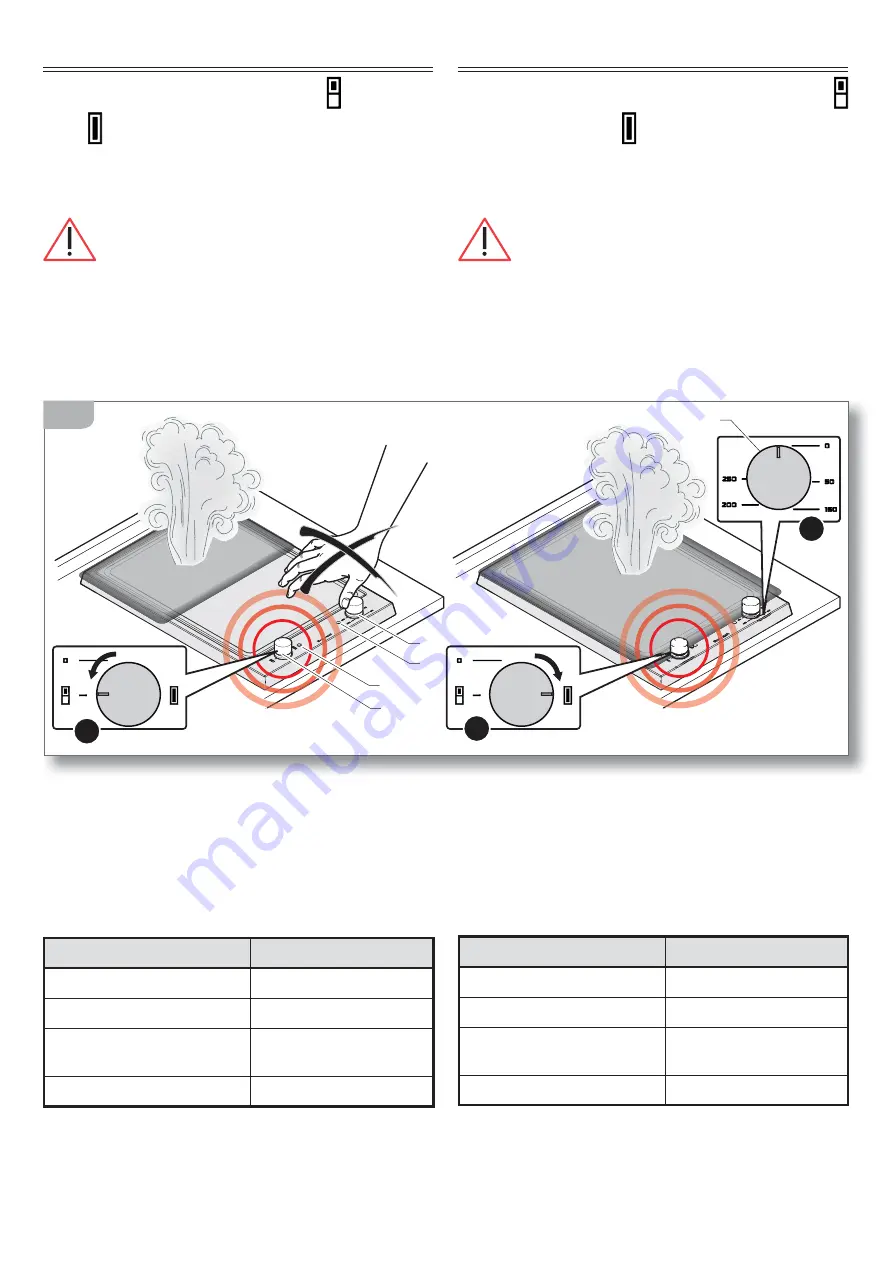
USING THE APPLIANCE

After selecting whether to cook solely on the back grilling zone 

or the entire grilling zone   rotate the knob (7) to the desired 
position (

figure 9 part 1)

.

Illumination of the indicator light (6) indicates that the appliance 
is being powered.

If you choose to only use the back grilling zone, due 
to the flush arrangement of the grill surface, the front 
grilling zone will also heat up (for example, if the back 

grilling zone is heated to 200°C, the front grilling zone will reach 
a temperature of 100°C) and can therefore be used to keep 
cooked food hot. 

Burn  hazard!  Do  not  touch  the  back  grilling  zone  with 
unprotected hands thinking that it will be cool!

(

figure 9 part 2) 

Rotate the knob (4) to select the desired 

temperature; the indicator light (5) will illuminate and 
will then switch off once the set temperature has been 
reached.
The choice of temperature depends on the type of food 
that you want to cook, its size and its water content: a 
table listing guidelines is provided as follows.

Food type

°C

Fish

170°C - 180°C

Vegetables/fruit

200°C

Meat (pork, beef, veal)

180°C - 200°C

Meat (lamb, poultry)

150°C - 180°C

Wait  a  few  minutes  until  the  grill  heats  up  well, 
subsequently,  with  the  help  of  a  spatula,  spread  fats 
or oils across the grill surface and place the food to be 
cooked on this surface.

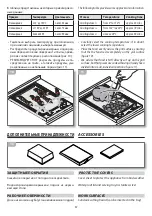
Summary of Contents for Thalas 1PTITK 00 Series

Page 1: ...1PTITK 00 1PTFTK 00 taste of design Thalas Teppanyaki QVWDOODWLRQ DQG XVH PDQXDO...

Page 2: ...of the appliance General information 2014 35 UE 2014 30 UE Themanufacturerreservestherighttomakeanychanges deemed suitable to the product without prior notice The drawings installation diagrams and t...

Page 3: ...llation site choice 7 Connection to the power mains 8 Built in unit installation 10 USAGE 12 Safety warnings 12 Before starting 14 Understanding the appliance 14 Useful information 14 Using the applia...

Page 4: ...chnical data Voltage V 220 240 Frequency Hz 50 60 Total absorbed power kW 3 Cable type H05RN F H07RN F 3x1 5 mm2 Cable length cm 200 mm 37 37 1PTITK 00 350 40 23 30 370 520 mm 40 40 1PTFTK 00 400 100...

Page 5: ...ation rooms must be suitable and satisfy the safety standards in force in the country of use protective isolating switch earthing system equipotential system etc The manufacturer will not be held liab...

Page 6: ...lasticbags polystyrene etc unattended asthey are a potential hazard for children and animals danger of suffocation Move the appliance to the installation location using appropriate personal safety equ...

Page 7: ...re designed for outdoor use For better protection werecommendtheuseofthespecialcoversheet Ifitisnotusedfrequently possiblykeepitinaplacesheltered frombadweather Appliancesmaybeassembledontounits made...

Page 8: ...be crushed or rolled up comeintocontactwithanytypeofliquid sharporhot objects or corrosive substances reach atanypoint atemperaturewhichis50 Chigher than the room temperature be replaced with a differ...

Page 9: ...nnect the electrical power To access the electrical connections fix the steel protection panel only in the free standing model removethecoverfromtheterminalboardbyunscrewing the screws figure 4 Discon...

Page 10: ...certain that the cabinet in which you willbeinstallingtheapplianceisinperfectcondition and completely stable Standard DIN 68930 Prepareanembeddedholewithmeasurementsasspecified in figure 5 It is possi...

Page 11: ...t positioned under the edges of the appliance figure 7 part 1 Subsequently arrange the appliance above the embedded hole figure 7 part 2 secure it using the screws and brackets provided figure 7 part...

Page 12: ...finish using the appliance If you should note any anomalies do not use theappliancebutcontactanauthorizedService Centre and report the data indicated on the data plate The appliance may be used by chi...

Page 13: ...suffocate the flames using a moist dishcloth or a similar material and immediately call the fire services Fire hazard Donotcovertheapplianceorpartsoftheappliancewith aluminium foil or similar materia...

Page 14: ...that the desired temperature has been reached 6 main operation indicator light indicates that the appliance is on 7 cooking area selection knob cooking using the entire grilling zone or solely the bac...

Page 15: ...therefore be used to keep cooked food hot Burn hazard Do not touch the back grilling zone with unprotected hands thinking that it will be cool figure 9 part 2 Rotate the knob 4 to select the desired t...

Page 16: ...nded edges Burn hazard During operation some parts of the appliance reach extremely high temperatures Do not touch these parts without suitable personal protection Whilstcooking ifrequired itispossibl...

Page 17: ...t the lower cooking temperature Place the food evenly across the grill surface ensuring that the the food rests completely on the grill surface figure 10 We advise that food is NOT directly cut up on...

Page 18: ...iance using only the procedures and products indicated in this manual in particular do not use abrasive sponges scrapers acidic or aggressive detergents steam or pressure cleaning devices direct water...

Page 19: ...ot remained lodged under the knob Ensure that upon finishing the cleaning of the knob it has not been accidentally moved from the 0 off position grill surface the grill surface should be cleaned when...

Page 20: ...acids may mark the grill surface avoid extended contact with these types of substances In the case where the grillsurfaceisslightlymarked treatitwithhousehold lemon juice If you wish to clean the gri...

Page 21: ...than Italy you must comply with the regulations in force in your country Before disposing of the appliance render it unusable by removing the power cord AFTER SALES SERVICE Barazzasrlensuresyoutheutmo...

Page 22: ......

Page 23: ......

Page 24: ...Artlinea PTHT_00_7 01 03 2022 Barazza srl 31025 Sarano di S Lucia di Piave TV ITALIA Via Risorgimento 14 Tel 39 0438 62888 Fax 39 0438 64901 info barazzasrl it www barazzasrl it taste of design...

Reviews: