background image


13 

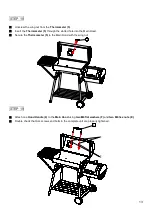
STEP 18


Unscrew the wing nut from the 

Thermometer (5)


Insert the 

Thermometer (5)

 through the slotted hole into the Main Hood. 


Secure the 

Thermometer (5)

 to the Main Hood with the wing nut. 


STEP 19


Attach one 

Hood Handle (6)

 to the 

Main Hood

 using 

two M6 flat washers (F)

 and 

two M6


hex nuts (E)


Double check that ALL screws and bolts in the complete unit are properly tightened. 


6

5

Summary of Contents for BBOFF

Page 1: ...QUES GALORE OUTDOOR COOKING INSTRUCTIONS BILLABONG OFFSET SMOKER For The Safe Use And Enjoyment Of Your New Barbeque Smoker PRODUCT CODE BBOFF BILLABONG OFFSET SMOKER Tools required 1 adjustable spanner 1 phillips head screwdriver ...

Page 2: ...hilst it is hot or in use NEVER leave the smoker unattended when in use or hot Take care when touching a hot smoker especially on surfaces close to the firebox or roasting hood WARNING Read instruction manual for additional warnings and operating procedures Carbon Monoxide Hazard Burning charcoal inside an enclosed area can kill you It gives off carbon monoxide which has no odour Never burn charco...

Page 3: ...ATERIALS 1000MM IN ALL HORIZONTAL DIRECTIONS DO NOT USE UNDER A ROOF Keep the unit sheltered from the wind Make sure the surface is level This is safer and makes cooking easier Don t put the smoker too close to windows or anywhere else where cooking smoke is likely to cause a problem DO NOT USE DURING A TOTAL FIRE BAN Putting Your Smoker In An Enclosure This unit must only be used in an above grou...

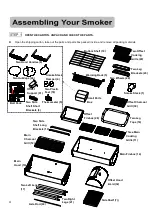
Page 4: ...ong Brackets 10 Two Left Legs 17 Three Main Cooking Grills 11 Main Firebox 14 Offset Hood Lid 32 Side Shelf 7 Warming Rack 5 Two Wheels 20 Two Offset Cooking Grills 29 Two Leg Brackets 23 Smoke Stack 1 Offset Charcoal Grill 30 Two Leg Tops 16 Bottom Shelf 19 Offset Firebox 26 Two Side Shelf Short Brackets 8 Two Plastic Feet 18 Offset Support 31 Two HubCaps 24 Two Hood Handles 6 Thermometer 5 Bolt ...

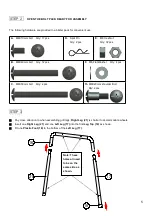
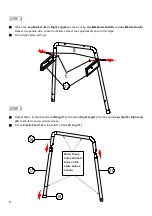
Page 5: ...horter to accommodate wheels Insert one Right Leg 21 and one Left Leg 17 into the first Leg Top 16 as shown Fit one Plastic Foot 18 to the bottom of the Left Leg 17 A M6X10mm bolt Qty 17 pcs D Split Pin Qty 2 pcs E M6 Hex Nut Qty 32 pcs B M6X40mm bolt Qty 12 pcs F M6 Flat Washer Qty 4 pcs C M6X50mm bolt Qty 2 pcs 13 M6X20mm shoulder Bolt Qty 2 pcs Note These holes all need to be on the same side a...

Page 6: ...e bottom holes of the Leg Brackets open at this stage Do not fully tighten bolts yet STEP 5 Repeat Step 3 to attach another Left Leg 17 and another Right Leg 21 into the second Leg Top 16 Right Leg 21 is shorter to accommodate wheels Fit one Plastic Foot 18 to the bottom of the Left Leg 17 23 Note These holes all need to be on the same side as shown ...

Page 7: ...to holes of assembled legs as shown STEP 7 Attach the other end of Leg Bracket 23 to Right Leg 21 as shown using one M6x40mm Bolt B and one M6 Hex Nut E Repeat on opposite side Leave the bottom holes of the Leg Brackets open at this stage Do not fully tighten bolts yet 19 ...

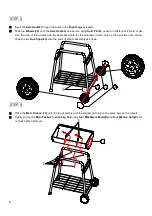
Page 8: ...heels with the depressed hole for the Hubcaps in the center is facing outward as shown Snap the two Hub Caps 24 onto the ends of Wheel assembly as shown STEP 9 Place the Main Firebox 14 onto the leg assembly with the smoker opening on the same side as the wheels Tightly secure the Main Firebox to each Leg Top using four M6x40mm Bolts B and four M6 Hex Nuts E Do not fully tighten bolts yet 22 20 24...

Page 9: ... nuts E as shown STEP 11 a ON THE NON WHEEL LEG SIDE Attach one end of each of the Side Shelf Long Brackets 9 into the lower hole in the Leg Bracket as shown below using two M6x40mm bolts B Secure with two M6 hex nuts E Attach the other end of each of the Side Shelf Long Brackets 9 to the Side Shelf using two M6x10mm bolts A b ON THE WHEEL LEG SIDE Lock the other end Leg Bracket lower holes in pla...

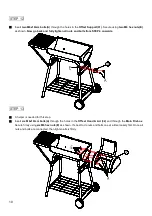
Page 10: ...l nuts and bolts from STEP 4 onwards STEP 13 A helper is needed for this step Insert six M6x10mm bolts A through the holes in the Offset Hood Lid 32 and through the Main Firebox Secure firmly using six M6 hex nuts E as shown It s best to do nuts and bolts one at a time loosely first Once all nuts and bolts are connected then tighten all six firmly 31 32 ...

Page 11: ... Hood Secure using four M6 hex nuts E as shown Insert one M6x10mm bolt A through the hole INSIDE the Offset Firebox into the Offset Support 31 Tighten all bolts firmly STEP 15 Attach one Hood Handle 6 to the Offset Lid as shown using two M6 flat washers F and two M6 Hex Nuts E Tighten firmly 6 ...

Page 12: ...er pack STEP 17 Insert the Smoke Stack 1 through the Main Hood from inside and secure with two M6x10mm bolts A and two M6 hex nuts E Unscrew the M6 Cap Nut 2 and remove the Spring 3 from the Smoke Stack 1 Secure the Smoke Stack Damper 4 to the Smoke Stack with the Spring 3 and the M6 Cap Nut 2 as shown 10 13 1 4 2 3 2 3 1 4 ...

Page 13: ...ugh the slotted hole into the Main Hood Secure the Thermometer 5 to the Main Hood with the wing nut STEP 19 Attach one Hood Handle 6 to the Main Hood using two M6 flat washers F and two M6 hex nuts E Double check that ALL screws and bolts in the complete unit are properly tightened 6 5 ...

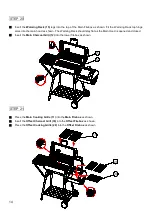
Page 14: ...arming Rack should stay flat as the Main Hood is opened and closed Insert the Main Charcoal Grill 12 into the lower firebox as shown STEP 21 Place the Main Cooking Grills 11 into the Main Firebox as shown Insert the Offset Charcoal Grill 30 into the Offset Firebox as shown Place the Offset Cooking Grills 29 into the Offset Firebox as shown 15 12 29 30 11 ...

Page 15: ... the inside surface of the smoker clean it with sand paper or steel wool then coat with cooking oil NEVER USE PAINT ON THE INSIDE SURFACES OF THE SMOKER Smoke build up the inside of the unit will protect the steel and resist rusting Grilling Instructions and Tips 1 Preheat the smoker for 5 10 minutes 2 Before heating lightly coat the cooking grills with cooking oil to prevent food from sticking 3 ...

Page 16: ...ad of firelighter to light the fire but only according to those manufacturers instructions Never use instant light charcoal or charcoal lighter fluid with any of these other starting methods CONTROLLING A FIRE Allow enough time for properly building the fire and getting the smoker up to desired temperature before attempting to cook Rising heat and smoke will move up and out of the unit pulling in ...

Page 17: ... may occur when fats and oils start to run from cooking food You can barbeque in the main firebox the offset firebox or both Just a small amount of fuel is needed as the food is directly above the heat BARBEQUE INDIRECT COOKING Indirect Cooking is cooking using indirect heat and smoke This method takes a little longer but can be used for nearly any kind of food you want to cook including those abo...

Page 18: ...isonous Any smoking woods used should be well cured Green wood still contains all the sap and moisture needed to keep the tree alive and will impart a very strong tasting smoke that will turn your foods black Also when you try burning green wood it is hard to reach a good temperature because all the moisture inside the wood can put the fire out while it s burning Well cured wood lights easily main...

Page 19: ...19 Below exploded diagram and parts list for your after service reference 1 2 3 4 5 6 7 8 9 10 11 12 13 14 17 18 19 20 16 21 22 23 24 25 15 26 27 28 30 29 31 06 32 ...

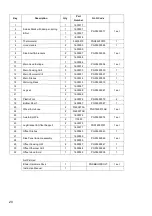
Page 20: ...rming Rack 1 1600015 PGS1600015 1 16 Leg set 2 1600067 PGS1600067 1 set 17 2 1600068 21 2 1600069 18 Plastic Foot 2 1600072 PGS1600072 2 19 Bottom Shelf 1 1600087 PGS1600087 1 20 Wheel Hubcap 2 01600073A PGS1600073AB 1 set 24 2 01600073B 22 Axle Split Pin 1 1600074 PGS1600074 1 set 25 2 110050 23 Leg Bracket Offset Support 2 1600070 PGS16000701 1 set 31 1 1600071 26 Offset Firebox 1 1600043 PGS160...

Page 21: ...protects it from the elements as well as backyard pests And there are many more Ultimately anything you can cook in the kitchen you can cook on your barbeque Need more information or assistance in any way You can call your Barbeques Galore store where barbeque experts will be happy to help you Call 1300 301 392 for your nearest store Or visit our website at www barbequesgalore com au G L G Austral...

Reviews: