background image

4

GB

THANK YOU FOR BUYING THE BARB’ XPERT� THIS INFORMATION MUST BE RETAINED FOR FUTURE CONSULTATION�

PLEASE READ CAREFULLY BEFORE USING THE APPLIANCE

DANGER

Avoid getting the appliance wet�

CAUTION


Keep the appliance dry�

ATTENTION

This appliance must not be washed with water� Never immerse the appliance in water and never rinse it with water�


WARNINGS

- This appliance can be used by children aged 8 years and over and people with reduced physical, sensory or mental 

capacities or those lacking experience or knowledge if they are able to benefit from supervision or instructions concern-

ing the safe use of the appliance and they understand the dangers involved� Children must not play with the appliance� 

Cleaning and maintenance must not be carried out by children unless they are over 8 years old and under supervision�

- Always check the appliance before using it� Do not use the appliance if one of the elements is damaged or broken 

because there is a risk of injury�

- For hygiene reasons, the appliance must be used by just one person�

- Do not use compressed air, scrubbers, abrasive products or aggressive detergents such as fuel or acetone to clean 

the appliance�

- Only use a non-rechargeable LR6/AA battery�

- Remove the battery from the appliance if you are not using it for an extended period�

• Powered by a LR6/AA 1�5v battery included

• Stainless steel blades

TECHNICAL CHARACTERISTICS

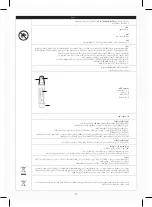
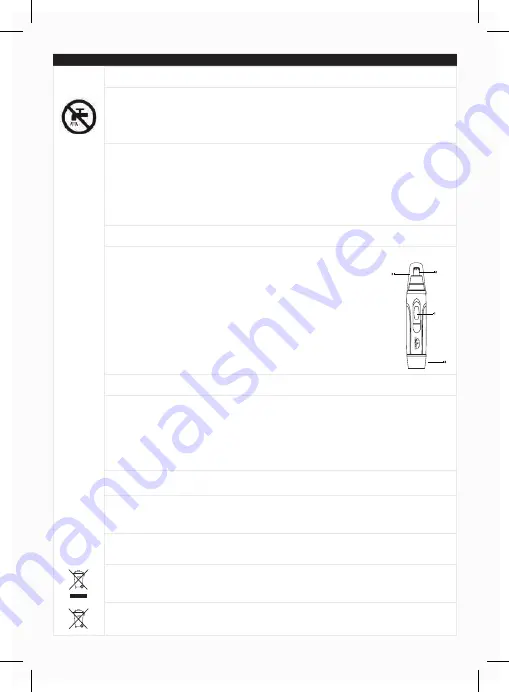
1� On/off button

2� Clipping head

3� Protective cover

4� Battery compartment

BEFORE USING THE APPLIANCE

INSERT THE BATTERY AND SWITCH ON

- Your clippers require 1 LR6/AA 1�5v battery included

- Open the battery compartment by turning it in an anti-clockwise direction until the marking ( I ) matches up with the 

marking (o)�

Insert the battery into the compartment by respecting the polarity indicated� 

- Reposition the battery compartment cover and turn it in a clockwise direction until it matches up with the small locking 

symbol�

- Switch the appliance on using the ON position�

In the event that leaks occur from the batteries, and the liquid (electrolyte) touches the skin, wash immediately in plenty 

of soap and water, or neutralise with a mild acid such as lemon juice or vinegar� If the liquid comes into contact with the 

eyes, rince immediately in clean water for 10 minutes, then consult a doctor�

ADVICE FOR ACHIEVING BEST RESULTS

- To remove unwanted hair from the nose and ears, carefully insert the clippers’ circular clipping head into the nostril or 

ear to cut the hair

INSERTING AND REMOVING THE TRIMMING HEAD

Switch the appliance off using the OFF position

- Place the trimming head carefully on the appliance then lock by turning the trimming head to the left�

- Remove the trimming head from the appliance by turning it to the right� Then pull the appliance’s head upwards to 

check that the cutting head is in place�

MAINTENANCE

- Switch the appliance off using the OFF position them remove the head from the appliance by turning it anti-clockwise� 

Then pull the appliance’s head upwards to check that the cutting head is in place�

- Remove hair collected in the head by blowing on it or using a small cleaning brush� 

This symbol, shown on the product or its packaging indicates that this product complies with European directive 

2012/19/EU and that it must not be discarded with household waste� It must be taken to a suitable collection point for the 

recycling of electrical and electronic equipment� By making sure that this product is disposed of properly, you will help 

to prevent any potentially-negative consequences for the environment and human health� Recycling helps to conserve 

natural resources�

IMPORTANT: When replacing your used batteries, we ask you to follow current regulations regarding their disposal� Please 

dispose of them appropriately to guarantee their safe and environmentally-friendly destruction�

Summary of Contents for FPH-003

Page 1: ...1 EPILE NEZ ET OREILLES NOSE AND EARS TRIMMER MANUEL D UTILISATION INSTRUCTION MANUAL FPH 003 REV2...

Page 2: ...rad av Uvoznik ABC DISTRIBUTION 3 avenue des Violettes ZAC des Petits Carreaux 94380 Bonneuil sur Marne France FR GARANTIE GB GUARANTEE PL GWARANCJA NL WAARBORG IT GARANZIA ES GARANT A PT GARANTIA DE...

Page 3: ...des aiguilles d une montre jusqu ce qu il soit r gl sur le petit symbole de v rouillage Mettez l appareil en marche sur la position ON Dans le cas o des fuites se produiraient au niveau de la pile et...

Page 4: ...y compartment cover and turn it in a clockwise direction until it matches up with the small locking symbol Switch the appliance on using the ON position In the event that leaks occur from the batterie...

Page 5: ...o W o y bateri przestrzegaj c prawid owej polaryzacji Ponownie umie ci pokrywk miejsca na baterie i przekr ci w kierunku przeciwnym do ruchu wskaz wek zegara a do znacznika blokady Uruchomi urz dzeni...

Page 6: ...het deksel opnieuw op het batterijcompartiment en draai het in tegenwijzerzin tot het ingesteld staat op het vergrendelsymbooltje Zet het apparaat aan op de stand ON In het geval dat een batterij lekt...

Page 7: ...non si trova sul piccolo simbolo di chiusura Accendere l apparecchio portandolo in posizione ON In caso di perdita di sostanze dalle pile e se del liquido elettrolita entra a contatto con la pelle sci...

Page 8: ...ado Ponga en marcha el aparato en la posici n ON En caso de que las fugas se produzcan en las pilas y que el l quido electrolito toque la piel l mpiela de inmediato y abundantemente con agua y jab n o...

Page 9: ...cada Volte a colocar a tampa do compartimento da pilha e rode a para a esquerda at que fique alinhada com o pequeno s mbolo do cadeado Coloque o aparelho em funcionamento na posi o ON No caso de ocorr...

Page 10: ...den Uhrzeigersinn bis er auf das kleine Verriegelungssymbol zeigt Schalten Sie das Ger t ein indem Sie es auf ON stellen Sollte die Fl igkeit der Batterien Elektrolyt austreten und die Haut ber hren r...

Page 11: ...r ud for det lille l sesymbol Start apparatet ved at s tte det p positionen ON I tilf lde af l kage fra batterierne og v sken elektrolyt ber rer huden skal du straks vaske med rigeligt s be og vand e...

Page 12: ...capacul compartimentului pentru baterie i roti i l n sens contrar acelor de ceasornic p n c nd este reglat pe micul simbol de blocare Pune i aparatul n func iune aduc ndu l n pozi ia ON n cazul n care...

Page 13: ...tokotelon takaisin ja k nn vastap iv n kunnes se on pienen lukkosymbolin kohdalla Laita laite k yntiin kohdassa ON Jos paristoista vuotaa nestett elektrolyytti ja se p see koskemaan ihoon iho on pest...

Page 14: ...till facket och vrid moturs tills det sitter vid symbolen f r l st l ge Starta apparaten med l get ON Om det uppst r en l cka i batterierna och v tskan elektrolyt nuddar huden d ska du tv tta omg ende...

Page 15: ...te pokrov prostora za baterije in ga zasu ite v nasprotni smeri urinega kazalca dokler ni poravnan s simbolom za zaklep Aparat vklopite tako da gumb za vklop izklop obrnete v polo aj ON e pride do izt...

Page 16: ...16 CN BARB XPERT 8 8 LR6 AA LR6 AA 1 5V 1 2 3 4 1 LR6 AA 1 5V I o ON 10 OFF OFF 2012 19 UE...

Page 17: ...17 THE BARB XPERT 8 8 LR6 AA LR6 AA 1 5V 1 2 3 4 LR6 AA 1 5V o I ON 10 OFF OFF UE 2012 19...

Page 18: ...18 GUARANTEE...

Page 19: ...duto garantido por ABC DISTRIBUTION contra qualquer defeito de fabrica o ou de material durante o per odo de validade da garantia a partir da data de compra Se durante o per odo de validade da garanti...

Page 20: ...WYSY KOWY DO OBS UGI POSPRZEDA NEJ NL VERZENDADRES VAN DE DIENST NA VERKOOP ES DIRECCI N DE ENV O PARA EL SERVICIO DE POSVENTA PT ENDERE O DE ENVIO PARA O SERVI O P S VENDA DK EFTERSALGSSERVICENS ADRE...

Reviews: