background image

Warnings

1.  Read the operating manual thoroughly and be familiar with its contents prior to using 

     this equipment.

2.  Carefully unpack the unit and check if any damage occurred during shipment.

3.  Should any solid object or liquid fall into the panel, unplug the unit and have it checked 

     by qualified personnel before operating it any further.

4.  Uplug the unit if it is not to be used for an extended period of time. To disconnect the 

     cord, pull it out by the plug. Never pull the cord itself.

5.  Be a qualified physician, having complete knowledge of the use of this equipment.

6.  Test this equipment prior to a medical procedure. This monitor was fully tested at the 

     factory before shipment.

7.  Avoid removing covers on control unit to avoid electric shock.

8.  Attempt no internal repairs or adjustments not specifically detailed in this operating 

     manual.

9.  Pay close attention to the care, cleaning instructions in this manual. A deviation may 

     cause damage (refer to the Cleaning section).

10. DO NOT STERILIZE MONITOR.

11. Read the entire instruction manual before assembling or connecting the camera.

12. Do not place the monitor or any other heavy object on the power cord. Damage to the 

      cable can cause fire or electirc shock.

13. Monitor with power supply is suitable for use in patient environment.

14. DO NOT stack more than 3 boxes high

15.  To avoid the risk of electric shock, this equipment must only be connected to a supply 

mains with protective earth.

This equipment has been tested and found to comply with the limits for medical devices in 

IEC 60601-1-2:2014. These limits are designed to provide reasonable protection against 

harmful interference in a typical medical installation. 
This equipment generates, uses and can radiate radio frequency energy and, if not installed 

and used in accordance with the instructions, may cause harmful interference to other devic-

es in the vicinity. However, there is no guarantee that interference will not occur in a particular 

installation. If this equipment does cause harmful interference to other devices, which can be 

determined by turning the equipment off and on, the user is encouraged to try to correct the 

interference by one or more of the following measures:  

- Reorient or relocate the receiving device.  

- Increase the separation between the equipment.  

- Connect the equipment into an outlet on a circuit different from that to which the other 

  device(s) are connected. 


- Consult the manufacturer or field service technician for help.

NOTICES TO USER

This device complies with Part 15 of the FCC Rules. Operation is subject to the following two 

conditions:

(1) this device may not cause harmful interference, and (2) this device must accept any inter

-

ference received, including interference that may cause undesired operation.

FCC WARNING

This equipement generates or uses radio frequency energy.  Changes or modifications not 

expressly approved by the party responsible for compliance could void the user’s authority 

to operate the equipment. The user could lose the authority to operate this equipment if an 

unauthorized change or modification is made.


AMM215WTD 


5

Summary of Contents for AMM215WTD

Page 1: ...TAL CONTROL LCD COLOR MEDICAL MONITOR AMM215WTD Operation Manual For future reference record the serial number of your display monitor in the space below Serial Number The serial number is located on...

Page 2: ......

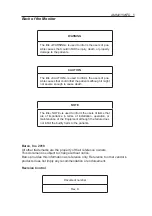
Page 3: ...is used to inform the users of pos sible causes that could inflict the injury death or property damage to the patients CAUTION The title CAUTION is used to inform the users of pos sible causes that c...

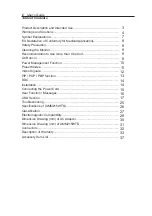
Page 4: ...r Management Function Preset Modes Video Signals PIP POP PBP function DDC Installation Connecting the Power Cord User Function Messages OSD Section Troubleshooting Specifications of AMM215WTD Classifi...

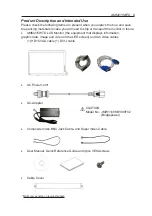
Page 5: ...AMM215WTD LCD Monitor the equipment that displays information graphic data image and video on the LED screen and two video cables 1 HD15 VGA cable 1 DVI I cable AC Power cord AC Adapter Composite Vide...

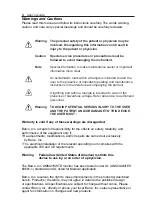
Page 6: ...US INJURY TO THE USER AND THE PATIENT AND OR DAMAGE TO THIS DEVICE THE USER MUST Warranty is void if any of these warnings are disregarded Barco Inc accepts full responsibility for the effects on safe...

Page 7: ...his equipment has been tested and found to comply with the limits for medical devices in IEC 60601 1 2 2014 These limits are designed to provide reasonable protection against harmful interference in a...

Page 8: ...OP connectors should either comply with IEC 60601 1 and or IEC 60601 1 1 harmonized national standard or the combination should be evaluated Do not touch the patient with signal input or output connec...

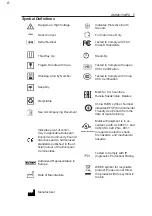
Page 9: ...ipment Indicates Protective Earth Ground For Indoor Use Only Tested to Comply with FCC Class B Standards Stand By Tested to Comply with Japan VCCI Certification Tested to Comply with China CCC Certifi...

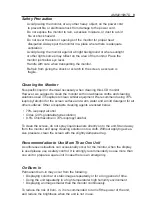
Page 10: ...d by natural convection it has no fan For optimum performance do not block the cooling vents While unpacking the monitor inspect it and other package contents for shipping damage that could cause a fi...

Page 11: ...alcohol for the screen surface and warm water and a mild detergent for all other surfaces Other acceptable cleaning agents are listed below 70 isopropyl alcohol Cidex 2 4 glutaraldehyde solution 0 5...

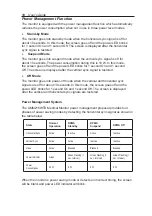
Page 12: ...e The monitor goes into power off mode when the vertical and horizontal sync signals are off for about 10 seconds In this mode the screen goes off and the power LED blinks for 1 second On and 1 second...

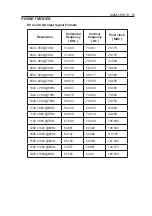
Page 13: ...x 600 75Hz 46 875 75 000 49 500 1024 x 768 60Hz 48 363 60 004 65 000 1024 x 768 70Hz 56 476 70 069 75 000 1024 x 768 75Hz 60 023 75 029 78 750 1152 x 864 60Hz 54 348 60 053 80 000 1152 x 864 70Hz 63...

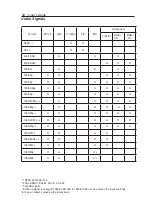
Page 14: ...0 60p O O O O O O 1080 23 98p 4 O O O O O 1080 24p 4 O O O O O 1080 25p 4 O O O O O O 1080 29 97p 4 O O O O O O 1080 30p 4 O O O O O O 1080 50i 4 O O O O 1080 59 94i 4 O O O O 1080 60i 4 O O O O 1080...

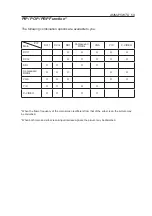
Page 15: ...s VGA Y C C VIDEO DVI 1 O O O O O DVI 2 O O O O O SDI O O O O Component RGBs O O O O O VGA O O O O O Y C O O O O C VIDEO O O O O When the frame frequency of the main screen is different from that of t...

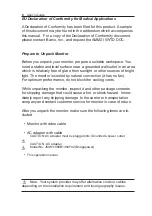
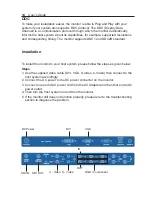
Page 16: ...install the monitor to your host system please follow the steps as given below Steps 1 Use the supplied video cable DVI VGA S Video C Video then connect to the host system accordingly 2 Connect the D...

Page 17: ...ate safety approvals for the country in which the equipment will be installed and marked HAR For 120 volt Applications use only the UL Listed detachable power cord with NEMA configuration 5 15P type p...

Page 18: ...Input Switch To change the video source Power Switch To turn ON or OFF the system How to Access the Menu 1 Push the Rotary Knob button to activate the OSD menu 2 Turn the Rotary Knob to the left or ri...

Page 19: ...Sharpness H Setting Adjust Scale Mode Color Space Speaker Volume Freeze Frame Zoom Pan PIP POP PBP Advanced Adjust OSD Position Control Screen Control DPMS Auto Source Select Smart Select Restore Fact...

Page 20: ...isual Brightness Adjust the Brightness of Panel Range 0 100 Contrast Adjust the Contrast of Video Range 0 100 Phase Adjust the Phase of Video Range 0 100 Available for C and S video Chroma Adjust the...

Page 21: ...olor Space Between RGB and YPbPr Available for Component and RGBS Speaker Volume Adjust Volume Range 0 100 Freeze Frame Off On Freeze Frame Zoom Pan Enable Zoom In and Pan Function PIP Enable PIP Pict...

Page 22: ...en Position Top L Top R Bottom L Bottom R Size PIP Sub Screen Size Small Medium Large Blending PIP Sub Screen Blending Range 0 20 Swap PIP Sub Screen Swap Exit Exit the Menu Mode PBP Mode ON OFF Sourc...

Page 23: ...omponent RGBS VGA S Video C Video Position POP Sub Screen Position Top L Top R Bottom L Bottom R Size POP Sub Screen Size Small Medium Large Blending POP Sub Screen Blending Range 0 20 Swap POP Sub Sc...

Page 24: ...nd Adjust H and V position Freqency Phase Noise Reduction Motion Offset DPMS Change the DPMS Auto Source Adjust Auto Source Select Between On and Off Select Smart Select Enable Disable Smart Select Su...

Page 25: ...h Japanese Chinese Korean French German Exit Exit the Menu H Position Adjust Screen H Position Range 0 100 Available for VGA SDI Component V Position Adjust screen V Position Range 0 100 Available for...

Page 26: ...ection Information Custom Entry Change the User or Monitor s Name SN Display the Serial Number Runtime Display the Total Runtime Input Format Display the Current input Resolution and Vertical Frequenc...

Page 27: ...Check if video signal cable is properly connected at the back of monitor Check if the power to computer system is ON Abnormal Picture Unstable Picture Check if the specification of graphics adapter a...

Page 28: ...C x1 SDI 3G HD SD SDI BNC x1 VGA 15pin D Sub x 1 R G B 0 7 0 1 Vp p H V Sync TTL Level V high 2 3V V low 0 5V DVI1 DVI I x 1 DVI2 Optical DVI I x 1 Remote Input 9 pin D Sub RS 232C x 1 Audio Audio Inp...

Page 29: ...standard UL60601 1 UL cUL Mark Because many medical offices are located in residential areas this monitor in ad dition to the medical requirements has also been tested and found to comply with the li...

Page 30: ...Compliance Electromagnetic environment guidance RF emissions CISPR 11 Group 1 The Model AMM215WTD uses RF energy only for its internal function Therefore its RF emissions are very low and are not lik...

Page 31: ...to any part of the AMM215WTD including cables than the recommended separation distance calculated from the equation applicable to the frequency of the transmitter Recommended Separation Distance 0 15...

Page 32: ...e m according to frequency of transmitter 150kHz to 80MHz d 1 17 p 80MHz to 800MHz d 1 17 p 800MHz to 2 5GHz d 2 33 p 0 01 0 12 0 12 0 23 0 1 0 37 0 37 0 74 1 1 17 1 17 2 33 10 3 70 3 70 7 37 100 11 7...

Page 33: ...AMM215WTD 31 Dimension Drawing mm of AMM215WTD Power Switch Standby Power Button...

Page 34: ...V Power 22 T M D S Clock Shield 7 DDC Data 15 Ground for 5V 23 T M D S Clock 8 NC 16 Hot Plug Detect 24 T M D S Clock 15 Pin VGA Connector Pin Description Pin Description Pin Description 1 RED 6 GND R...

Page 35: ...12 months from the date of shipment Protection filters are not warranted as damage to the protection filter is considered to be normal wear and tear and can be replaced at Buyer s cost Components used...

Page 36: ...arranty period and request an RMA number If the configuration has been modified in any manner the product must be returned to its original configuration before any warranty service will be performed b...

Page 37: ...BARCO or its ASC without prior authorization Buyer will be responsible for packaging preferably original container and shipping the defective goods to BARCO or its ASC shipping charges prepaid BARCO...

Page 38: ...LONG AN IMPLIED WARRANTY LASTS SO THE ABOVE LIMITATIONS MAY NOT APPLY BARCO S TOTAL LIABILITY UNDER THIS OR ANY OTHER WARRANTY EXPRESSED OR IMPLIED IS LIMITED TO REPAIR OR REPLACEMENT AND ARE THE SOLE...

Page 39: ...8M BLACK 6 User s Manual 1 Rev K 7 Quick Reference Guide 1 Rev G 8 Power Cord 1 Medical Grade 115V GRAY 9 VESA Screw 4 BH M4x10 Ni 10 Extension Power Cord 1 Part No CB 47D2001P50MF 5ft or CB 47D2004P5...

Page 40: ...Barco Inc 1421 McCarthy Blvd Milpitas CA 95035 USA Tel 1 408 400 4102 Fax 1 408 400 4116 Web Page http www barco com...

Reviews: