2. Installation Guidelines
How to replace with another lens?
Follow the next procedure:
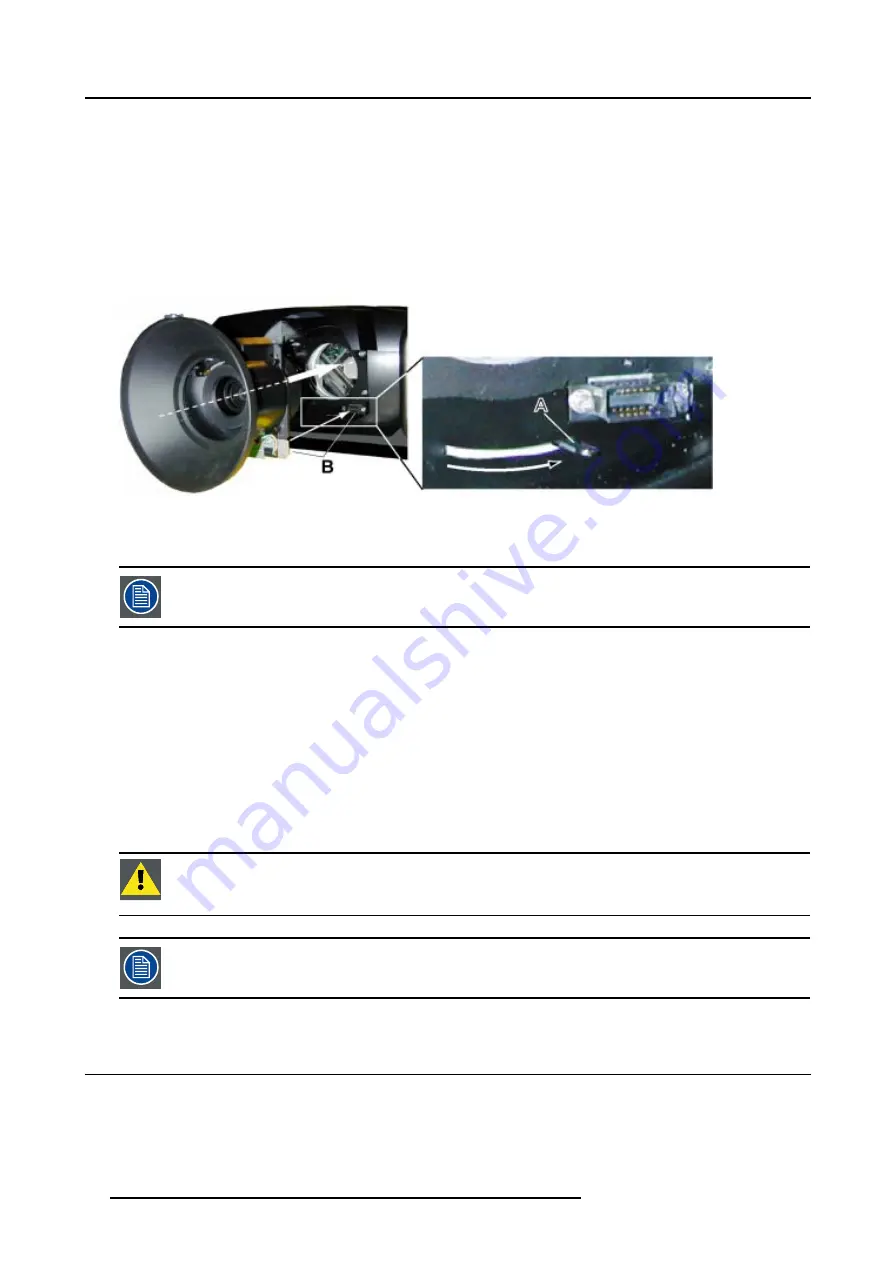
1. Move the handle (A) of the lens anchor system to the left and take out the lens.
2. Take the new lens assembly out of its packing material and remove the lens caps on both sides.
3. Push the lens, motors at the top, in the lens block gap horizontally, lining up the motor connector on the lens with the connector
on the lens block (B). (image 2-4)
Caution:
On a table mounted projector, hold the projector when pushing the lens into the lens block to avoid sliding off from
the table.
4. Move the handle (A) of the lens anchor system to the right (front view, table mount) to lock the lens.
Image 2-4
2.5.4
Cleaning the lens
To minimize the possibility of damage to optical coatings, or scratches to lens surfaces, we have developed
recommendations for clean. FIRST, we recommend you try to remove any material from the lens by blowing
it off with clean, dry deionized air. DO NOT use any liquid to clean the lenses.
Necessary tools
Toraysee
TM
cloth (delivered together with the lens kit). Order number : R379058.
How to clean the lens ?
Proceed as follow :
1. Always wipe lenses with a CLEAN Toraysee
TM
cloth.
2. Always wipe lenses in a single direction.
Warning:
Do not wipe back and forwards across the lens surface as this tends to grind dirt into the coating.
3. Do not leave cleaning cloth in either an open room or lab coat pocket, as doing so can contaminate the cloth.
4. If smears occur when cleaning lenses, replace the cloth. Smears are the first indication of a dirty cloth.
C
AUTION
:
Do not use fabric softener when washing the cleaning cloth or softener sheets when drying the
cloth.
Do not use liquid cleaners on the cloth as doing so will contaminate the cloth.
Other lenses can also be cleaned safely with this Toraysee
TM
cloth.
2.6
Battery Insertion in the Remote Control
Where to find the batteries
The batteries are not placed in the remote control to avoid remote control operation in its package, resulting in a shorter battery life
time.
16
R5976629 BARCORLM G5 02/06/2006
Summary of Contents for BarcoRLM G5
Page 1: ...BarcoRLM G5 Owner s manual R9010020 R9010021 R5976629 05 02 06 2006 ...
Page 4: ......
Page 8: ...Table of contents 4 R5976629 BARCORLM G5 02 06 2006 ...
Page 14: ...1 Packaging and Dimensions 10 R5976629 BARCORLM G5 02 06 2006 ...
Page 36: ...3 Connections 32 R5976629 BARCORLM G5 02 06 2006 ...
Page 50: ...4 Getting Started 46 R5976629 BARCORLM G5 02 06 2006 ...
Page 54: ...5 Getting used with the Menu structure 50 R5976629 BARCORLM G5 02 06 2006 ...
Page 60: ...6 Source Selection 56 R5976629 BARCORLM G5 02 06 2006 ...
Page 64: ...7 General Menu Image 7 7 60 R5976629 BARCORLM G5 02 06 2006 ...
Page 90: ...8 Image Menu Image 8 46 Image 8 47 86 R5976629 BARCORLM G5 02 06 2006 ...
Page 100: ...9 Tools Menu 96 R5976629 BARCORLM G5 02 06 2006 ...
Page 139: ...14 Installation menu Image 14 21 R5976629 BARCORLM G5 02 06 2006 135 ...
Page 140: ...14 Installation menu 136 R5976629 BARCORLM G5 02 06 2006 ...
Page 154: ...A Standard Image Files 150 R5976629 BARCORLM G5 02 06 2006 ...


