background image

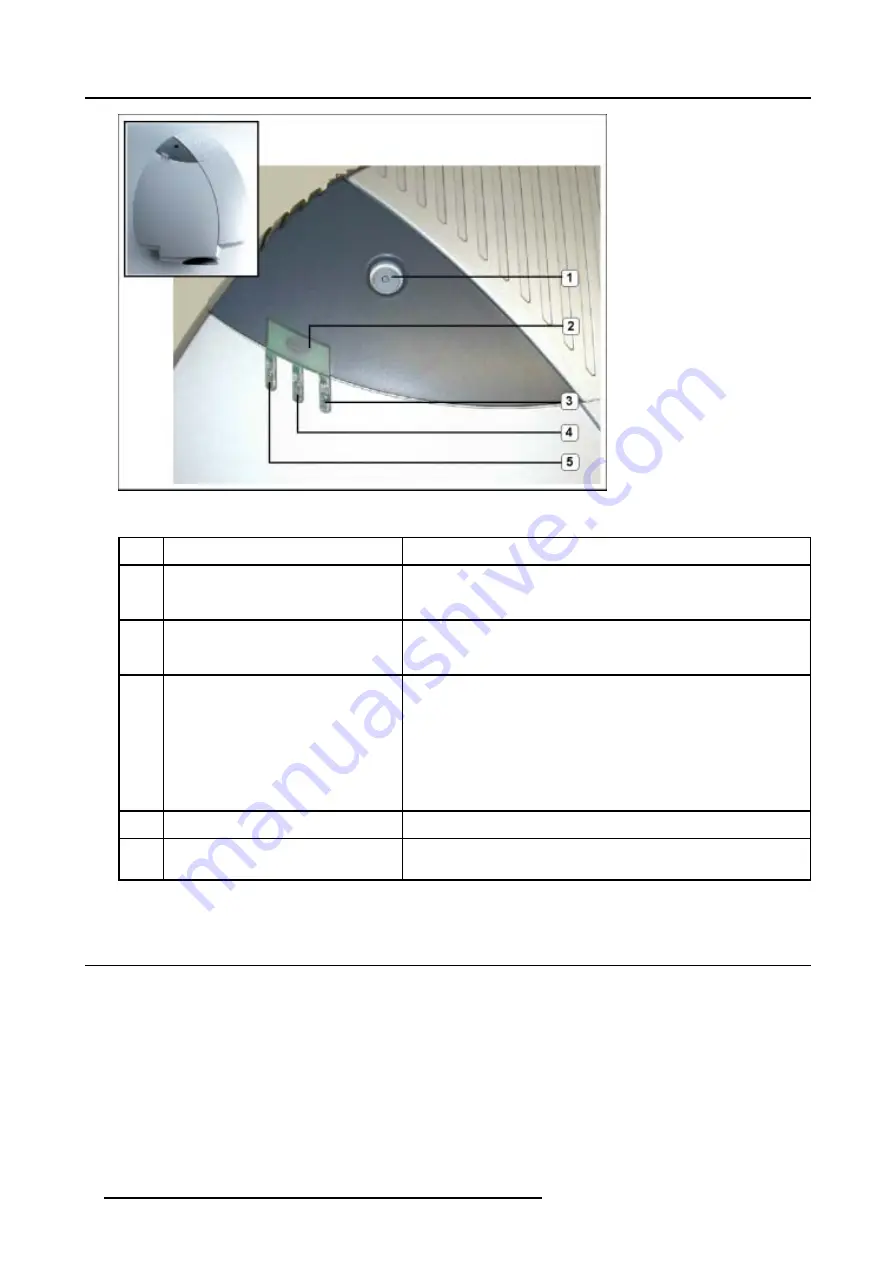
3. Overview User’s Controls

Image 3-2
Cine VERSUM 120 controls

Controls function description

Ref.

Function

Description

1

Main power switch

Button pressed, switches the projector in the ’Standby’ mode. This mode
is indicated by the standby LED which lights up repeatedly 2 times short
on, 1 time long off.

2

Infra Red Receiver

Reception diode for the IR signals from the Remote Control. Allows
switching On/Off (Standby) of the projector separately and controlling
the Cine VERSUM Master.

3

Standby LED

Lights up continuously: projector in the operation mode.

Lights up repeatedly 2 times short on, 1 time long off: projector in the
standby mode

Blinks fast: projector in the cooling down mode after switching off
(duration 1 min.).

Lights up repeatedly 1 time long, 1 time short: projector has been started
up in the cooling down mode, waiting for lamp ignition.

4

Not used

5

Infra Red Reception LED indicator

Lights up when a valid IR signal from the Remote Control has been
captured.

Table 3-2

3.3 Remote Control

Top side

The Infra Red Remote Control buttons support the following functionality:

8

R5976667 CINEVERSUM SYSTEM 01102003

Summary of Contents for Cine VERSUM 120

Page 1: ...HOME CINEMA CINEVERSUM SYSTEM R9010090 OWNERS MANUAL Cine VERSUM 120 01102003 R5976667 00 ...

Page 2: ...Barco nv Home Cinema Noordlaan 5 B 8520 Kuurne Phone 32 56 36 84 30 Fax 32 56 36 88 62 E mail salesassistantht bci barco com Visit us at the web www homecinema barco com Printed in Taiwan ...

Page 3: ...e equipment into a different outlet so that the equipment and receiver are on different branch circuits Fasten cables connectors to the equipment by mounting screws The use of shielded cables is required to comply within the limits of Part 15 of FCC rules and EN55022 Guarantee and Compensation Barco provides a guarantee relating to perfect manufacturing as part of the legally stipulated terms of g...

Page 4: ......

Page 5: ...andby 17 4 4 1 From STANDBY mode to Economic STANDBY 18 4 4 2 From Economic STANDBY mode to STANDBY 18 4 5 Switching the system OFF completely and BACK to Operation mode 18 4 5 1 Turning OFF the system from Operation mode 19 4 6 Turning ON the system from total OFF mode 19 5 Direct source selection 21 5 1 From standby mode 21 5 2 Return to standby mode 22 6 Image Control 23 6 1 Brightness Control ...

Page 6: ...Table of contents 2 R5976667 CINEVERSUM SYSTEM 01102003 ...

Page 7: ...Damage Requiring Servicing Unplug the modules from the wall outlet and refer servicing to qualified service personnel under the following circumstances If the power supply cord or plug is damaged If liquid has been spilled or objects have fallen into the modules If the module has been exposed to rain of water If the product exhibits a distinct change in performance this indicates a need for servic...

Page 8: ...1 Safety Instructions 1 2 2 Cine VERSUM Master Unit damage Overheating may lead to the master shutting down during operation 4 R5976667 CINEVERSUM SYSTEM 01102003 ...

Page 9: ... is therefore inherently a compromise combo In the high end of the market however individual modules are optimized to do one specific task A pre amplifier or AV processor A separate power amplifier for all or multiple power amplifiers for each individual audio channel A digital link between pre and power amplifier to guarantee a perfect signal transmission Barco Home Cinema with CineVERSUM brings ...

Page 10: ...2 System Configuration Image 2 2 Display link 6 R5976667 CINEVERSUM SYSTEM 01102003 ...

Page 11: ...ed 2 Infra Red Receiver Reception diode for the Infra Red signals sent by the Remote Control when a key is pressed 3 Standby LED Blinks when the Cine VERSUM Master has been powered down to Standby or Economy Standby mode 4 Main power switch see Switching On Off the Cine Versum System page 15 5 LCD Display This display indicates the status of the Cine VERSUM Master and allows you to navigate throug...

Page 12: ...the Cine VERSUM Master 3 Standby LED Lights up continuously projector in the operation mode Lights up repeatedly 2 times short on 1 time long off projector in the standby mode Blinks fast projector in the cooling down mode after switching off duration 1 min Lights up repeatedly 1 time long 1 time short projector has been started up in the cooling down mode waiting for lamp ignition 4 Not used 5 In...

Page 13: ...llows to directly select sources 6 RC operation indication Lights up when a button on the remote control is pressed Visual indication of remote control operation Battery check 7 Function keys The function keys are used in picture in picture PIP to position the PIP image 8 EXIT button To go up one step in the menu structure 9 ENTER button To enter the adjustment menus or to confirm an adjustment wi...

Page 14: ...it button 1 to 8 Digit Button Stored source 1 2 3 4 5 6 7 8 3 4 Remote Control operation Overview General Battery Insertion in the Remote Control Visualization of commands 3 4 1 General How to use The Remote Control allows you to control your Cine VERSUM Master even when it is built into a cabinet Indeed the SL XL cable allows for 2 way communication This means you can point the Remote Control to ...

Page 15: ...mon Address Cine VERSUM 120 address 9 no common address Cine VERSUM Master address 1 common address 0 Common address is a fixed address stored in the module The module will execute the commands sent by a Remote Control programmed with the common address 0 3 4 2 Battery Insertion in the Remote Control Where to find the batteries The batteries are not placed in the remote control to avoid remote con...

Page 16: ...ontrolled separately own address the respective address of the module you desire to control has to be set To reinstall an address follow procedure below 1 Point the Remote Control to the module of which you want to know the address and press the address button use a pencil image 3 8 On the screen appears a message box image 3 9 indicating the address number In the graphical display of the Cine VER...

Page 17: ...n the screen of the plasma display or of the projector and also on the graphical display of the Cine VERSUM Master This can take the form of a menu a message or a bar scale Below an illustration of each item Image 3 11 On screen main menu Image 3 12 Main menu on Master display Image 3 13 On screen message Image 3 14 Message on Master display Image 3 15 On screen bar scale Image 3 16 Bar scale on M...

Page 18: ...3 Overview User s Controls 14 R5976667 CINEVERSUM SYSTEM 01102003 ...

Page 19: ...is is the chapter s structure Upon first startup Switching the system between OPERATION mode and STANDBY Switching the system between STANDBY and ECONOMIC STANDBY Switching the system OFF completely and BACK TO OPERATION mode 4 2 Upon first startup Required steps There are two steps upon first startup 1 Press the power switch A on the Cine VERSUM Master image 4 1 The Cine VERSUM Master goes from O...

Page 20: ... Using the Jog dial on the Cine VERSUM Master 1 Press the jog dial once to enter the main menu image 4 5 2 Rotate the jog dial until Shut down in the menu is pointed to image 4 6 3 Press jog dial to activate the Shutdown selection The Cine VERSUM Master and the Cine VERSUM 120 go from OPERATION to STANDBY During the power down process a power down message appears on screen and on the Master displa...

Page 21: ...otate the jog dial until Power up in the menu on the Cine VERSUM Master is pointed 2 Press jog dial to activate the selection The Cine VERSUM Master and the Cine VERSUM 120 go from STANDBY to OPERATION displaying the last selected source Using the Remote Control 1 Point the Remote Control to the front of the Cine VERSUM Master or to the Cine VERSUM 120 2 Press the standby button The Cine VERSUM Ma...

Page 22: ...ggle with the or arrow keys until Economic in the menu on the Cine VERSUM Master is pointed to image 4 11 3 Press ENTER to activate selection The Cine VERSUM Master and the Cine VERSUM 120 go from STANDBY to Economic STANDBY The economic standby is visualized in the Master display with a Zzzzz message with turned off backlighting image 4 12 4 4 2 From Economic STANDBY mode to STANDBY Awaking the C...

Page 23: ...er switch on the Cine VERSUM Master image 4 1 The Cine VERSUM Master goes from standby to OFF 4 6 Turning ON the system from total OFF mode How to turn ON the system back to Operation mode 1 Press the power switch on the Cine VERSUM Master image 4 1 The Cine VERSUM Master goes from OFF to standby image 4 15 2 Press the power switch on the Cine VERSUM 120 The Cine VERSUM 120 goes from OFF to standb...

Page 24: ...4 Switching On Off the Cine Versum System 20 R5976667 CINEVERSUM SYSTEM 01102003 ...

Page 25: ... connected displays Image of the selected source appears on the display Image 5 1 Digit buttons on Remote Control Using the standby button on the Remote Control 1 Make sure that the connected sources to the Cine VERSUM Master are turned on 2 Using the standby button on the Remote Control press the standby button image 5 2 The Cine VERSUM Master powers up and starts on its turn powering up the conn...

Page 26: ...aster switches to the standby mode and switches on its turn the connected display into the standby mode When switching the Cine VERSUM 120 into the standby mode a cool down period for the lamp of about 1 minute is activated As a result restarting of the lamp is not possible during the cool down period This mode starting up during cool down period is indicated by the standby LED which blinks at a b...

Page 27: ... The following barscale is overlayed on the source image image 6 2 Press the button for a brighter image or the button for a darker image If video or data is displayed with a black background adjust until the background just appears black becomes a very dark grey Image 6 1 Image 6 2 6 2 Contrast Control How to adjust the Contrast The Contrast function is used to adjust the contrast between the lig...

Page 28: ... adjust Color press the or side of the button COLOR image 6 5 The following barscale is overlayed on the source image image 6 6 Press the or button until the desired color saturation level is displayed If color is set to a 0 level the result will be black and white picture If the color is set too high the color levels in the image will be over powering Image 6 5 Image 6 6 24 R5976667 CINEVERSUM SY...

Page 29: ...43 or NTSC 3 58 color system For PAL and SECAM sources Tint is not adjustable To adjust Tint press the or side of the button TINT image 6 7 The following barscale is overlayed on the source image im age 6 8 Press the or button until an optimal display is obtained It is best to adjust tint while displaying an image with natural flesh tones Image 6 7 Image 6 8 R5976667 CINEVERSUM SYSTEM 01102003 25 ...

Page 30: ...6 Image Control 26 R5976667 CINEVERSUM SYSTEM 01102003 ...

Page 31: ...nu 7 3 5 Select item PIP yes or PIP No by rotating the selection wheel on the Master or the up down arrow keys on the Remote Control to confirm 6 Press the ENTER key on the Remote Control or the selection wheel on the Master to toggle the PIP function On Yes or Off No 7 Press EXIT key on the Remote Control or select item BACK to return Cine VERSUM System Image Settings Advanced Settings Installati...

Page 32: ...ange only the PiP window When the same source is pressed twice the selected source becomes the main window and the PiP window disappears 7 3 Function keys for Picture in Picture Available keys F1 PiP in left top corner F1 second time PiP in left top corner bigger image F2 PiP in left bottom corner F2 second time PiP in left bottom corner bigger image F3 Swap between main image and PiP F4 PiP in ri...

Page 33: ... Image 7 3 PiP position A F1 left corner top B F2 left corner bottom C F4 right corner top D F5 right corner bottom Image 7 4 PiP window enlarged A PiP normal format B Enlarged format R5976667 CINEVERSUM SYSTEM 01102003 29 ...

Page 34: ...7 Picture in Picture Image 7 5 PiP swap A Start image B Swapped image after pressing F3 30 R5976667 CINEVERSUM SYSTEM 01102003 ...

Page 35: ... arrow keys to select Display list and press ENTER to select The Display list menu will be displayed menu 8 3 4 Use the up or down arrow keys to select the display you want to adjust E g projector 1 Press ENTER to select The selected display menu will be displayed menu 8 4 5 Use the up or down arrow keys to select Lens Press ENTER to select The Lens menu will be displayed menu 8 5 Cine VERSUM Syst...

Page 36: ...Adjust with the arrow keys until sharp picture is obtained Lens Focus Horizontal shift Vertical shift Zoom Back Menu 8 6 8 1 3 Horizontal shift Steps to be taken 1 Use the up or down arrow keys to select Horizontal shift Press ENTER to select menu 8 7 A message will be displayed to use the arrow keys to control the lens 2 Use the arrow keys to shift the image horizontally image 8 1 Lens Focus Hori...

Page 37: ... arrow keys to select Vertical shift Press ENTER to select menu 8 8 A message will be displayed to use the arrow keys to control the lens 2 Use the arrow keys to shift the image vertically image 8 2 Lens Focus Horizontal shift Vertical shift Zoom Back Menu 8 8 A B C Image 8 2 Vertical shift A Normal image B Image shifted upwards C Image shifted downwards R5976667 CINEVERSUM SYSTEM 01102003 33 ...

Page 38: ...e arrow keys to zoom in or out until the desired screen size is obtained image 8 3 Lens Focus Horizontal shift Vertical shift Zoom Back Menu 8 9 A B C Image 8 3 Zoom 8 2 Lamp Lamp Your projector can work with a single lamp or with a dual lamp The ignited lamp or lamps can be boosted in power between a low 200W or a high power 250W Overview Access controls Lamp mode Lamp power 34 R5976667 CINEVERSU...

Page 39: ...ODULE Shutdown Back Menu 8 10 Image Settings Display Brightness Contrast Gamma Color Temperature Primary Projector Lamp mode Single Lamp power Normal Master Back Menu 8 11 Image Settings Master Brightness Contrast Saturation Tint Display Back Menu 8 12 Display List Plasma 1 Plasma 2 Projector 1 Projector 2 Back Menu 8 13 8 2 2 Lamp mode Different modes As the projector is equipped with 2 lamps it ...

Page 40: ...rmal mode 250W How to switch 1 Use the up or down arrow keys to select Lamp Power menu 8 15 2 Press ENTER to toggle between Normal and Economic Note Lamp life time will be extended in Economic mode Image Settings Display Brightness Contrast Gamma Color Temperature Primary Projector Lamp mode Single Lamp power Normal Master Back Menu 8 15 36 R5976667 CINEVERSUM SYSTEM 01102003 ...

Page 41: ... non action films 1 78 Wide screen television format Anamorf format Letterbox Forces the letter format of the input signal into the native panel resolution Select the desired ASPECT RATIO depending the image format of the input source item by pushing the button on the Remote Control This setting obtained via the button will not be saved for later use Aspect ratios set via the adjustment menus are ...

Page 42: ... maximum projection area according the DMD inside the projector Image 9 1 9 2 Selecting an Aspect Ratio Steps to be taken 1 Press button on the remote control to scroll through the possible aspect ratios Note The selected aspect ratio will not be saved when switching to another source 38 R5976667 CINEVERSUM SYSTEM 01102003 ...

Page 43: ...e in Picture 27 28 Function keys 28 Turning On Off 27 PiP 28 Function keys 28 Selecting input source 28 PIP 27 Turning On Off 27 R Remote control 10 11 13 Battery insertion 11 General 10 Visualization of commands 13 Return 22 To standby 22 S Safety instructions 4 Cine VERSUM Master 4 Safety Instructions 3 Cine VERSUM 120 3 General 3 Module related 3 Source 21 Direct selection 21 Source selection 2...

Reviews: