6. CSE-800 Configurator
2. Click
WiFi & Network
→
Network integration
. Click on
Change con
fi
guraton
.
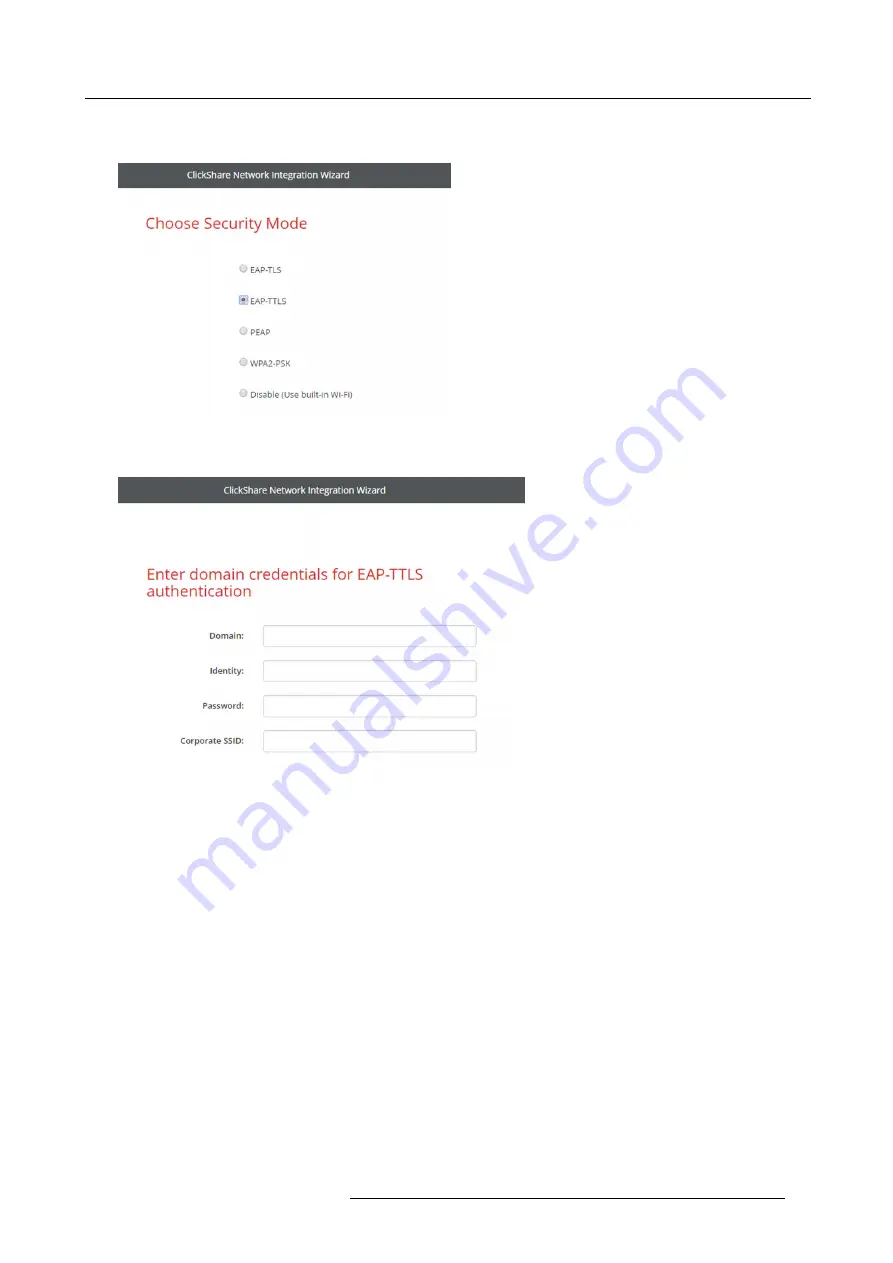
3. Select the radio button next to
EAP-TTLS
and click
Next
.
Image 6-31
Network integration, EAP-TTLS selected
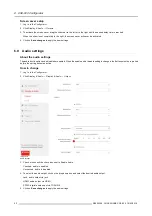
The EAP-TTLS mode window opens.
Image 6-32
Necessary Data to continue:
Domain
The company domain for which you are enrolling, should match with the one de
fi
ned in your
Active Directory.
Identity
Identity of the user account in the Active Directory which will be used by the ClickShare Buttons to
connect to the corporate network.
Password
The corresponding password for the identity that you are using to authenticate on the corporate
network. Per Base Unit each Button will use the same identity and password to connect to the
corporate network.
Corporate SSID
The SSID of your corporate wireless infrastructure to which the ClickShare Buttons will connect.
Click
Next
to continue.
When having problems connecting the Button to your corporate network, to get feedback from the Button please have a look
at the ClickShare Client log. This log can be enabled by holding shift when starting the Client executable. Look for the lines
“EDSUSBDongleConnection::mpParseDongleMessages”
. An error code and a short summary of the issue should be logged.
R5900049 CLICKSHARE CSE-800 19/03/2018
53
Summary of Contents for ClickShare CSE-800
Page 1: ...ClickShare CSE 800 Installation manual R5900049 05 19 03 2018...
Page 16: ......
Page 30: ...3 Getting started 14 R5900049 CLICKSHARE CSE 800 19 03 2018...
Page 42: ...5 Preparing the buttons 26 R5900049 CLICKSHARE CSE 800 19 03 2018...
Page 90: ...7 Software updates 74 R5900049 CLICKSHARE CSE 800 19 03 2018...
Page 94: ...8 Troubleshooting 78 R5900049 CLICKSHARE CSE 800 19 03 2018...
Page 98: ...9 Environmental information 82 R5900049 CLICKSHARE CSE 800 19 03 2018...


