background image

6. GUI orientation

6.40 Settings Menu > WebKit area > Tools > Backup & Restore

General

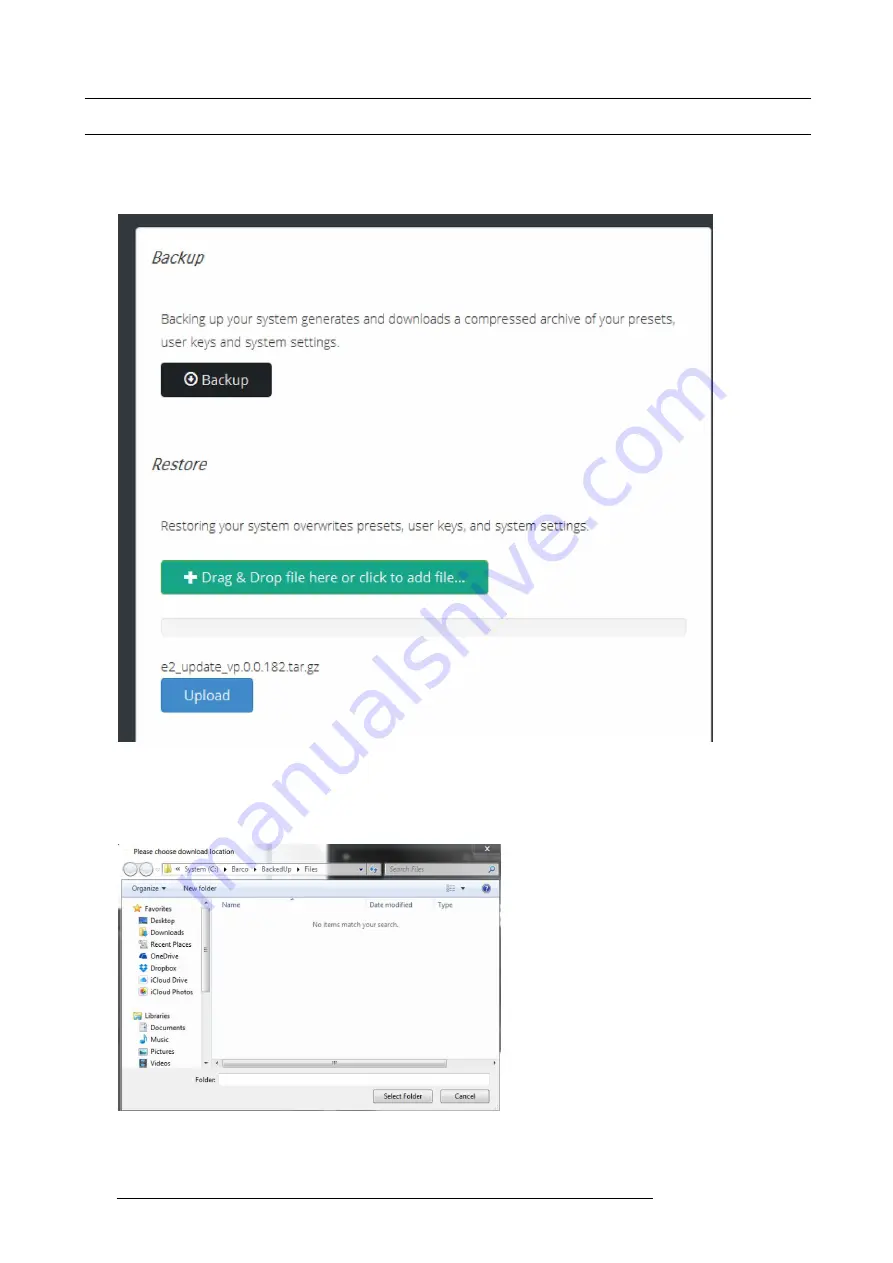
In this menu the user can store presets, user keys and other system settings on the computer. The menu also allows the user to
restore a previously stored system

fi

le.

Image 6-82

How to backup presets, user keys and system settings

1.

Click on the

Backup

button.

A dialog box opens up.

Image 6-83

2. Choose the folder location where you want to store the backed up

fi

le.

3. Click on

Select Folder

.

152

R5905948 E2 12/12/2014

Summary of Contents for Event Master E2

Page 1: ...E2 User s guide R5905948 00 12 12 2014...

Page 2: ...Barco Inc Image Processing 3078 Prospect Park Drive Rancho Cordova CA 95670 USA Phone 1 916 859 2500 Fax 1 916 859 2515 Support www barco com esupport Visit us at the web www barco com Printed in USA...

Page 3: ...goods are handled incorrectly in particular if the systems are operated incorrectly or if after the transfer of risks the goods are subject to influences not agreed upon in the contract all guarantee...

Page 4: ...esponsible for compliance could void the user s authority to operate the equipment EN55032 CISPR32 Class A Multimedia Equipment Warning This equipment is compliant with Class A of CISPR 32 In a reside...

Page 5: ...t panel 62 5 13 Using the Tech Support menu 63 5 14 Restoring Factory Default Settings 64 5 15 Firmware Upgrade 65 5 16 Save All 66 6 GUI orientation 67 6 1 General requirements 69 6 2 Download of Eve...

Page 6: ...14 Configuration Menu Add Screen Destinations Layers 171 7 15 Configuration Menu Add Aux Destinations 172 7 16 Configuration Menu Add MVR Outputs 173 7 17 Programming Menu Select Thumbnails for Backgr...

Page 7: ...Front Rack Ears 273 10 34 Top Cover 274 10 35 Top Card Guide 275 10 36 Motherboard Fan 276 11 Environmental information 279 11 1 Disposal information 280 11 2 RoHS compliance 281 11 3 Production addre...

Page 8: ...Table of contents 4 R5905948 E2 12 12 2014...

Page 9: ...1 Introduction 1 INTRODUCTION Overview About this guide Symbols pictures and fonts The 4K screen management system E2 R5905948 E2 12 12 2014 5...

Page 10: ...provides a 3 year parts and labor warranty for all hardware components Please refer to the Appendix B Warranty page 299 for specific details regarding the warranty terms Available System documentation...

Page 11: ...ives extra information about the described subject Tip gives extra advice about the described subject Picture overview Images and pictures given in the manual are used as illustration The content of t...

Page 12: ...sing and routing to distribute the signals And as its inputs and layers can also be extended the E2 is even capable of managing a blend of up to 32 4K projectors Simple servicing and control The E2 co...

Page 13: ...event damage to the E2 Ensure that you understand and follow all safety guidelines safety instructions and warnings mentioned in this chapter before you begin installation After this chapter additiona...

Page 14: ...2 No 60950 1 which are the safety standards of information technology equipment including electrical business equipment These safety standards impose important requirements on the use of safety criti...

Page 15: ...f the covers Always wear a wrist band which is connected to the ground while handling the ESD sensitive parts Wear insulating gloves during the execution of the installation and maintenance actions to...

Page 16: ...2 Safety 12 R5905948 E2 12 12 2014...

Page 17: ...apter is designed to introduce you to the E2 product Overview E2 overview Features Terms and definitions Control overview Presentation System overview Installation requirements Initial inspection E2 R...

Page 18: ...or full show control Multiple E2 units can be linked in order to achieve a combination of Layer Canvas Input and Output expansion The control interface is performed through a GUI application running W...

Page 19: ...rs E2 ships with the following input cards 14 Outputs via 4 Output cards Up to 3 x 4K Outputs each Output card supports up to 4K 60 out 4 x SD HD 3G SDI 6G ready 8 x HDMI 1 4 297 Mpix sec max 2 x HDMI...

Page 20: ...blended 2 output per blend up to 1x 8 output blended Auxiliary Outputs User definable from 4 x 2 048x1 200 60 to 1 x 4K 60 Layer Mode Max Number of Outputs 4K output 1x Scaled Aux output Dual Link ou...

Page 21: ...3 General Chassis 4RU Dual Redundant PSU Modular field swappable processing and I O cards Variable flow cooling Rugged steel chassis R5905948 E2 12 12 2014 17...

Page 22: ...llows VESA Video Elec tronics Standards Association standards with typical resolutions of 800 x 600 1024 x 768 1280 x 1024 etc Crosspoint The video switch or button that selects the input required on...

Page 23: ...ut and outputs to be displayed on one or more monitors eliminating the need for individual source monitors By utilizing different arrays of PIPs users can select the preferred multiviewer look and str...

Page 24: ...0 Mbit s only SMPTE 259M Example formats are 480i and 525i SDI Serial Digital Video A digital representation of the video signal that is distributed via a single coaxial cable with BNC connectors Syst...

Page 25: ...anage the dedicated multiviewer and create your presentation s overall look In addition since the configuration parameters and presets are stored on the E2 chassis multiple instances of the GUI can be...

Page 26: ...ears behind all other PIPs and keys The system can transition between two background sources PIP layer appears over backgrounds and under other layers of higher priority PIP effects include mixes smoo...

Page 27: ...m 9843Ft 60 197Ft to 10000m 32810Ft CAUTION Let the E2 acclimate to the ambient temperature after unpacking Ensure that the humidity is within the specification Neglecting this may result in startup f...

Page 28: ...be necessary if you ever have to ship your E2 For maximum protection repack your E2 as it was originally packed at the factory Box content After unpacking the E2 it is recommended to check if all of...

Page 29: ...circuit Reliable grounding earthing of rack mounted equipment should be maintained Rack mount the E2 from the front rack ears using four rack screws not supplied Threads may be metric or otherwise de...

Page 30: ...en properly adjusted the end of each side rail will protrude through the slot in the rear mounting bracket once the chassis is rack mounted Image 3 4 To take advantage of this feature ensure that ther...

Page 31: ...chassis slide the screws in the front rails through the two keyholes and let the chassis settle up into the keyhole slots 5 Tighten the two lower screws then install and tighten the two uppers screws...

Page 32: ...3 General 28 R5905948 E2 12 12 2014...

Page 33: ...ut this chapter This chapter explains the E2 hardware in detail Overview Front panel Rear panel 6G SDI Input Card Dual Link DVI Input Card HDMI DisplayPort Input Card HDMI Output Card 6G SDI Output Ca...

Page 34: ...with the rear connectors towards the ground If you do you may damage the rear connectors Display screen The 4 line x 24 character screen shows all E2 menus sub menus and messages The display is dimmab...

Page 35: ...tup Menu tree from the Status Menu Select the menu item indicated by the navigation cursor Change or accept a parameter Answer Yes to menu queries Press the ESC button to exit a menu without making ch...

Page 36: ...power source through the supplied power cords Input Power Specification 100 240 VAC 47 63 Hz On each power supply there are 3 LED lights that provide status information as follows DC Output Power LED...

Page 37: ...connectors 2 Expansion Link Card 2x High Speed bi directional connectors For more details on capabilities of expansion refer to the section Expansion link card page 44 Input cards Slots 3 through 10...

Page 38: ...supporting 4 monitors The Multiviewer card is a dedicated fully integrated monitoring solution allowing multiple displays to be shown together on a single display Up to 64 MVR windows Sources backgro...

Page 39: ...n when a valid sync has been detected 2 BNC connector SDI 2 with an LED that turns on green when a valid sync has been detected 3 BNC connector SDI 3 with an LED that turns on green when a valid sync...

Page 40: ...rry digital representation of analog video such as NTSC and PAL over a serial interface and is more pop ularly known as standard definition SD SDI The data rate required to transmit SD SDI is 270 Mbps...

Page 41: ...verter The figure below illustrates the Dual Link DVI input card s rear panel connectors Image 4 6 Dual Link DVI Input Card Rear Panel 1 DVI I dual link connector DVI 1 with an LED that turns on green...

Page 42: ...input via 2x DVISL L and R half or 4x DVISL quadrants o 4 096x2 400 50 59 94 60 input via 2x DVIDL L R half or 4x DVISL quadrants EDID version 1 3 compatible HDCP version 1 4 compatible DVI Digital Vi...

Page 43: ...4 HDMI connector HDMI 2 with an LED that turns on green when a valid sync has been detected Features Default slot s 7 8 9 10 Process up to 4 signals independently 2x 19 pin HDMI connector Type A 2x 2...

Page 44: ...ace is a compact audio video interface for transferring uncompressed video data and compressed uncompressed digital audio data from a HDMI compliant device the source device to a com patible computer...

Page 45: ...onnector Type A The two connectors support single link signals up to 300MHz Specifications HDMI per 1 4a Specification Supported format formats up to 2 560x1 600 60 and 3 840x1 200 60 30 bits 4K UHD S...

Page 46: ...I Output Card s rear panel connectors Image 4 9 6G SDI output Card Rear Panel 1 BNC connector SDI 1 2 BNC connector SDI 2 3 BNC connector SDI 3 4 BNC connector SDI 4 Features Default slot s 13 Provide...

Page 47: ...SMPTE 292M 1920x1080 59 94i 50i 720x480 60p 50p 3G 1 4 SMPTE 424M Barcolink 1920x1080 60p 50p 1920x1200 60p 50p 4K UHD 4 1 TBD 3840x2160 23 98 24 25 29 97 30 input via 4x HD SDI quadrants 3840x2160 50...

Page 48: ...t Ethernet three 40 Gigabit Ethernet channels or twelve 10 Gigabit Ethernet channels or a single Infiniband 12 QDR link The connector has 4 rows each of 21 pin total 84 pins Note 1 The C is the Roman...

Page 49: ...at throughout the chapter Overview Power up initialization E2 Front Panel menu tree Using menu system About Status menu About Setup menu About the System menu System menu Black Invalid System menu USB...

Page 50: ...d to your facility s AC power source through the two supplied power cords Locate the power button on the front panel and turn power On While the system is initializing the front panel buttons light up...

Page 51: ...5 2 E2 Front Panel menu tree About this section The diagram below illustrates the E2 Front Panel menu tree Please use this diagram for reference as you learn how to operate the system Menu tree Image...

Page 52: ...h you can take action This arrow moves as you rotate the ADJUST knob on the front panel When you reach an editable field and press SEL the navigation cursor changes to an edit cursor Making a menu sel...

Page 53: ...Turning the ADJUST knob clockwise once moves to the next letter of the alphabet If you start with an upper case letter as shown in the preceding illustration then the next letter is also a capital le...

Page 54: ...age of the GUI For more details please refer to the section dedicated to the E2 configuration in the chapter Configuration Menu page 76 Genlock This line gives information about the Genlock connection...

Page 55: ...menu you can configure certain system settings for the E2 display Technical Support contact information restore factory default settings and check for available firmware updates And finally you can sa...

Page 56: ...E2 configuration obtain diagnostic information adjust the intensity or lock the display screen Image 5 8 System menu The following sections describe each Setup Menu option in detail System menu Black...

Page 57: ...General The Black Invalid system setting determines whether the output is black when connected to a signal it cannot process Black Invalid is either On or Off The default setting is On This is a globa...

Page 58: ...E2 s front panel USB port 2 From the System menu scroll to the USB Backup Restore submenu Select Backup Config The USB Backup Config submenu appears as shown in the following illustration The navigati...

Page 59: ...3 Press SEL and scroll through the list of configuration files When you locate the file you want press SEL again 4 Scroll to Restore Config and press SEL A message confirms the restore operation and...

Page 60: ...ess along with a subnet mask and gateway in the Set Static IP submenu Consult your network administrator for a valid IP address subnet mask and gateway Setting a static IP Address When a DHCP server i...

Page 61: ...5 Front Panel Menu orientation If you press ESC at any time before accepting your final change all your edits will be removed and the original values restored R5905948 E2 12 12 2014 57...

Page 62: ...brightness display brightness General The VFD Brightness submenu adjust the intensity of the front panel vacuum fluorescent display VFD screen The adjustment range is 0 to 6 with 6 being the brightest...

Page 63: ...ls or if a character segment is bad in the display After several seconds of showing all pixels on at the brightest setting the E2 will automatically advance to the ENCODER BUTTON TEST menu the next me...

Page 64: ...be tested the following message will be displayed Image 5 18 Pressing SEL to continue will start the diagnostic testing The following message will be displayed Image 5 19 If only one slot was selected...

Page 65: ...degrees Celsius Backup Log Files Backup log files can be saved for customer service troubleshooting In the event the E2 log files need to be backed up first install a USB stick in the front panel of...

Page 66: ...Ethernet communications commands function normally How to enable and disable the front panel lock 1 On the System menu scroll to Lock Front Panel and press SEL The front panel is locked and the follow...

Page 67: ...nu This menu displays The software version of your E2 For more details on software upgrade instructions please refer to section Updating firmware page 183 The US Customer Support telephone number This...

Page 68: ...Restoring all factory settings To restore all default settings to the E2 use the following procedure 1 Select Factory Reset from the Setup Menu The Factory Reset Menu appears 2 Select Factory Reset A...

Page 69: ...two options for upgrading firmware Using the USB port on the front panel Using the Web Interface Please refer to the chapter Settings Menu page 142 for the instructions on how to perform firmware upg...

Page 70: ...ed the next time you power up the E2 If you do not use this function your custom settings are not restored during the next system power up sequence Saving all modified settings 1 Select Save All from...

Page 71: ...ace with the E2 from a PC or Mac via an Ethernet connec tion The program provides a step by step approach to configure program setup the dedicated Multiviewer and manage system functions Some screensh...

Page 72: ...ea Programming Menu Adjustment area Layer configuration Programming Menu Adjustment area Background configuration Programming Menu Adjustment area User keys configuration Programming Menu Adjustment a...

Page 73: ...entium IV or equivalent 1 GHz or faster 8 GB RAM Free hard disk space 600 MB SXGA resolution 1280 x 1024 Ethernet connection Software Windows XP Professional Windows 7 Windows 8 System requirements fo...

Page 74: ...for free from Barco s website URL http www barco com The software is also available on myBarco and login to get access to secured information Registration is necessary If you are not yet registered cl...

Page 75: ...will be available in a future release To install on Microsoft Windows The process of installing your software involves the following steps 1 Browse to the directory where the install program is downlo...

Page 76: ...ol Software icon on your desktop Or click Start All programs Barco E2 Event Master Control Software The software starts up with the same look and feel as when it was closed before The connection is au...

Page 77: ...reen is the Menu Navigation bar that allows users to navigate between the different screens and save or restore system configurations This area of the screen is always visible and remains unchanged Th...

Page 78: ...6 GUI orientation Configuration area On the right hand side is the configuration area where users perform all needed adjustments 74 R5905948 E2 12 12 2014...

Page 79: ...r allows modification of the value with slider Image 6 3 Properties Slide the cursor to modify the value The value can also modified by clicking the or symbols Drop down menu Drop down menu allows the...

Page 80: ...mulated devices 2 System diagram area The selected system is graphically represented in this area To view a different system you select the corresponding tab from the top 3 System modifier area System...

Page 81: ...us of the unit Yellow Found in network but not assigned Green Assigned and currently has an open or active communication port Red Assigned but currently has errors trying to communicate heart beat com...

Page 82: ...6 GUI orientation Image 6 8 78 R5905948 E2 12 12 2014...

Page 83: ...the GUI The last tab allows the users to create a new system A set of zoom buttons allows to reduce or enlarge the view size This functionality is very useful when the system is composed of more than...

Page 84: ...stination e g Aux Image 6 12 The destination is selected The destination is highlighted in blue Select a device or a destination in the Diagram area allows it to display the parameters corresponding t...

Page 85: ...estination mode a message will appear warning that existing layer assignments will be deleted and requesting for verification to continue Aux Destinations are not affected by this mode Native rate Sys...

Page 86: ...e output of E2 screens multiple screens monitors etc The user could assign the outputs that are created in the previous tab to Destinations and deleted unused or obsolete Destinations Always on top Ad...

Page 87: ...able SW If the versions are different the Upgrade SW button will be lit to allow users to upgrade downgrade the SW on the VP Resets If the user selects one of the reset options a confirmation pop up w...

Page 88: ...or Grouping The connectors can also be grouped together to define a 3D or a 4K inputs For example 2 DVI connectors can be configured for a 3D Left and Right eye signals and 4 SDI connectors can be con...

Page 89: ...created on the system e g Input1 A button to automatically allocate all unassigned input connectors to an input A button to manually allocate connectors to an input A button to delete unused or obsole...

Page 90: ...Adding button that is highlighted in blue A new Input is added in the input list To stop the add procedure without add new input just click on the Done Adding button without selecting an input How to...

Page 91: ...r Mode Selects between motion adaptive mode or Field to frame Only applicable if the input format is interlaced or PSF If the input format is progressive this field is disabled When On the default is...

Page 92: ...us Menu displays the Invalid Signal message Please note the following important points regarding In Auto Acquire It is recommended that you turn Off Auto Acquire in applications where you have already...

Page 93: ...nes V Polarity Polarity active High or Low of the vertical sync pulse N A in SDI Input adjustment panel Color Adjustment This menu allows for color adjustments for each input The RGB Contrast and Brig...

Page 94: ...6 GUI orientation Image 6 20 90 R5905948 E2 12 12 2014...

Page 95: ...defined by any number of connectors between 1 and 8 The same rules apply as in the Input definition The connectors need be on the same or adjacent card and be of the same type with the exception of D...

Page 96: ...out Output Connector Grouping The connectors can also be grouped together to define a 3D of 4K configuration For example a projector that requires 2 DVI connectors to pass 3D Left and Right eye signa...

Page 97: ...allocate output connector s to an output A button to delete unused or obsolete output s How to Auto create Outputs The Auto Create Outputs button allows all 2K outputs that are not assigned to an outp...

Page 98: ...tput is 4K provided by the 4 SDI connectors the 4 SDI connectors need to be selected Connector s is immediately highlighted in blue 3 The selection is completed by clicking the Done Adding button that...

Page 99: ...d 2 Click on the Adjust tab that is on the top of the Adjustment area Image 6 26 The output adjustment panel is displayed Output adjustment panel description The output adjustment panel is divided in...

Page 100: ...Turns ON or OFF on a raster around the default active area This raster box is a white single pixel wide broken line Diagonal Motion Turns the Diagonal Motion ON or OFF for select patterns The motion i...

Page 101: ...ive area H Sync Adjusts in pixels the H sync width H Polarity Adjusts the polarity active High or Low of the horizontal sync pulse N A in SDI V Total Adjusts in lines the total line count per frame V...

Page 102: ...If more than one output connector are part of the output configuration as in a blended widescreen screen then the connector mapping menu appears From this menu the user can select the appropriate con...

Page 103: ...en defining an Destination configuration 1 Destinations accept only the same output connector types SDI and HDMI connectors cannot be mixed in the same destination 2 Destinations accept only output co...

Page 104: ...opied to the desti nation output format New Screen or Aux destinations can be added as long as there are unassigned output configurations to destinations Alternatively you assign outputs to destinatio...

Page 105: ...inations can be deleted the same time by clicking the Select All button How to access to the Destination configuration adjustments Adjustments to Destinations are performed in the Adjust panel 1 Selec...

Page 106: ...in the output configuration menu Layer only applicable when Destination is a Screen The list shows the layers assigned to this Destination There are only sixteen 2K layers available in the system Eac...

Page 107: ...tion is adjustable within a range of 0 to 200 The default setting is 0 Reset changes all values to their default settings Gamma is adjustable within a range of 0 3 to 3 28 The default setting is 1 0 W...

Page 108: ...ectors Data Doubling H or V Overlap width The adjustment can be made my moving the slider or entering the value manually in the box Feathering submenu First select the region where feathering will be...

Page 109: ...Preview screens can be created individually by selecting the corresponding tab All Program and Previews screens can be viewed simultaneously by selecting the View All button 3 Layer modifier area Alig...

Page 110: ...t an input signal to the E2 The number of connectors required is listed in the table below 2K Resolutions up to 2048x1200 60 Dual Link Resolutions up to 3840x1200 60 4K Ultra HD Resolutions up to 4096...

Page 111: ...ystem can transition between two background sources On any mixer a PIP layer appears over backgrounds and under other layers of higher priority PIP effects include mixes smooth moves resizing adjustab...

Page 112: ...Sources available in the system Sources are listed after the input and can be view by clicking on the arrow next to the Input name Background Lists backgrounds assigned to destinations For each of th...

Page 113: ...nto a new Source and adds it in the list Source Thumbnail View Thumbnails are sent from the E2 to the GUI Behavior is similar to the List View mode see above Each thumbnail could be refreshed individu...

Page 114: ...te and click the Delete Source s button The selected sources are removed How to hide Inputs To hide the inputs from the list 1 Check the Hide Inputs box Sources are displayed without their associated...

Page 115: ...6 GUI orientation Image 6 37 Thumbnail view Image 6 38 R5905948 E2 12 12 2014 111...

Page 116: ...ackground 2 Preview screen where the program is composed before is transitioned to program 3 Users can zoom in out of the diagram area in from 25 to 150 in 25 increments 4 BGND Input tab This is the m...

Page 117: ...placed into the preview screen then the software will automatically place the layer in the position where the Source was dropped and allocate the lowest unassigned layer to the source The source and l...

Page 118: ...oved with the keyboard s arrow keys Size adjustments can be performed by selecting and right clicking the vertical horizontal or any corner of the layer Any size adjust ment maintains the aspect ratio...

Page 119: ...o align the top edges of all selected PIPs 3 Align Right to align the right edges of all selected PIPs 4 Align Bottom to align the bottom edges of all selected PIPs 5 Align Centers Horizontally to ali...

Page 120: ...p 3 Moves down in priority and swaps the z order of the selected layer with the layer previously below 4 Moves the selected layer to the bottom of the priority and swaps it with the layer previously a...

Page 121: ...ey are visible 2 Full Screen Horizontal takes the selected PIP s to full screen using the source s width as the guide If borders are on they will be taken into account 3 Match PGM button forces the se...

Page 122: ...the selected layer from preview If the selected layer is on program this button is disabled Toggle Enables the sources to toggle back and forth with each transition Toggle on After a transition is pe...

Page 123: ...n worth of information Adjustment Based on what is selected in the Preview or Program canvas area this is the panel where we are adjusting what is selected For example if we select Layer1 we will be a...

Page 124: ...d the layers assigned to them The eye icon replaces or removes the layers from the Preview destination This button works in a toggle mode BGNG and ScreenDest Backgrounds and Destinations layers can be...

Page 125: ...r layer sizing and color adjustments Main adjustment Border and Shadows Layer Window adjustment Size Position Mask Layer Color Effects adjustment Brightness Contrast Gamma Hue Saturation Monochrome In...

Page 126: ...ponding sliders or entering a figure in the adjacent edit boxes The border width can be entered either in Percentage of the vertical size or in pixels The selected color is shown in the Current Color...

Page 127: ...g information is derived from the luminance brightness level of the key source Source on the Key Bus can be selected as the cut You can select Self or Matte Preset Bus or Split for the fill source Cli...

Page 128: ...tal center of the screen 00 as measured from the exact center of the PIP Thus the value 34 is 34 pixels to the left of center V Position indicates the PIP s position relative to the vertical center of...

Page 129: ...tely monochrome Invert Toggle this button to turn the color invert function on and off When on all image colors are inverted Reset All Returns all values to their default settings Strobe Toggles the s...

Page 130: ...the Background adjustments Adjustments to Backgrounds are performed in the Adjust panel 1 Select the background from the list in the layer panel Or Select the background from the preview windows The...

Page 131: ...or for the Background The Color wheel is another way to specify the color The user can press and hold the mouse when the mouse is on the color wheel Learn The Learn button in the bottom is a way to st...

Page 132: ...y selected User Key to all selected layers Save to new User key 1 Select the layer whose parameters you want to store 2 Using the menu enable or disable the specific parameters that you wish to store...

Page 133: ...GUI orientation Search edit box Search User keys by name Apply Selected Selected key is applied to the selected layer on Preview and on Program if Modify on Program is enabled R5905948 E2 12 12 2014 1...

Page 134: ...and Dest3 looks will be stored Dest 2 will not be part of this Preset Overwrite Preset This button allows the override of a selected Preset if the destination is active The name of the preset will no...

Page 135: ...tments But the user can click on the Source adjustment tab to see the adjustments mentioned in this section Two Tabs for Source adjustment Main adjustment Size position Aspect ratio Color adjustment B...

Page 136: ...hin a range of 0 3 to 3 28 The default setting is 1 0 Hue is adjustable within a range of 180 to 180 degrees The default setting is 0 degrees Saturation is adjustable within a range of 0 to 200 The de...

Page 137: ...s Description These controls are disabled if no Destination is selected Image 6 59 All Trans button This button transitions the Preview into Program according to the transition rate The transition Rat...

Page 138: ...iviewer page is divided in four parts Image 6 61 1 Resources area Lists the resources available to be displayed in the Multiviewer Inputs Backgrounds and Program Preview Destination Outputs 2 Multivie...

Page 139: ...dd a resource to the Multiviewer Resources are placed in the Multiviewer layout area by dragging them as it is done with the sources in the programming menu When a resource is dropped in the Multiview...

Page 140: ...grounds and destination sources There are 3 elements that make up a multiviewer image window Content area border and UMD Under Screen Display Image 6 66 Content area The default content display area h...

Page 141: ...ng it will be terminated with The background color is adjustable the default color is gray The UMD color will go red in case sync is lost Border The border width is fixed at 5 pixels Border color is a...

Page 142: ...alignment panel For more details please refer to the chapter Programming Menu Layer Modifier area page 115 Image 6 67 Miscellaneous Control Image 6 68 Source Preview Allows the user to view the select...

Page 143: ...e several tabs in this area Output colors Provides 2 tabs one per multiviewer output where the user can modify the color attributes of each output Window adjustment Provides sizing and positioning adj...

Page 144: ...ols under the 3 tabs are identical and operate similar as the color adjustments in other menus The selected color is shown in the Current Color bar The color can also be stored by clicking in one of t...

Page 145: ...horizontal position in pixels V Pos pixel Adjusts the window s vertical position in pixels Automatic preset The eight buttons at the bottom are shortcuts to different sizes depending on how many of th...

Page 146: ...are no System VPs connected in the system this button is disable Image 6 70 1 GUI Language This parameter allows the user to choose the language of the GUI The only language available in version 1 is...

Page 147: ...e web interface of the selected VP 5 System select combo box Informs the users which System is currently being selected If there is more than 1 System defined in the UI this combo box can be used to s...

Page 148: ...in the Dashboard window provide access to card diagnostics software Tools This menu allows users to Download software and perform Backup and Restore operations Help This menu contains a list of freque...

Page 149: ...nputs menu presents a list of the input cards installed in the system The status column indicates whether any errors have been detected Detailed diagnostics tests for each card are performed by select...

Page 150: ...list of the output cards installed in the system The status column indicates whether any errors have been detected Detailed diagnostics tests for each card are performed by selecting the diagnostics...

Page 151: ...for each card are performed by selecting the diagnostics button under the action column Image 6 74 Other This menu presents diagnostics for the Motherboard and internal VPU cards The status column ind...

Page 152: ...6 GUI orientation Note that the Motherboard diagnostics test also provides status information for the power supplies Image 6 75 148 R5905948 E2 12 12 2014...

Page 153: ...s in this menu Manage Software From this menu the user can select download and install a new software version from the Barco Server Backup Restore From this menu the user can backup or restore the sys...

Page 154: ...elect the file and drag and drop it on top of the green button The file is compressed and it has tar gz extension Image 6 78 3 Click on the blue Upload button This action will copy the file from the c...

Page 155: ...rientation Image 6 80 8 After the new software is installed the previous message goes away and a new message appears asking which settings to use after the unit boots up Image 6 81 R5905948 E2 12 12 2...

Page 156: ...ettings on the computer The menu also allows the user to restore a previously stored system file Image 6 82 How to backup presets user keys and system settings 1 Click on the Backup button A dialog bo...

Page 157: ...location where the backed up file is located 2 Drag and drop the file on the green restore button A progress bar and a blue Upload button appear 3 Click on the Upload button The progress bar indicates...

Page 158: ...tion 6 41 Settings Menu WebKit area Help General This menu contains a list of frequently asked questions FAQ to help you implement your system This list is sorted by category Image 6 85 154 R5905948 E...

Page 159: ...6 GUI orientation 6 42 Settings Menu WebKit area Contact us General Displays contact information for the Barco tech support Image 6 86 R5905948 E2 12 12 2014 155...

Page 160: ...6 GUI orientation 6 43 Settings Menu WebKit area Follow us General Displays links to Barco s and the Image Processing group s social media sites Image 6 87 156 R5905948 E2 12 12 2014...

Page 161: ...onfiguration Menu Initial Setup Configuration Menu Add Background s Configuration Menu Add Inputs Configuration Menu Add Outputs Configuration Menu Add Screen Destinations Layers Configuration Menu Ad...

Page 162: ...ally secured on a rack or is placed on a flat surface with a stable support If the unit is installed on a rack it is mandatory that the rear brackets are also installed For details please refer to cha...

Page 163: ...nformation see section Configuration Menu Add Inputs page 169 11 Configuring Menu Add Outputs For more information see section Configuration Menu Add Outputs page 170 12 Configuring Menu Add Screen De...

Page 164: ...initialization is completed 2 Power up all peripherals such as display devices projectors monitors and sources 3 Turn on the PC and run the EM GUI software The system configuration page is the first p...

Page 165: ...set ensure that you have backed up your system for details please refer to the procedure Backing up the system page 166 Prerequisite Ensure that you are familiar with the Reset Menu For details on all...

Page 166: ...Control Software or via a web interface Please contact the manager of the local network LAN to know how config uring your device Query the DHCP server 1 Select Ethernet from the System Menu The Ether...

Page 167: ...Restore a system configuration file Use the following steps to restore your system from the USB Drive 1 Insert a formatted flash drive in the E2 s front panel USB port 2 From the System menu scroll to...

Page 168: ...ith the VFD brightness menu For details on this menu please refer to chapter System menu VFD brightness display brightness page 58 Set a variety of important user preferences Use the following steps t...

Page 169: ...ou are familiar with the Save All function For details on this menu please refer to chapter Save All page 66 Save all system setup parameters Use the following steps to save all system setup parameter...

Page 170: ...sert a formatted flash drive in the E2 s front panel USB port 2 From the System menu scroll to the USB Backup Restore submenu Select Backup Config The USB Backup Config submenu appears The navigation...

Page 171: ...rning green 2 Drop the E2 from the device area into the middle diagram area 3 If multiple units are connected to the PC the green LEDs next to the system will turn green You can assign a unique name t...

Page 172: ...e Optional Edit the Name 1 Double click on default name in the Name list to edit the name 2 When the area turns blue click the eraser icon to clear the field 3 Type a new name Optional Adjust Backgrou...

Page 173: ...3 Type a new name Optional Adjust Input Parameters Click on the Adjust tab that is located on the top From this menu you can adjust 1 Select Format value color space and connector type Default value...

Page 174: ...he field 3 Type a new name Optional Adjust Output Parameters Click on the Adjust tab that is located on the top From this menu you can adjust 1 Edit the name 2 Select Format value color space and conn...

Page 175: ...Layer to Destination blue button 2 Click on this button as many times is required to add the layers you are assigning to the destination Observe the number of layers indicated in the Layer box is inc...

Page 176: ...2 diagram Optional Edit the Name 1 Double click on Destination1 in the Name list to edit the name 2 When the area turns blue click the eraser icon to clear the field 3 Type a new name and hit enter wh...

Page 177: ...ea turns blue click the eraser icon to clear the field 3 Type a new name and hit enter when done Optional Adjust Output Parameters Click on the Adjust tab that is located on the top From this menu you...

Page 178: ...humbnails from the E2 1 Click on the Background tab on the top of the left hand side 2 Click on the refresh icon to receive the latest icon from the E2 Image 7 1 Optional Update thumbnails from the PC...

Page 179: ...humbnails from the E2 1 Click on the Input tab on the top of the left hand side 2 Click on the refresh icon to receive the latest icon from the E2 Image 7 3 Optional Update thumbnails from the PC memo...

Page 180: ...ore sources can be created by following the steps below Optional Create additional sources 1 Click on the Input tab on the top of the left hand side 2 Click on the List icon Image 7 5 3 Click on the a...

Page 181: ...site Ensure that you are familiar with the Programming Menu For details on this menu please refer to chapter Programming Menu page 105 Drop Backgrounds 1 Click on the Background tab on the top of the...

Page 182: ...size 3 Click the Blue Add KF button to save the initial state 4 Move the layer at the end position and size 5 Click the Blue 2 square button to save the end state Now the two states are saved The lay...

Page 183: ...Trans or Cut button all of the selected Preview screens will be transitioned to Program 3 You can select background to be transitioned to program by clicking on the background button next to the Scre...

Page 184: ...rogramming Menu page 105 Drop Layers into Screen Destinations 1 On top in the middle of the layout area click on the Aux destination you wish to input 2 On the left hand side click on the Inputs tab 3...

Page 185: ...b that is labeled Background and drag the desired backgrounds to the multiviewer window 4 Click on the top tab that is labeled Destination and drag the desired Destination to the multiviewer window Op...

Page 186: ...7 System Setup 182 R5905948 E2 12 12 2014...

Page 187: ...e upgrade pro cedure via the Setting Menu in the Event Master Control Software EM GUI please refer to chapter Settings Menu WebKit area Tools Manage Software page 150 In the event the E2 gets into a s...

Page 188: ...computer or a secure site any files you wish to keep then format the drive Formatting the flash drive 1 Insert the flash drive into a Windows PC or laptop s USB port 2 Select a Windows Explorer or a p...

Page 189: ...from the Barco website to the USB drive This operation automatically creates a directory named E2 with the upgrade file inside e2_update_vp xx xx tar gz Performing the firmware upgrade using the USB...

Page 190: ...wn in the following illustration appears Image 8 4 Web Firmware Upgrade Submenu 3 Select Check A message informs you if a new firmware version is available Image 8 5 Firmware Version Upgrade Message O...

Page 191: ...8 Updating firmware Image 8 8 Resetting Message If you are not connected to the internet a message prompts you to check the connection R5905948 E2 12 12 2014 187...

Page 192: ...8 Updating firmware 188 R5905948 E2 12 12 2014...

Page 193: ...demonstrate the basic E2 operation The example provides the user a step by step setup and operation instructions in order to meet some specific event requirements Overview Event requirements Prelimina...

Page 194: ...d that are equal in size and are side by side Two looks are desired One look displays the two video clips simultaneously from the KiPROs The other look shows the PowerPoint and the stage camera Backgr...

Page 195: ...nput PC Background DVI 6 1 Input PC Background DVI 6 2 Input KiPRO1 Video Clip1 HDMI 8 3 Input KiPRO2 Video Clip2 HDMI 9 3 Input MacPRO Power Point DisplayPort 10 1 Output AUX DSM DSM for cameras HDMI...

Page 196: ...9 General operation example Image 9 3 192 R5905948 E2 12 12 2014...

Page 197: ...ter the control software is divided in 3 parts 1 Configuration Menu In this section users define the system components like inputs backgrounds outputs and destinations See the detailed procedure in se...

Page 198: ...s address is the same as the address listed on the unit s front panel on the top status menu Image 9 5 Note If the unit doesn t connect automatically to the PC you can type the PC s IP address in the...

Page 199: ...e Hit enter when done 8 Repeat steps 2 thru 6 until done Enter the names as shown in the image below Image 9 7 C4 Add Output 1 Click on the Output tab to select the outputs that will be defined 2 Clic...

Page 200: ...estination 8 In the layout area 1 layer will appear in the green area of the box 9 Repeat the previous step to add one more layer C5 Part2 Add Main Screen Destinations In this section we will create t...

Page 201: ...n the Aux destination is created a box appears next to the E2 diagram 4 Double click on the Destination1 area in the Name list to edit the name 5 When the area turns blue click the eraser icon to clea...

Page 202: ...the field and type a new name Sources Hit enter when done 7 Click on the third HDMI connector of slot 14 8 Click on the Done Adding button to exit the Add mode 9 Double click on MVROut2 in the Name li...

Page 203: ...y drop sources into the layers Image 9 12 P1 You can skip this step if you don t want thumbnail images to represent the background In this case the background in the destinations area will be black an...

Page 204: ...humbnails for Inputs 1 From the left hand side click on the Input tab 2 Next to the Refresh All Thumbnails click on the thumbnail button 3 Click in the black box and navigate the computer to find and...

Page 205: ...ion only one source will be used for each input so no additional sources need to be created Therefore in this example this step will be skipped P4 Drop Backgrounds into Screen Destinations 1 On top cl...

Page 206: ...nd position parameters Part1 Site Screen 1 On top click on the Site Screen tab to only view the Site Screen 2 On the right hand side of the screen click on the Layers tab and then click on the arrow n...

Page 207: ...xample Image 9 17 4 Select the layer white box and then click on the Adjust tab on the top 5 Select the Window Adjustment Icon and then unlock the aspect ration lock by clicking in the lock icon R5905...

Page 208: ...ge 9 18 6 Adjust the sizing parameters as follows a H Size 1920 b V size 1080 c H Pos 0 d V Pos 0 7 From the left hand side click on the Input tab 8 Click the source under CAM1 and drop it into the la...

Page 209: ...e layer to program 10 Drop the source for CAM 2 to the preview layer Image 9 20 Part2 Main Screen 1 On top click on the Main Screen tab to only view the Main Screen 2 Under the Layers tab click on the...

Page 210: ...ch layer separately and adjust their sizing parameters as follows Note You need to unlock the aspect ratio for each layer Layer1 a H Size 1720 b V size 970 c H Pos 100 d V Pos 50 Layer2 a H Size 1720...

Page 211: ...op Sources into Aux Screens DMS Output 1 On top click on the DSM tab 2 Drag the CAM 1 input1 into the preview screen Image 9 23 P7 In this application we will not save any user keys All layers attribu...

Page 212: ...ts so we have a preset for both video clips and both cameras Image 9 24 5 Select the Main screen and select the sources into the two PiPs are the event requirements described in the introduction of th...

Page 213: ...9 General operation example Image 9 25 R5905948 E2 12 12 2014 209...

Page 214: ...viewer outputs were declared We will setup the top window to display all the inputs and the bottom window to display the Program and preview screens Setup the Sources window 1 Click on the top tab tha...

Page 215: ...the top tab that is labeled MVROut2 2 Click on the Destination tab and the top of the right hand side 3 Drag the Program and Previews under the Site and Main Screens into the window area 4 Resize and...

Page 216: ...9 General operation example 212 R5905948 E2 12 12 2014...

Page 217: ...urself with the sequence of procedures ESD recommendations The following precautions must be taken Perform the Service procedures only at approved anti static work station equipped with anti static ma...

Page 218: ...Tray VPU Card s Front Panel Knob Front Panel Mount Front Panel Board VFD Display Assembly VFD Display Filter Bottom Panel Solid State Memory System Battery CPU Module Power Supply System Power Board G...

Page 219: ...nd main components Image 10 1 T Top 6 Mother Board F Front 7 Top Cover 1 Front Panel Knob 8 Front Brackets 2 VFD Display 9 EMI Filter 3 Front Cover Assembly 10 1RU Fan Tray 4 Rack Ears 11 3RU Fan Tray...

Page 220: ...10 Maintenance 10 2 Process Overview Flow chart Image 10 2 216 R5905948 E2 12 12 2014...

Page 221: ...board cables 1x Genlock to System flat cable 1x Front Panel Keyboard to System flat cable 1x RJ45 to System CAT5 Ethernet cable 1x USB to System 5 pin cable R767270K 1RU fan tray The fans are not ava...

Page 222: ...1 Necessary tools Phillips Screwdriver 2 How to remove a card 1 Locate the card you wish to replace Note There are 14 card slots The first slot on the left is slot 1 and the last slot on the most rig...

Page 223: ...Image 10 5 How to install a card To install a card follow the same procedure in the reverse order Apply a little pressure on the card until it is fully inserted in the back plane connector R5905948 E2...

Page 224: ...he Heatsink and secure the fan on to the board 3 Turn the board over and with small fine nose pliers while bringing together the two sides of the pin push it through the hole 4 After both pins are pus...

Page 225: ...ry tools 1 x Screwdriver HEX 0 05 7 05 Provide by Barco in the original package Image 10 10 How to remove the Front Cover Assembly 1 Use the Hex screwdriver to remove the 4 screws Hex 6 32x 25 that at...

Page 226: ...10 Maintenance Image 10 11 2 Pull out the Front cover and lay it flat in front of the unit 222 R5905948 E2 12 12 2014...

Page 227: ...tor 3 USB Connector 3 Pull the latches away from connectors and gently pull the flat Front Panel away 4 Remove cables as outlined in the related procedures VFD USB and Front Panel connectors How to in...

Page 228: ...to remove the Front Brackets 1 Remove the two front brackets by lifting them up and then pulling them inwards and then out Image 10 14 How to install the Front Brackets To install the front Brackets f...

Page 229: ...tall the EMI Filter To install the EMI Filter follow the same procedure in the reverse order Begin by tucking in the left side behind the key features To get the right hand side in position use finger...

Page 230: ...You need to tilt the tray and maneuver it to go around the dimples located on the side of the chassis Image 10 19 How to install the 3RU Fan Tray Follow the same procedure in the reverse order and in...

Page 231: ...an tray to the chassis Note You may need a screwdriver if the thumbscrews are very tight Image 10 21 2 Pull the tray out Note You might need to tilt the tray and maneuver it to go around the dimples l...

Page 232: ...e following 1 Pass the USB and VFD cable through the grommet Image 10 23 2 Make sure that the front panel flat cable goes through the slot located on the right hand side 3 Line up the connector behind...

Page 233: ...d 1 Locate the VPU you need to replace Note There are 9 VPU slots The first slot on the left is slot 15 and the last slot on the most right position is 23 2 Loosen and unscrew the thumbscrew that is h...

Page 234: ...ool with a sharp edge How to remove the Front Panel Knob 1 Remove the knob cover with a flat screw driver or a sharp object to expose the inside of the knob Image 10 29 2 Use the knob removal tool pro...

Page 235: ...10 Maintenance Image 10 30 How to install the Front Panel Knob To install the Front Panel Knob follow the same procedure in the reverse order R5905948 E2 12 12 2014 231...

Page 236: ...emove the Front Panel Mount 1 Turn the Front Cover over and remove the four screws 4 40X 25 that secure the control panel mount to the front panel Image 10 32 How to install the Front Panel Mount To i...

Page 237: ...ront Panel Board Necessary tools 1 x Phillips Screwdriver 2 How to remove the Front Panel Board 1 Remove the two screws 4 40X 25 that secure the PCB to the front mount Image 10 34 2 Move the PCB to th...

Page 238: ...10 Maintenance Image 10 35 How to install the Front Panel Board To install the Front Panel Board follow the same procedure in the reverse order 234 R5905948 E2 12 12 2014...

Page 239: ...R767241K VFD Display Assembly Necessary tools 1 x Phillips Screwdriver 2 How to remove the VFD Display Assembly 1 Turn the Front Cover over and remove the four screws 4 40X 25 that secure the VFD dis...

Page 240: ...of the unit push hard on the filter until it detaches from the unit Image 10 39 2 Use alcohol to clean the adhesive residue that held the filter to the metal plate How to install the VFD Display Filt...

Page 241: ...ide of the unit 3 Remove the 6 screws that hold the two sides together 4 Remove the rest of the screws from the perimeter of the panel as shown below 5 Push on the edge of the piece that is in the mid...

Page 242: ...an also be replaced after the System Power board is removed from the unit Overview Image 10 42 1 System Power board 2 Solid State Memory card 3 Socket Concerned parts R767275K Solid State Memory Neces...

Page 243: ...10 Maintenance Image 10 43 How to install the Solid State Memory To install the Solid State Memory follow the same procedure in the reverse order R5905948 E2 12 12 2014 239...

Page 244: ...System Battery can also be replaced after the System Power board is removed from the unit Concerned parts V327007 Battery Necessary tools None How to remove the System battery 1 Carefully remove the b...

Page 245: ...sticker on the inside of the metal plate Bottom Panel that indicates when the battery was last replaced The absence of sticker means the battery has never been replaced In this case the S N sticker ca...

Page 246: ...re Overview Image 10 48 1 Chassis 2 CPU Module 3 Bottom Panel Part 1 4 System Card 5 Bottom Panel Part 2 Concerned parts R767264K CPU module Necessary tools 1 x Phillips Screwdriver 2 How to remove th...

Page 247: ...10 Maintenance Image 10 49 How to install the CPU module To install the CPU module follow the same procedure in the reverse order R5905948 E2 12 12 2014 243...

Page 248: ...10 Maintenance 10 21 Power Supply Concerned parts R767267K Power Supply Necessary tools None How remove Power Supply 1 Push the latch towards the right 244 R5905948 E2 12 12 2014...

Page 249: ...all Power Supply 1 Insert the Power Supply into the slot Note The card edge should be at the top of the power supply as shown in the drawing 2 Push the power supply completely inside the slot Apply a...

Page 250: ...moving the System Power board you need to remove the Power Supplies Bottom Panel and the CPU board Follow the instructions provided in these sections Overview Image 10 52 1 Chassis 2 System Power Boar...

Page 251: ...her board 4 Carefully lift the board up and remove the card from the System Don t pull the board too far because there are still 3 cables attached to the card Note Interposer card s may come out In th...

Page 252: ...10 Maintenance Top side Image 10 54 1 USB connector 3 3RU connector 2 VFD connector 4 1RU connector 248 R5905948 E2 12 12 2014...

Page 253: ...10 Maintenance Bottom side Image 10 55 1 Keyboard connector 3 Ethernet connector 2 Genlock connector R5905948 E2 12 12 2014 249...

Page 254: ...ck Assembly Necessary tools 1 x Phillips Screwdriver 2 How to remove the Genlock Assembly 1 Remove the seven flat head screws 4 40 X 25 that attach the Genlock assembly to the rear side of the chassis...

Page 255: ...ecting the Genlock Assembly to the unit 4 Unlatch the VFD ribbon cable from the connector and pull it up and away from the Genlock board Note This cable connects the Genlock board to the System Power...

Page 256: ...10 Maintenance How to install the Genlock Assembly To install the Genlock Assembly follow the same procedure in the reverse order 252 R5905948 E2 12 12 2014...

Page 257: ...mpletely detach and pull the Front Cover assembly away from the unit refer to the related procedure 2 Disconnect the USB cable from the USB Extension cable the other side of the cable is connected to...

Page 258: ...10 Maintenance Image 10 61 7 Remove the plate that has been exposed after the nuts are removed 8 Remove the three screws that hold the USB cable into the metal plate 254 R5905948 E2 12 12 2014...

Page 259: ...10 Maintenance Image 10 62 9 Remove the USB cable How to install the USB cable To install the USB cable follow the same procedure in the reverse order R5905948 E2 12 12 2014 255...

Page 260: ...anel assembly and pull it away to expose the cables behind it refer to the related procedure 2 Disconnect the USB Extension cable from the USB cable 3 Gently push the cable through the grommet located...

Page 261: ...10 Maintenance How to install the USB Extension cable To install the USB Extension cable follow the same procedure in the reverse order R5905948 E2 12 12 2014 257...

Page 262: ...arts R767269K Cable Kit Set Necessary tools 1 x Phillips Screwdriver 2 Hex Screwdriver How to remove the VFD Cable 1 Partially remove the front panel assembly and pull it away to expose the cables beh...

Page 263: ...nstructions provided in the bottom panel removal section 5 Locate the VFD cable that is plugged on the System Power board Image 10 69 6 Pull the cable out of the unit How to install the VFD Cable To i...

Page 264: ...3RU Fan Tray and 1RU Fan Tray Make sure that the Keyboard Cable is disconnected from the Front Panel board 2 Remove the Power supplies from the unit 3 Turn the unit upside down and follow the steps de...

Page 265: ...ove the cable from the unit How to install the Keyboard Cable To install the Keyboard Cable follow the same procedure in the reverse order There is a key on the connector to prevent incorrect insertio...

Page 266: ...enlock Assembly and disconnect the Genlock cable from the board Follow the instructions as provided in the previous section 2 Turn the unit upside down and follow the steps detailed in other procedure...

Page 267: ...the Genlock Cable To install the Genlock Cable follow the same procedure in the reverse order There is a key on the connector to prevent incorrect insertion of the cable Make sure the latches are full...

Page 268: ...etailed in other procedures to remove the Bottom Panel and the CPU module from the System Power board 3 Remove the USB VFD 3RU and 1RU cables that are connected to the System Power board 4 Remove the...

Page 269: ...em Power board and is accessible when the bottom panel is removed Concerned parts R767269K Cable Kit Set Necessary tools 1 x Phillips Screwdriver 2 Hex Screwdriver How to remove the 3RU Fan cable 1 Ma...

Page 270: ...8 4 Push the connector up until the slots in the metal bracket align with the flanges on the connectors Image 10 79 5 Gently pull the 3RU cable assembly away from the bracket Image 10 80 6 Turn the un...

Page 271: ...intenance Image 10 81 8 Remove the 3RU cable by gently pushing it out How to install the 3RU Fan Cable To install the 3RU Fan Cable follow the same procedure in the reverse order R5905948 E2 12 12 201...

Page 272: ...he System Power board and is accessible when the bottom panel is removed Concerned parts R767269K Cable Kit Set Necessary tools 1 x Phillips Screwdriver 2 Hex Screwdriver How to remove the 1RU Fan cab...

Page 273: ...e snap lock on the connector and push it back to release the connector from the bracket Image 10 84 4 Push the connector to the left until the slots in the metal bracket align with the flanges on the...

Page 274: ...mage 10 85 5 Gently pull the cable away from the bracket Image 10 86 6 Turn the unit upside down and remove the bottom panel 7 Locate the 1RU cable that is plugged on the System Power board 270 R59059...

Page 275: ...intenance Image 10 87 8 Remove the 1RU cable by gently pushing it out How to install the 1RU Fan Cable To install the 1RU Fan Cable follow the same procedure in the reverse order R5905948 E2 12 12 201...

Page 276: ...ove the eight pan head screws 8 32x 31 four from each side to detach the rear rack ears and connector protectors from the unit Note You don t need to remove the rear rack ears to access any other part...

Page 277: ...to remove Side Rack Ears 1 Loosening and removing the eight four on each side pan head screws that secure the brackets to the chassis sides Image 10 90 2 Remove the Rack Mount Brackets from the Chassi...

Page 278: ...the top side of the unit 2 Remove the two 2 screws 4 40x0 25 located closer to the rear end of the unit These are flat head screws 3 Remove the 8 screws 6 32x0 25 located on the top at the back of the...

Page 279: ...ttom of the unit 2 Remove the card guide cover by gently pulling it away from the E2 Image 10 94 How to install Top Card Guide To install the Top Card Guide follow the same procedure in the reverse or...

Page 280: ...d Fan 1 Remove the cable that provides power to the heatsink fan 2 Lift the two handles to release the fan from the heatsink Image 10 97 3 Lift the fan away from the heatsink How to install Motherboar...

Page 281: ...10 Maintenance Disregard the heatsink from the spare kit R5905948 E2 12 12 2014 277...

Page 282: ...10 Maintenance 278 R5905948 E2 12 12 2014...

Page 283: ...11 Environmental information 11 ENVIRONMENTAL INFORMATION Overview Disposal information RoHS compliance Production address R5905948 E2 12 12 2014 279...

Page 284: ...e them responsibly to promote the sustainable reuse of material resources For more information about recycling of this product please contact your local city office or your municipal waste disposal se...

Page 285: ...X O O O O O Nuts bolts screws washers Fasteners O O O O O O O SJ T 11363 2006 O Indicates that this toxic or hazardous substance contained in all of the homogeneous materials for this part is below t...

Page 286: ...11 Environmental information Republic of Turkey In conformity with the WEEE Regulation 282 R5905948 E2 12 12 2014...

Page 287: ...11 Environmental information 11 3 Production address Factory Barco Inc 3000 Technology Road Angleton TX 77515 USA R5905948 E2 12 12 2014 283...

Page 288: ...11 Environmental information 284 R5905948 E2 12 12 2014...

Page 289: ...A Specifications A SPECIFICATIONS About this annex This chapter gives an overview of the specifications of the E2 R5905948 E2 12 12 2014 285...

Page 290: ...1 3 compatible HDCP version 1 4 compatible Display port per Displayport 1 1a specification on Displayport connector formats up to 2 560x1 600 60 and 3 840x1 200 60 30 bits 4K UHD Supported 3 840x2 160...

Page 291: ...25 29 97 30 input via 1x HDMI 2x HDMI L and R half or 4x HDMI quadrants 3 840x2 160 50 59 94 60 input via 2x HDMI L and R half or 4x HDMI quadrants 4 096x2 160 23 98 24 25 29 97 30 input via 1x HDMI 2...

Page 292: ...ed to Ground 5 GND 15 AUX CH p 6 ML_Lane 1 n 16 GND 7 ML Lane 2 p 17 AUX CH n 8 GND 18 Hot Plug Detect 9 ML_Lane 2 n 19 Return return for power 10 ML_Lane 3 p 20 DP_PWR Power for connector 3 3 V 500 m...

Page 293: ...Analog Red Video C4 Analog Horizontal Sync C2 Analog Green Video C5 Analog Common Ground Return C3 Analog Blue Video Ethernet connector pinouts The following figure illustrates the Ethernet connector...

Page 294: ...1 TMDS Data2 11 TMDS Clock Shield 2 TMDS Data2 Shield 12 TMDS Clock 3 TMDS Data2 13 CEC 4 TMDS Data1 14 5 TMDS Data1 Shield 15 SCL 6 TMDS Data1 16 SDA 7 TMDS Data0 17 DDC CEC HEC Ground 8 TMDS Data0 S...

Page 295: ...TOCOL About this annex This chapter lists and provides details for the E2 remote control commands In release 1 only a limited number of commands are available Additional commands will be implemented i...

Page 296: ...ely To access the E2 remote commands use the following procedure 1 In a command prompt window type a telnet command in the following format telnet nnn nnn nnn nnn 9878 where the n s represent the E2 I...

Page 297: ...n range will override the transition time in the controller If this argument is not specified the current transition time known by the controller will be used Examples ATRN 200 Transition Preview to P...

Page 298: ...B Remote Control Protocol 294 R5905948 E2 12 12 2014...

Page 299: ...C Troubleshooting C TROUBLESHOOTING R5905948 E2 12 12 2014 295...

Page 300: ...C Troubleshooting 296 R5905948 E2 12 12 2014...

Page 301: ...board diagnostics in order to detect errors If the board diagnostics doesn t detect any errors proceed to the next step From the GUI change the output card from which the image is derived If the probl...

Page 302: ...isplay VFD screen The unit is not responding to any front panel button presses Front panel is locked To unlock the front panel press and hold the SEL and ESC buttons simultaneously for 3 seconds When...

Page 303: ...D Warranty D WARRANTY About this annex This chapter gives an overview of Warranty and conditions of RMA concerning the E2 R5905948 E2 12 12 2014 299...

Page 304: ...egligence special modifications lightning strikes abuse drop crush and or other unusual damages The customer shall pay shipping charges when unit is returned for repair Barco will cover shipping charg...

Page 305: ...guration 83 Device area 77 System diagram area 79 System modifier area 81 Configuration Menu Example 1 Double Screen Configuration 194 Control overview 21 Controls 75 Create new system 79 D Device are...

Page 306: ...layout presentation 73 Settings Menu 142 144 145 149 150 152 154 156 WebKit area 144 WebKit area Contact us 155 WebKit area Dashboard 145 WebKit area Follow us 156 WebKit area Help 154 WebKit area To...

Page 307: ...Setting Menu Dashboard 145 WebKit area Setting Menu Follow us 156 WebKit area Setting Menu Help 154 WebKit area Setting Menu Tools Backup Restore 152 WebKit area Setting Menu Tools Manage Software 150...

Reviews: