background image

51

R5914477 /00

XDM

4.4 Connecting a UPS with the projector
electronics

WARNING:

Only use UPS units which are suitable for the XDM series projector. See chapter

Installation requirements

, for more information about the requirements of the UPS.

CAUTION:

The electrical connection with the UPS INLET socket of the projector must be done with

a certified AC power supply cord (minimum 1.50 mm² or 14 AWG and minimum 300V)

The projector is configured by default for use without UPS.

Required tools

Torx screwdriver T20

Flat screwdriver

Open-end wrench 24 mm

Nut driver 10 mm

Torque wrench with 10 mm hexagon socket

Required parts

Certified AC power supply cord 1.5 mm², 14 AWG, min 300 V

How to connect a UPS unit with the projector electronics?

1.

Make sure the net input cover has been removed. For more info, see

Accessing the power connections

,

page 46

.

2.

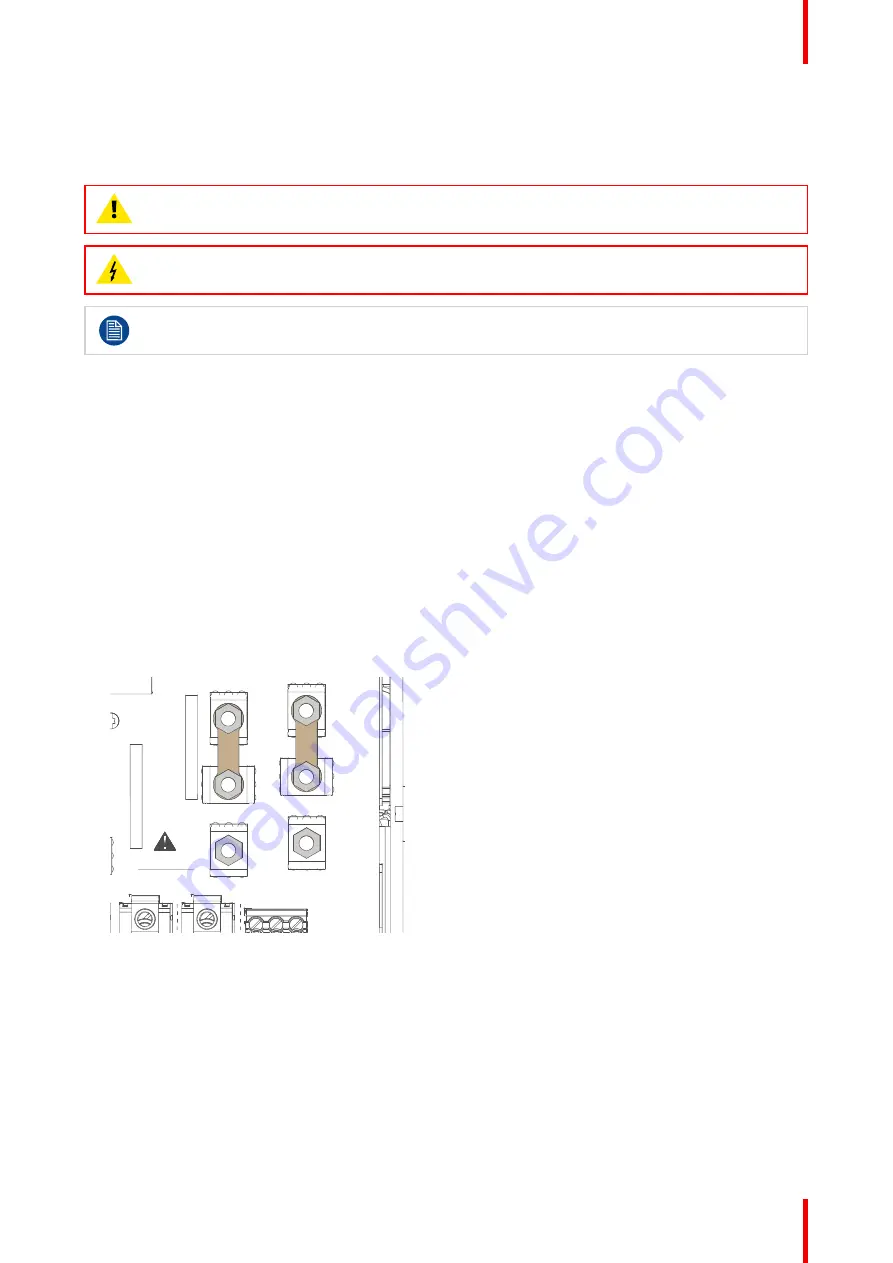
Loosen the top nuts on the six UPS configuration pins. Use a 10 mm nut driver.

Image 4

8

3.

Replace the links as illustrated.

Installation procedures

Summary of Contents for XDM

Page 1: ...ENABLING BRIGHT OUTCOMES Installation manual XDM ...

Page 2: ...Registered office Barco NV President Kennedypark 35 8500 Kortrijk Belgium www barco com en support www barco com Barco NV Beneluxpark 21 8500 Kortrijk Belgium www barco com en support www barco com ...

Page 3: ... to deliver secure solutions and services to our customers while protecting Barco s intellectual property When product security concerns are received the product security incident response process will be triggered immediately To address specific security concerns or to report security issues with Barco products please inform us via contact details mentioned on https www barco com psirt To protect...

Page 4: ......

Page 5: ... the projector 30 3 3 Initial inspection 35 3 4 Projector configurations 36 3 5 Available lenses 39 3 6 Lens selection 43 4 Installation procedures 45 4 1 Accessing the power connections 46 4 2 Power input configuration of the projector 47 4 3 Connecting the projector with the power net 49 4 4 Connecting a UPS with the projector electronics 51 4 5 Installation of a lens on a C Lens Holder 53 4 6 R...

Page 6: ...moval of the front cover 82 6 2 Removal of the rear cover 83 6 3 Removal of the operator side cover 84 6 4 Mounting the operator side cover 85 6 5 Mounting the rear cover 87 6 6 Mounting the front cover 89 A Dimensions 91 A 1 Dimensions of the projector 92 A 2 Dimensions of the projector when equipped with exhaust adapter 93 A 3 Position of the optical adapter for the B lens holder 94 Glossary 97 ...

Page 7: ...and follow all safety guidelines safety instructions and warnings mentioned in this chapter before installing and using the XDM projector After this chapter additional warnings and cautions are given depending on the procedure Read and follow these warnings and cautions as well Clarification of the term XDM used in this document When referring in this document to the terms XDM XDM 4K25B or XDM 4K2...

Page 8: ...energy of the light source which is equivalent with lamp based systems Thermal retinal eye injury is possible when exposed within the Hazard Distance HD The HD is defined from the projection lens surface towards the position of the projected beam where the irradiance equals the maximum permissible exposure as described in the chapter Hazard Distance WARNING No direct exposure to the beam within th...

Page 9: ...ask described in the User Installation manual All other maintenance tasks and service tasks must be performed by qualified SERVICE PERSONNEL The DLP Cinema Systems are intended FOR PROFESSIONAL USE ONLY by AUTHORIZED PERSONNEL familiar with potential hazards associated with high voltage high intensity light beams generated by lasers Only qualified SERVICE PERSONNEL and TRAINED PROJECTIONISTS knowl...

Page 10: ...let cord shall be not less than 1 5 mm 14 AWG and has a rating of minimum 300V In case of using a circuit breaker of a current rating less than 40A the cross sectional area of the conductors in the power supply cord must comply with the local electrical code regulations where the projector is installed The cable gland of the power supply cord has a clamping range between 11 mm and 21 mm cable diam...

Page 11: ...tor s covers Do not place this equipment on an unstable cart stand or table The product may fall causing serious damage to it and possible injury to the user Lenses shields or screens shall be changed if they have become visibly damaged to such an extent that their effectiveness is impaired For example by cracks or deep scratches The associated Safety responsible of the unit must evaluate the setu...

Page 12: ... provided Ensure that nothing can be spilled on or dropped inside the projector If this does happen switch off and remove all power from the projector Do not operate the projector again until it has been checked by qualified service personnel Do not block the projector cooling fans or free air movement around the projector Proper operation of the projector can only be guaranteed in table mounting ...

Page 13: ...perating condition Safety Data Sheets for Hazardous Chemicals For safe handling information on chemical products consult the Safety Data Sheet SDS SDSs are available upon request via safetydatasheets barco com On the reinforcement frame The XDM reinforcement frame is exclusively designed for the XDM projectors and can thus not be used on other equipment The reinforcement frame is single use While ...

Page 14: ...N 62471 5 2015 CLASS 1 IEC EN 60825 1 2014 HAZARD DISTANCE CONSULT SAFETY MANUAL RG3 IEC EN 62471 5 2015 CLASS 1 IEC EN 60825 1 2014 RG3 IEC EN 62471 5 2015 CLASS 1 IEC EN 60825 1 2014 WARNING DO NOT LOOK INTO THE BEAM NO DIRECT EYE EXPOSURE TO THE BEAM IS PERMITTED RG3 IEC EN 62471 5 2015 CLASS 1 IEC EN 60825 1 2014 HAZARD DISTANCE CONSULT SAFETY MANUAL Important safety instructions page 10 THIS ...

Page 15: ...ENT À LA TERRE INDISPENSABLE AVANT LE RACCORDEMENT AU RÉSEAU VOIR LA NOTICE D INSTALLATION AVANT DE RACCORDER AU RÉSEAU 在取下此外殼前 斷開投影機主電源端的電源並 從UPS電源插座上拔下電源線 額定功率參閱產 品標籤 警告 大漏電流 在接通電源之前必須 先接地 在連接電源前請查看安裝說明書 在取下此外壳前 断开投影机主电源端的电源并 从UPS电源插座上拔下电源线 额定功率参阅产 品标签 警告 大漏电流 在接通电源之前必须 先接地 在连接电源前请查看安装说明书 Printed on Mains cover CAUTION DOUBLE POLE NEUTRAL FUSING HIGH RESIDUAL VOLTAGE WARNING RISK OF ELECTRIC SHO...

Page 16: ...ese values are minimum values and are based on the guidance provided in IEC 62471 5 2015 section 6 6 3 5 The installer and user must understand the risk and apply protective measures based upon the hazard distance as indicated on the label and in the user information Installation method separation height barriers detection system or other applicable control measure shall prevent hazardous eye acce...

Page 17: ...eters above the floor Horizontal clearance to the hazard distance zone shall be not less than 2 5 meters Any human access horizontally to the Hazard Zone if applicable shall be restricted by barriers If human access is possible in an unsupervised environment the horizontal or vertical clearances shall be increased to prevent exposure to the hazard distance zone The LIP shall be installed by Barco ...

Page 18: ...r intrabeam exposure HDreflection the distance that has to be kept restrictive related to the reflected light from the rear projection screen HDdiffuse the relevant distance to be considered while observing the diffuse surface of the rear projection screen As described in High Brightness precautions Hazard Distance page 16 it is mandatory to create a restricted zone within the beam areas closer th...

Page 19: ...difying optics Hazard distance 0 1 2 3 4 5 6 7 8 9 10 11 12 13 0 5 1 1 5 2 2 5 3 3 5 4 4 5 5 5 5 6 6 5 7 7 5 8 8 5 9 9 5 10 10 5 11 11 5 12 Hazard Distance HD m Throw Ra o TR XDM 4K25B XDM 4K25C Image 1 4 HD Hazard Distance TR Throw Ratio Safety ...

Page 20: ...7 00 XDM 20 1 7 Compliance UK Compliance UK This product is fit for use in the UK Authorised Representative Barco UK Ltd Ad dress Building 329 Doncastle Road Bracknell RG12 8PE Berkshire United Kingdom Safety ...

Page 21: ...21 R5914477 00 XDM 2 1 Convention projector orientation 22 2 2 Air flow of the projector 23 2 3 Web Communicator 24 2 4 Exhaust adapter Optional 25 System overview 2 ...

Page 22: ... the side at your left hand when standing behind the projector and looking at the projection screen in front of the projector B L R F T Image 2 1 T Top of the projector L Left side of the projector Light source side F Front of the projector R Right side of the projector User input side B Back side of the projector System overview ...

Page 23: ... projector Take into account the location of the air inlets and outlets when determining a suitable location to install the projector Make sure that when installed the hot air coming from the air outlets is not automatically sucked back in via the air inlets 1 2 4 3 Image 2 2 1 Air inlet front of the projector 2 Air inlet bottom side of the projector at the user input side 3 Air inlets back of the...

Page 24: ...rojector without any additional software installation It is accessible via a web browser and is fully supported on iOS and Android devices While all web browsers are supported the recommended browser is Chrome Image 2 3 Example of the Web Communicator tool Quick and Easy configuration Clearly indicated tab pages allow the control of Projector connection configuration test color calibration and con...

Page 25: ...top of the top cover of the projector This exhaust adapter allows the customer to fix an air extraction system to the projector in order to extract hot air coming from the air outlet of the projector Image 2 4 Projector with exhaust adapter mounted For all ordering information about options and accessories see Barco website System overview ...

Page 26: ...R5914477 00 XDM 26 System overview ...

Page 27: ...owed ambient temperature humidity conditions required safety area around the installed projector required power net etc Furthermore careful consideration of things such as image size ambient light level projector placement and type of screen to use are critical to the optimum use of the projection system Barco provides a guarantee relating to perfect manufacturing as part of the legally stipulated...

Page 28: ...ed in order to avoid build up of heat It is necessary to vent hot exhaust air from the projector to the outside of the building The minimum flow rate of the air extraction system depends on the ambient temperature Projector Minimum airflow at 25 C 77 F Minimum airflow at 35 C 95 F XDM 4K25B XDM 4K25C 400 CFM 650 CFM When two or more projectors are installed close to each other ensure that the proj...

Page 29: ... be operated without an adequate cabinet ground connection The AC supply must be installed by a qualified electrician in conformance to local codes Hardware wire sizes and conduit types must comply with local codes A readily accessible disconnect device shall be incorporated externally to the equipment for removal of the power to the equipment mains terminals The building installation must be prov...

Page 30: ... Neglecting this may result in a failure in the start up of the Light Processor Unit There is a difference in the unpacking procedure between projector variants depending on the lens holder This to take into account the larger B Lens holder and optical adapter delivered in an extra box The mentioned tools are only required for the projector with B Lens holder Required tools Side cutter Knife How t...

Page 31: ...als 6 Remove the outer cardboard box 7 Remove the four foam corner pieces reference 1 1 Image 3 3 Removing the outer cardbox and the four foam corner pieces 8 Remove the top cardboard plate and the cardboard surrounding the projector by lifting them up Installation preparations ...

Page 32: ... if you ever have to ship your projector For maximum protection repack your projector as it was originally packed at the factory The projector is delivered with a plastic cover inside the Lens Holder This to prevent intrusion of dust and foreign particles The projector is not delivered with a lens by default If you also ordered a lens it will be delivered in a separate box For lens installation se...

Page 33: ...move the outer cardboard box Image 3 7 Removing the cardboard box 6 Remove the cardboard on the front side of the projector Use a knife to remove any tape holding the cardboard and other foam pieces together 7 Remove the box with the optical adapter from the cardboard protector reference 1 Image 3 8 Use a side cutter to cut the cable tie holding the box onto the cardboard Installation preparations...

Page 34: ...ft the projector L R Image 3 9 Lifting up the projector Save the original shipping carton and packing material they will be necessary if you ever have to ship your projector For maximum protection repack your projector as it was originally packed at the factory The projector is delivered with a plastic cover inside the Lens Holder This to prevent intrusion of dust and foreign particles The project...

Page 35: ...s soon as possible Projector Box content After unpacking the projector it is recommended to check if all following items where included A note with QR codes to inform the user that the installation manual this manual is available online on the Barco website Worldwide safety manual Mechanical check This check should confirm that there are no broken knobs or connectors that the cabinet and panel sur...

Page 36: ...may have to be flipped horizontally and or vertically The projected image can be adapted via the menu Configuration Projector Image orientation Front projection The projector is installed either on a table or hanging from a truss beam at the same side of the audience SC TH Image 3 10 Examples of Front projection TH Theater Audience area SC Screen Rear projection The projector is installed either i...

Page 37: ... the projector can be positioned in On Axis or Off Axis configuration On Axis configuration means that the projector is positioned so as to have the centre of the lens coinciding with the centre of the screen Off Axis projection is obtained by shifting the lens up down left or right Several parameters can be calculated determining the position in any installation Formula to calculate the distance ...

Page 38: ...ilt and rotation limits 90 90 90 MAX MAX MAX M A X 45 A A B B Image 3 14 Left Projector rotation limits Right Projector tilt limits A Allowed tilt rotation range B Not allowed tilt rotation range While combinations of projector tilt and projector rotation can be used as a general rule of thumb make sure the top cover does not point downward Installation preparations ...

Page 39: ...nses Consult the lens selection list to see which non active lenses are also supported Which lenses are available for the XDM 4K25C Order No Type Image Throw range on XDM 4K25C R9801661 TLD lens Ultra Short Throw 90 0 38 1 R9862001 TLD lens Ultra Short Throw 90 0 64 0 82 1 R9801414 TLD lens High Brightness 0 80 1 16 1 R9862005 TLD lens High Brightness 1 09 1 40 1 R98559572 DC2K lens High Brightnes...

Page 40: ...lens High Brightness 1 60 2 50 1 R9862020 TLD lens High Brightness 1 75 2 40 1 R9855934 DC2K lens High Brightness 1 95 3 20 1 R9862030 TLD lens High Brightness 2 40 3 91 1 R9855936 DC2K lens High Brightness 2 40 3 90 1 R9862040 TLD lens High Brightness 3 91 6 52 1 R9829997 TLD lens High Brightness 6 50 9 66 1 Installation preparations ...

Page 41: ...row 90 0 53 1 R9852945 XLD lens High Brightness 1 02 1 R9852950 XLD lens High Brightness 1 27 1 R98529502 XLD lens High Contrast 1 27 1 R9856506 XLD lens High Brightness 1 59 2 42 1 R98565062 XLD lens High Contrast 1 59 2 42 1 R9856527 XLD lens High Brightness 2 06 2 96 1 R98565272 XLD lens High Contrast 2 06 2 96 1 Installation preparations ...

Page 42: ...4K25B R9856529 XLD lens High Brightness 2 82 4 72 1 R98565292 XLD lens High Contrast 2 82 4 72 1 R9855947 XLD lens High Brightness 3 56 7 01 1 R98559472 XLD lens High Contrast 3 56 7 01 1 R9852920 XLD lens High Brightness 6 97 10 77 1 Installation preparations ...

Page 43: ...ite https lenscalculator barco com to determine the possible lenses for your configuration The Lens Calculator window opens Image 3 15 Lens calculator The Lens Calculator can also be used to determine the position of the projector when the lens type and screen width is known Due to lens tolerances the results of calculated values may be different from measured values These difference may vary 5 In...

Page 44: ...R5914477 00 XDM 44 Installation preparations ...

Page 45: ...r with the power net 49 4 4 Connecting a UPS with the projector electronics 51 4 5 Installation of a lens on a C Lens Holder 53 4 6 Removal of a lens on a C Lens holder 55 4 7 Installation of a lens on a B Lens holder 57 4 8 Removal of a lens from a B lens holder 62 4 9 Suspending the projector from a truss 64 Installation procedures 4 ...

Page 46: ...from the power net Required tools Torx screwdriver T20 How to access 1 Remove the front back and operator side cover of the projector 2 Slightly loosen the two screws on the bottom of the net input cover reference 1 Image 4 1 Use a T20 Torx screwdriver 3 Lift the net input cover up and away from the projector 1 Image 4 1 Removal of the net input cover Installation procedures ...

Page 47: ...supply of 200 240 V In this configuration 200 240 V is measured between L1 and the neutral N or L2 Before operating the projector place the links in the correct position depending on the local power supply W2 U1 U2 V1 V2 W1 Δ MONO W2 U1 U2 V1 V2 W1 W2 U1 U2 V1 V2 W1 Y Image 4 2 From left to right Y configuration Δ configuration and mono phase configuration Required tools Nut driver 10 mm Torque wr...

Page 48: ...W2 and U1 A and B W2 U1 U2 V1 V2 W1 A B C D Image 4 5 Δ configuration 3 Mono phase configuration Spread the four links over the six pins as illustrated Make sure both the upper and lower pins are connected with each other W2 U1 U2 V1 V2 W1 A C B D Image 4 6 Mono phase configuration 4 Turn a nut on each pin and secure with a torque wrench set to 3 5 Nm Installation procedures ...

Page 49: ...driver Open end wrench 30 mm Torx screwdriver T20 Required parts Certified AC power supply cord 4 mm 10 AWG min 300 V in case of mono phase or Δ configuration Certified AC power supply cord 4 mm 10 AWG min 500 V in case of Y configuration How to connect the main AC power with the projector 1 Make sure the net input cover has been removed For more info see Accessing the power connections page 46 2 ...

Page 50: ... pulling on each wire 4 Secure the AC power cord by fastening the cable gland reference 3 Use a 30 mm open end wrench 5 Place the net input cover back and seal it Tighten the two screws reference 1 using a T20 Torx screwdriver Installation procedures ...

Page 51: ...G and minimum 300V The projector is configured by default for use without UPS Required tools Torx screwdriver T20 Flat screwdriver Open end wrench 24 mm Nut driver 10 mm Torque wrench with 10 mm hexagon socket Required parts Certified AC power supply cord 1 5 mm 14 AWG min 300 V How to connect a UPS unit with the projector electronics 1 Make sure the net input cover has been removed For more info ...

Page 52: ...of 1 7Nm 1 25 lbf ft Warning Always connect the PE wire reference 4 first then the other wires 3 2 4 6 5 Image 4 10 2 UPS Power cord 3 Cable gland 4 PE wire 5 Other power wires 6 3 terminal strip Tip Check for good fixation by pulling on each wire 5 Secure the AC power cord by fastening the cable gland reference 3 Use a 24 mm open end wrench 6 Place the net input cover back and seal it Tighten the...

Page 53: ...he lens lock handle reference 1 Image 4 11 outward and then towards the lens power supply socket reference 2 as illustrated 1 2 Image 4 11 Lens installation preparation 2 Remove the dust cover from the lens opening Image 4 12 Tip While not placed in the projector place the dust cover in a lockable plastic bag to prevent dust from gathering on the cover 3 Take the lens assembly out of its packing m...

Page 54: ...s may fall out of the lens holder 6 Secure the lens in the lens holder by sliding the primary lens lock handle into the locked position to the top of the projector Ensure the lens touches the front plate of the lens holder Image 4 14 Lock lens 7 Check if the lens is really secured by trying to pull the lens out of the lens holder Installation procedures ...

Page 55: ...er by sliding the lock handle outwards and then towards the unlocked position as illustrated Image 4 15 Image 4 15 Unlock the lens 2 Gently pull the lens out of the lens holder Image 4 16 Lens removal It s recommended to place the lens caps of the original lens packaging back on both sides of the removed lens to protect the optics of the lens Installation procedures ...

Page 56: ...R5914477 00 XDM 56 It s recommended to place the dust cover of the original projector packaging back into the lens opening to prevent intrusion of dust Image 4 17 Installation procedures ...

Page 57: ...is held in place by tightening the screw of the clamping ring CAUTION Make sure you have removed the lens cap from the lens before mounting the optical adapter Required tools Torque wrench with hex bits Required parts Optical adapter for B Lens holder Ring 1 or 2 for the optical adapter depending on the used lens 3 M3 Screw inserts in case ring 1 is used 3 M3x5 hex screw in case ring 1 is used 3 M...

Page 58: ...Image 4 19 Two examples of mounting the optical adapter One with lens ring 1 left or lens ring 2 on the end position right 4 Mount the correct screw inserts in the appropriate openings of the optical adapter reference 1 Image 4 19 Tip Use the M3 screw inserts with ring 1 use the M4 screw inserts with ring 2 Installation procedures ...

Page 59: ...ve the adapter this way the adapter is mounted correctly However if you can remove the adapter this way retry this procedure Note Use gentle force If you use brute force the adapter WILL come lose and be removed This is normal behavior Keep the packaging of the optical adapter aside If you remove the lens it is advised to keep the optical adapter in its original packaging to prevent it from gettin...

Page 60: ...sert the lens in such a way that the lens connector matches the socket reference 2 Image 4 23 Lens installation 5 Insert the lens until the connector seats into the socket Warning Do not release the lens yet as the lens may fall out of the lens holder 6 Secure the lens in the lens holder by sliding the primary lens lock handle into the locked position to the top of the projector Ensure the lens to...

Page 61: ...61 R5914477 00 XDM Image 4 24 Locking the lens 7 Check if the lens is really secured by trying to pull the lens out of the lens holder Installation procedures ...

Page 62: ...s illustrated Image 4 25 Image 4 25 Unlock the lens 2 Gently pull the lens out of the lens holder Image 4 26 Lens removal 3 Remove the lens adapter from the lens and place it back in its original packaging Use an Allen wrench 1 5 mm or 2 mm depending on lens ring used to loosen the screws on the adapter It s recommended to place the lens caps of the original lens packaging back on both sides of th...

Page 63: ...63 R5914477 00 XDM It is recommended to place the dust cover of the original projector packaging back into the lens opening to prevent intrusion of dust Image 4 27 Installation procedures ...

Page 64: ... requirements into account You can only use swivel coupler double clamps for truss beams The number of clamps required depends on the types of clamps used Always make sure you use at least four clamps two clamps at two opposed sides of the frame Image 4 28 Examples of swivel coupler double clamps Take into account the total weight of projector and frame suspended from the truss For the XDM the wor...

Page 65: ...after adjustment Image 4 31 Example of mounting to truss 4 Lock all four rigging clamps 5 Secure the reinforcement frame and truss installation using safety cables Warning Make sure the safety cables are mounted on the longest bars on the side of the frame that faces the truss beam the same bars as used for the clamps Warning Make sure all safety cables are applied according to local regulations a...

Page 66: ...R5914477 00 XDM 66 Installation procedures ...

Page 67: ...5 Software update 75 5 6 Authorization to clear a security warning on the projector 78 About this chapter This chapter contains the Switch ON and Switch OFF procedures for the XDM projector These procedures highlight all important points to be checked prior to switching the projector ON This is to ensure a safe startup of the projector Starting the projector for the first time 5 ...

Page 68: ...and active touch display is on if available Web Communicator is active and light is ON Full GREEN Going to ECO mode Turning electronics and light source OFF Blinking green 2 3 4 5 6 1 Image 5 1 1 Mains power off 2 OFF mode 3 ECO mode 4 READY mode 5 ON mode 6 Going to ECO mode Switching between power states You can change power state by using one of the following options Pressing the Power button o...

Page 69: ...he Power button and GPI 1 4 input on the Cinema Controller Power state diagram ON ON 1 sec 6sec Image on the screen START UP FORCE SHUTDOWN SHUTDOWN ECO ECO READY READY OFF OFF Image 5 3 Power State diagram Starting the projector for the first time ...

Page 70: ...s power 3 Ensure that the correct lens is installed for your application 4 Press the power button to switch the projector ON The projector will start up and the touch panel will start its initialization procedure 5 Wait until the Projector control menu is fully accessible on the touch display Tip While the menu may become accessible early on certain icons e g the Light button may be greyed out unt...

Page 71: ...d in you will be redirected to the Light dowser lens menu 7 In this menu press the Light button to activate the light source Use a press of 1 second The Light source will start warming up 8 Press the Dowser button to open the dowser How to switch on remotely using only GPI3 1 Ensure that the XDM projector is installed onto a stable platform 2 Ensure the projector is correctly connected to the main...

Page 72: ... On the touch display of the projector press either About or Settings to see the IP address assigned to the projector 2 Use a web browser to browse to the assigned IP address The login page of Web Communicator will be displayed 3 Log in onto Web Communicator Default passwords Web Communicator When logging in for the first time use one of the following default passwords User group User name project...

Page 73: ...witched OFF You can only power it using the power button How to put the projector in ECO mode using the touch display 1 In the main menu of the touch panel press on the ECO button Image 5 6 2 In the Eco menu press Switch to ECO mode Press for more than one second Image 5 7 Example of the ECO menu on the touch display How to put the projector in ECO mode using the Web Communicator 1 In the Communic...

Page 74: ...to turn the projector OFF 1 Press the power button for more than six seconds The projector will go to OFF mode or Send a signal via GPI3 for more than six second The projector will go to OFF mode Starting the projector for the first time ...

Page 75: ...se for a package to install An Open browse window is prompted Image 5 9 6 Select the file downloaded from the Barco website The selected file will be mentioned under Manual update Image 5 10 Example of an update package 7 Click Install and confirm The software update will start How to update the software via USB device 1 Download the latest firmware from the Barco website Click on myBarco and logi...

Page 76: ...age name from the USB device connected to the projector and confirm The software update will start Update progress The update will proceed as follows 1 The software package will be installed on the projector Image 5 12 Example of an update in progress 2 Once the software package has been installed the following message will be prompted and the projector will reboot Image 5 13 Example of the prompt...

Page 77: ...R5914477 00 XDM Image 5 14 Example of the components update page 5 Once every component has been updated you will be redirected to the Web Communicator login page Starting the projector for the first time ...

Page 78: ...uired tools Authorization pin code Web Communicator Authorization procedure to clear security warning 1 Ensure that all modules and boards are properly installed 2 Start up the projector READY or ON mode 3 Log onto the projector using Web Communicator 4 In the notifications menu both in Web Communicator or on the touch display spot the error that can be cleared and press Clear Image 5 15 A pop up ...

Page 79: ...00 XDM 1 Image 5 17 Location of the key button Each attempt to clear the security warning and its result both successfully and unsuccessfully is logged inside the projector Starting the projector for the first time ...

Page 80: ...R5914477 00 XDM 80 Starting the projector for the first time ...

Page 81: ...dures about cover removing or installing are grouped together in this chapter The maintenance and servicing procedures also refer to this chapter if required The procedures in this chapter describe with detailed step by step actions and illustrations how to remove or install the projector covers Note that the covers may only be removed by qualified service personnel WARNING All procedures describe...

Page 82: ... projector Use a 4 mm Allen wrench to remove the hex screw locking the bracket reference 1 1 Image 6 1 2 Rotate and move the bracket to a position it won t hinder you while removing the front cover 3 Slide the front cover to the side of the Input Communication Unit towards the frame bar reference 2 and remove it reference 3 Note The handles do not click open They are fixed into the cover 2 3 Image...

Page 83: ...ctor Use a 4 mm Allen wrench to remove the hex screw locking the bracket reference 1 1 Image 6 3 2 Rotate and move the bracket to a position it won t hinder you while removing the rear cover 3 Slide the rear cover towards the bar of the frame reference 2 as much as possible Note The handles do not click open They are fixed into the cover 2 3 Image 6 4 Sliding the front cover towards the frame bar ...

Page 84: ...or 2 Release the two screws at the top of the side cover reference 1 Use a T20 Torx screwdriver 1 Image 6 5 Location of the set screws 3 Slightly turn over the top side of the cover reference 2 4 Lift up the operator side cover and remove it either through the front or the back of the frame reference 3 2 3 Image 6 6 Removing the side cover Projector covers ...

Page 85: ...ewdriver T20 How to mount 1 Slide the side cover towards the projector either from the front or the rear part of the frame reference 1 Image 6 7 1 1 2 Image 6 7 Mounting the side cover 2 Carefully place the side cover onto the three cover hooks located on the bottom frame of the projector Tip Place the cover in a slightly tilted angle so you can clearly see the hooks while mounting the cover Image...

Page 86: ...upper side of the cover towards the projector to close it reference 2 Image 6 7 4 Fasten the side cover with the two top screws reference 1 Image 6 9 Use a T20 Torx screwdriver 1 Image 6 9 Location of the set screws Projector covers ...

Page 87: ...ace the topside of the cover near the cover hooks on the top of the rear frame reference 2 3 Slide the clips in the rear cover over the cover hooks 2 1 Image 6 10 Sliding in the rear cover 4 Move the locking bracket reference 3 to the position of the holes in the frame bar reference 4 3 4 Image 6 11 Positioning the safety bracket 5 Lock the safety bracket in its place Use a 4 mm Allen wrench to dr...

Page 88: ...R5914477 00 XDM 88 5 Image 6 12 Locking the safety bracket Projector covers ...

Page 89: ... 2 Slide the clips in the front cover over the smaller cover hooks in the top of the frame reference 2 3 4 1 2 Image 6 13 Sliding in the front cover 3 Move the locking bracket reference 3 to the position of the holes in the frame bar reference 4 4 Lock the safety bracket in place Use a 4 mm Allen wrench to drive in the two screws 5 Image 6 14 Locking the safety bracket Projector covers ...

Page 90: ...R5914477 00 XDM 90 Projector covers ...

Page 91: ...91 R5914477 00 XDM A 1 Dimensions of the projector 92 A 2 Dimensions of the projector when equipped with exhaust adapter 93 A 3 Position of the optical adapter for the B lens holder 94 Dimensions A ...

Page 92: ...2 66 710 145 CENTER OF GRAVITY 49 3x 530 AIR INLET 345 499 779 5 MAX 225 5 AIR INLET Image A 1 All dimension given in mm Dimensions of the projector with B Lens holder AIR OUTLET 640 1070 1132 55 960 90 710 348 31 48 499 345 AIR INLET 530 CENTER OF GRAVITY AIR INLET 779 5 MAX 400 3 270 322 66 547 145 14 710 CENTER OF GRAVITY AIR INLET Image A 2 All dimensions given in mm Dimensions ...

Page 93: ...93 R5914477 00 XDM A 2 Dimensions of the projector when equipped with exhaust adapter Dimensions 129 159 200 244 121 18 18 452 Image A 3 Dimensions ...

Page 94: ...ring compatibility Lens nr Type Throw range on XDM Adapter ring Position Screws used R9802580 XLD lens Ultra Short Throw 90 0 53 1 Ring 2 TBC M4x10 3x R9852945 XLD lens High Brightness 1 02 1 Ring 2 End position M4x10 3x R98529502 XLD lens High Contrast 1 27 1 Ring 2 Front position M4x10 3x R9856506 DC4K lens High Brightness 1 59 2 42 1 Ring 2 End position M4x10 3x R98565062 DC4K lens High Contras...

Page 95: ...95 R5914477 00 XDM 1 2 3 4 5 Image A 4 Optical adapter with adapter rings 1 Adapter ring 1 2 Adapter ring 2 3 Optical adapter 4 Front position to mount ring 2 5 End position to mount ring 2 Dimensions ...

Page 96: ...R5914477 00 XDM 96 Dimensions ...

Page 97: ...ojection lens at which the intensity or the energy per surface unit becomes lower than the applicable exposure limit on the cornea or on the skin The light beam is considered to be unsafe for exposure if the distance from a person to the light source is less than the HD Glossary ...

Page 98: ...R5914477 00 XDM 98 Glossary ...

Page 99: ... holder 92 C Lens holder 92 exhaust adapter 93 E Enclosed projection 18 Exhaust adapter 25 F Front cover Mounting 89 Removal 82 G General considerations 8 H Hazard Distance 16 18 Modifying optics 19 Hazardous Chemicals 13 High Brightness precautions 16 I Important safety instructions 10 Initial inspection 35 Install Lens 53 57 Installation Power connection access 46 Power input configuration 47 Pr...

Page 100: ...nstallation 81 Removal 81 R Rear cover Mounting 87 Remove 83 Rear projection 18 Removal Front cover 82 Projector covers 81 Requirements Cooling 28 Environmental conditions 28 Power 28 UPS 29 Use in high altitude 28 Rotation range 38 S Safety 7 Battery explosion 12 Electrical shock 10 Fire hazard 11 Hazard Distance 16 18 Hazardous Chemicals 13 Personal injury 11 Projector damage 12 reinforcement fr...

Page 101: ...5 mm Allen wrench 2 mm Allen wrench 4 mm Authorization pin code Flat screwdriver Knife Nut driver 10 mm Open end wrench 24 mm Open end wrench 30 mm Side cutter Torque wrench with 10 mm hexagon socket Torque wrench with hex bits Torx screwdriver T20 Web Communicator ...

Page 102: ...R5914477 00 XDM 102 List of tools ...

Page 103: ......

Page 104: ...www barco com R5914477 00 2021 10 26 ...

Reviews: