

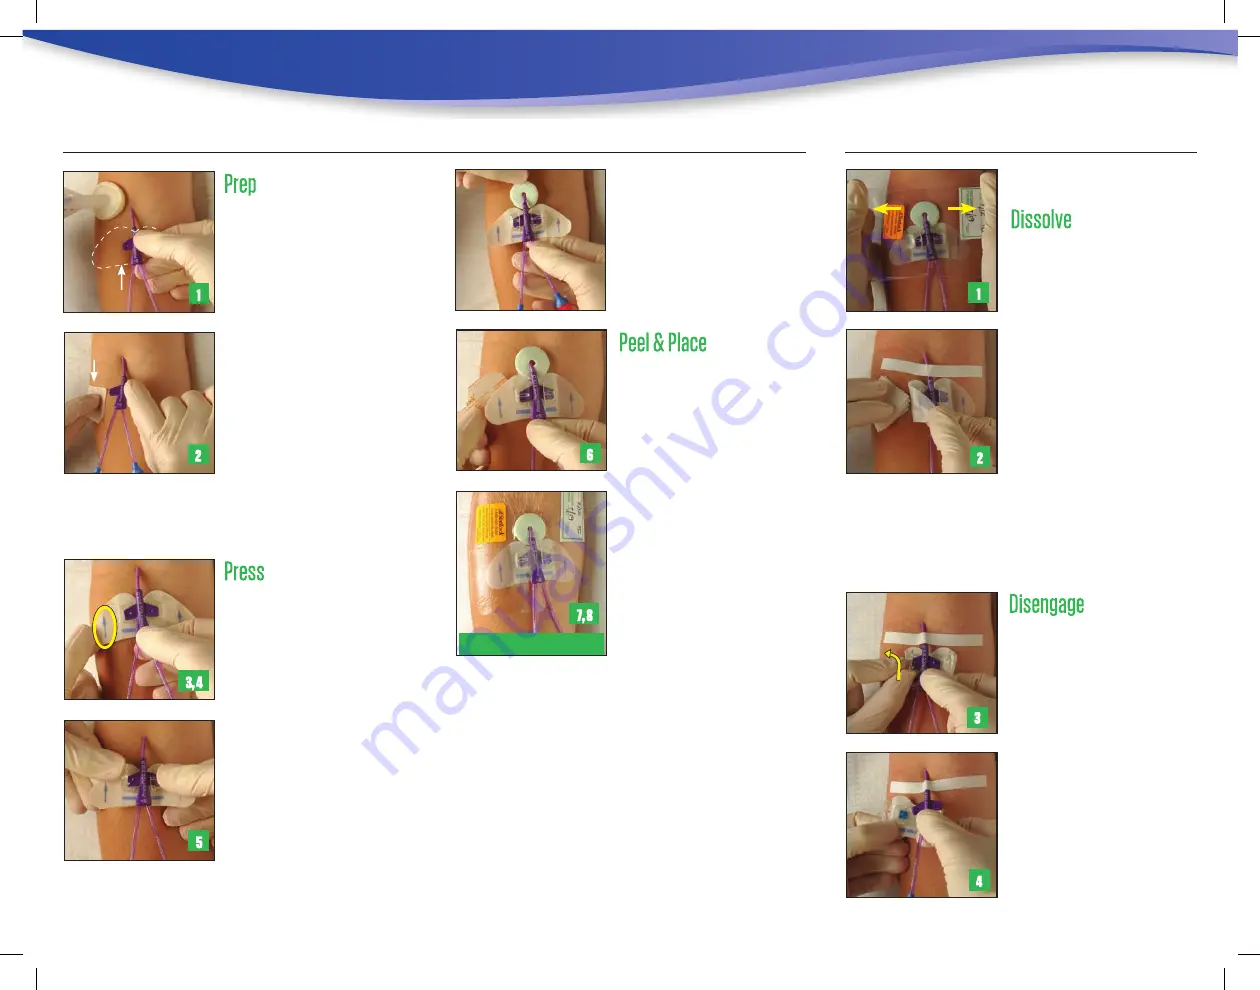
1. Cleanse around catheter insertion and
outlined stabilization site with chlorhexidine
solution, alcohol or as recommended by
your healthcare provider. Extend to both
sides to an area larger than where the
anchor pad will be placed.
Allow to dry
completely.
2. Apply provided skin protectant to
stabilization site. Extend to both sides to
an area larger than where the anchor pad
will be placed.
Allow to dry completely
(10–15 seconds)
until the site is smooth
to the touch. Skin protectant helps to further
enhance the adherence and holding power
of the anchor pad to your skin.
Securement
Site
Stabilization
Site
Skin
Protectant
Skin
Protectant
Application Technique
Catheter Stabilization
3. Align the
S
tat
L
ock
®
device anchor pad
so blue directional arrows point toward
catheter insertion site.
4. Sliding Posts (if the posts on the
S
tat
L
ock
®
device retainer slide back and forth) Place
catheter wing hole over first post, then slide
stabilization device to capture second post.
Fixed Posts (if the posts on the
S
tat
L
ock
®
device retainer do not slide back and forth
or do not move from side to side) Place
catheter wing holes over fixed posts.
5. Support undersurface of anchor pad and
catheter while closing retainer doors. This
prevents from pushing down on skin.
6. Hold the
S
tat
L
ock
®
device securely as you
peel away paper backing from anchor pad,
one side at a time, then place on skin.
7. Apply transparent dressing as instructed by
your healthcare provider.
8. Apply both provided dressing change labels.
Removal Technique
The
S
tat
L
ock
®
PICC Plus Stabilization Device should
be monitored daily and changed if the pad is lifting
(at least every 7 days).
3. Stabilize catheter while holding the
S
tat
L
ock
®
device. Use thumb of opposite hand to gently
lift retainer door from behind while pressing
down with index finger as shown. Reposition
hands and repeat process to open second
retainer door.
Note: It is best to grasp the plastic doors from
the bottom edge. Carefully remove PICC from
retainer.
4. Temporarily secure line by holding catheter
with sterile gloved finger or
sterile adhesive foam strip per healthcare
provider’s recommendations.
OR
Discontinue line IF recommended by
healthcare provider.
Reapply another
S
tat
L
ock
®
PICC
Plus Stabilization Device.
1. Apply alcohol on top of the plastic doors and
edges/corners of the transparent dressing.
Remove transparent dressing using “stretch
technique.” With one edge on each side
loosened, stretch in each direction by pulling
the dressing horizontally across catheter to
remove. Always start at the distal edge of
dressing and work toward catheter to limit
movement.
2. Lift edge of anchor pad by stacking 3–4
alcohol pads together, squeezing alcohol
onto skin and the undersurface of anchor
pad. Then continue to stroke undersurface of
pad with alcohol to dissolve anchor pad away
from skin. Be sure to work underneath the
pad and again squeeze the alcohol for easy
removal. Pad should lift from skin.
Fold adhesive anchor pad under itself and
repeat on opposite side.
If used, place chlorhexidine disc per
manufacturer’s instructions for use, if
indicated.
Note: It is acceptable practice to
first “DISENGAGE” then “DISSOLVE”
following the steps below.
Do not pull or force pad
to remove.
Note: Use sterile adhesive foam strip to
temporarily stabilize “non-silicone”
catheters. Remove to cleanse site.
40426_Bard.indd 2
10/19/10 1:03 PM


