background image

Manual

2100-483E

Page

51 of 59

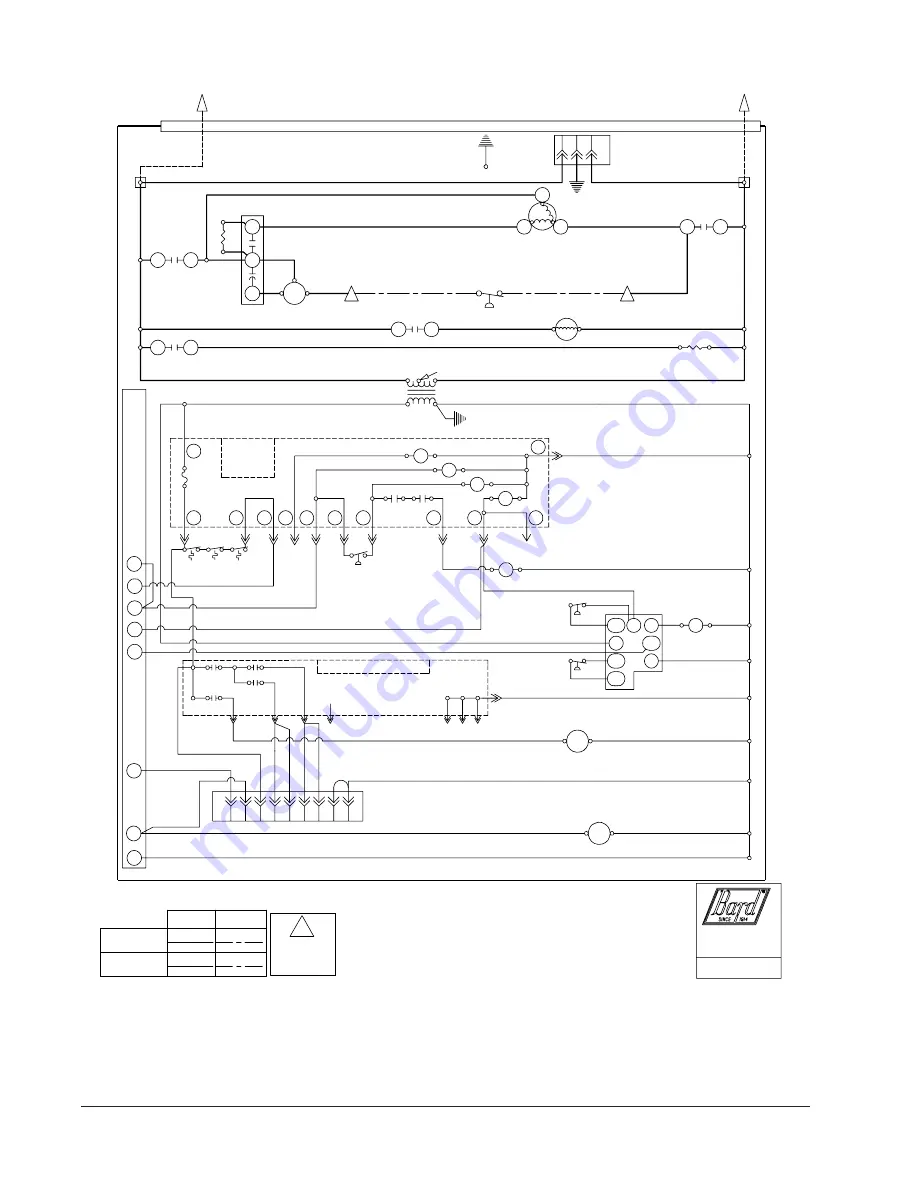
WG3S1-A, WG4S1-A, WG5S1-A     208/230/60/1

if Option Not

A

Wires Connect

Used

Bard Mfg. Co.

Bryan, Ohio

4085-143 A

Indoor Blower Motor

14 12 10

6

2 13

3

1

16 Pin Plug for

15

W1

C

HEAT UNUSED

G

High Voltage

Optional

Low Voltage

Factory

   CONTROL

INDUCED DRAFT

BLOWER RELAY

Y2

Contactor

Compressor

L2

T2

C

S

A

Compressor

Power Source

R

Crankcase

Line 2

230/208-60-1

for Indoor 

Block

4

3

5

Ground

Ladder Diagram

Blower Motor

Terminal

A

Dual Can 

Motor

H

F

C

T1

L1

Line 1

Low Vol

tage Term

. Bl

ock

C

Capacitor

Outdoor Fan

NC

Compressor

Contactor Aux.

Compressor

Block

Contactor

Terminal

BLOWER MOTOR

2

Start Kit

INDUCED DRAFT

4

INDUCED DRAFT

CONTROL (OPT.)

R

CONTROL MODULE

  COMPRESSOR 

CONTACTOR

COMPRESSOR

LOW PRESSURE

   CONTROL

LPC

LPC

C

ALR

Y

HPC

CC

Y1

2

R

FURNACE CONTROL BOARD

K3

K4
K4

K2

COOL

D1

BLOWER RELAY

LOW AMBIENT

Heater

HIGH PRESSURE

208

24VAC

240

COM

Transformer

Use for 208V Operation

 BOARD

CONTROL

FURNACE

VALVE

 GAS

1

 SWITCH

PRESSURE

K1

K1

K4

K1

K2

K3

12

11

3

6

8

10

7

9

5

4

2

LIMIT

SEC.

ROLLOUT

 FLAME 

LIMIT

PRIM.

W2

L1

 5 Pin Plug

HIGH SPEED 

SOLENOID

L2 L2 L2

Summary of Contents for WG3S1-A

Page 1: ...506 Since 1914 Moving ahead just as planned Copyright 2007 WARNING READ ALL INSTRUCTIONS CAREFULLY BEFORE BEGINNING THE INSTALLATION THE INSTALLATION MUST COMPLY WITH THESE INSTRUCTIONS AND THE REQUIREMENTS OF ALL GOVERNING CODES AND ORDINANCES FOR THE INSTALLATION LOCATION IT IS THE RESPONSIBILITY OF INSTALLER TO KNOW AND UNDERSTAND ALL OF THESE REQUIREMENTS FAILURE TO DO SO COULD CREATE A HAZARD...

Page 2: ...Orifice Sizing High Altitude Derate 29 22 Conversion of Gas Input BTUH From High to Low Rating 31 23 Measuring Air Temperature Rise 31 24 Filters 32 25 Compressor Control Module 32 33 26 Lighting Shutdown Instructions 34 27 Service Agency Procedures 35 28 Maintaining Unit in Good Working Order 35 36 29 Replacement Parts 36 30 Sequence of Operation Heating 37 31 Sequence of Operation Cooling 37 32 ...

Page 3: ...per Service Door 29 Figure 14 Lighting Shutdown Instruction Label 34 Figure 15 Top View of Gas Control 35 Figure 16 Sequence of Operation Electronic Blower Control 37 Figure 17 Furnace Control Board Blower Control 38 Figure 18 Start Up Label 40 Figure 19 Fan Blade 42 Figure 20 Control Disassembly 44 Figure 21 Winding Test 44 Figure 22 Drip Loop 44 Figure 23 Low NOx Insert 46 TABLES Table 1 Specifi...

Page 4: ... 447 4044 COPYRIGHT DECEMBER 2007 BARD MANUFACTURING COMPANY INC BRYAN OHIO 43506 USA Manufactured under the following U S patent numbers 5 485 878 5 002 116 4 924 934 4 875 520 4 4825 936 These publications can help you install the furnace You can usually find these at your local library or purchase them directly from the publisher Be sure to consult current edition of each standard National Fuel...

Page 5: ... M F I E S G W t l o V 0 3 2 r o t a l i t n e V y r e v o c e R y g r e n E R 5 A V R E S G W t l o V 0 6 4 r o t a l i t n e V y r e v o c e R y g r e n E R 5 C V R E S G W MODEL Wall Mount Gas Electric CONTROL OPTIONS See Table page 6 VENT See Table Below COOLING CAPACITY 3 3 ton 4 4 ton 5 5 ton OUTLET X Front Standard T Top COIL OPTIONS X Standard 1 Phenolic coated evaporator 2 Phenolic coated...

Page 6: ...arly Starting Procedure and any tags and or labels attached to the equipment All duct work supply and return must be properly sized for the design airflow requirement of the equipment Air Conditioning Contractors of America ACCA is an excellent guide to proper sizing Refer to Table 9 in this Manual for maximum static pressure available for duct design AIR CONDITIONING MODULE OPTIONS STD Standard e...

Page 7: ... s p m A d a o L d e t a R 3 3 1 4 1 1 2 8 5 6 3 3 4 7 1 0 5 1 1 1 1 4 9 5 4 1 3 2 8 9 1 0 5 1 4 3 1 7 6 t n e r r u C n o i t c e l e S t i u c r i C h c n a r B 7 6 1 2 1 1 5 4 2 1 2 5 3 1 5 6 7 5 2 6 8 1 5 9 s p m A r o t o R k c o L 2 8 8 5 9 2 6 9 8 8 1 4 8 1 1 3 2 1 2 6 r o s s e r p m o C d n a r o t o M n a F D P S M P R P H r o t o M n a F 2 0 5 8 3 1 2 0 5 8 3 1 1 0 5 8 3 1 2 0 5 8 3 1 2...

Page 8: ...R HINGED DOOR COMBUSTION AIR EXHAUST COMBUSTION AIR INTAKE GAS ENTRANCES CONTROL LOW VOLTAGE CIRCUIT BREAKER VENT OPTION PANEL MIS 2328 HIGH VOLTAGE ENTRANCES UNIT A B C D E F G H I J K L M N O P WG3S1 31 63 87 5 33 38 28 75 WG4S1 WG5S1 41 63 97 5 43 38 38 75 UNIT S T U V W X Y Z AA BB CC DD EE FF GG HH WG3S1 16 6 HOLES 24 9 2 WG4S1 WG5S1 16 7 HOLES 34 9 2 75 43 81 9 88 29 88 15 88 27 25 1 25 7 25...

Page 9: ...and in the absence of specific recommendations from the local authority having jurisdiction equipment ratings shall be reduced as specified in Section 21 5 TRANSPORTATION DAMAGE All units are packed securely in shipping container All units should be carefully inspected upon arrival for damage In the event of damage the consignee should 1 Note on delivery receipt of any damage to container 2 Notify...

Page 10: ...ounting bracket location 4 Mount bottom mounting bracket 5 Hook top rain flashing under back bend of top Top rain flashing is shipped secured to the right side of the back 6 Position unit in opening and secure with 5 16 lag bolts use 7 8 inch diameter flat washers on the lag bolts Use lag bolts long enough to support the unit s weight when mounted to the structure This length may be dependant on t...

Page 11: ...Manual 2100 483E Page 11 of 59 FIGURE 2A MOUNTING INSTRUCTIONS FOR WG3S1 ...

Page 12: ...Manual 2100 483E Page 12 of 59 FIGURE 2B MOUNTING INSTRUCTIONS FOR WG4S1 AND WG5S1 ...

Page 13: ...etween the supply air duct and combustible materials This is required for the first three 3 feet of ducting It is important to insure that the one 1 inch minimum spacing is maintained at all points Failure to do this could result in overheating the combustible material and may result in a fire causing damage injury or death ...

Page 14: ...Manual 2100 483E Page 14 of 59 FIGURE 4 WALL MOUNTING INSTRUCTIONS FIGURE 5 WALL MOUNTING INSTRUCTIONS ...

Page 15: ...Manual 2100 483E Page 15 of 59 FIGURE 6 COMMON WALL MOUNTING INSTALLATIONS ...

Page 16: ...ischarged air from the condenser to recirculate to the condenser inlet TABLE 2 MINIMUM INSTALLATION CLEARANCES s l a i r e t a m e l b i t s u b m o c m o r f t c u D t e l t u O t e e f 3 t s r i f h c n i 1 s l a i r e t a m e l b i t s u b m o c m o r f l a n i m r e T t n e V s e h c n i 7 1 t e l t u O r e s n e d n o C s e h c n i 0 2 p o T 3 e r u g i F e e S e c i v r e S r e n r u B s e h...

Page 17: ...includes a stainless steel transition drain tee silicone sealant and drain tubing If unit is installed with vertical vent kit annually inspect the vent system and drain Replace any portion of the vent system that shows signs of deterioration Make sure drain is open and free of obstruction FIGURE 8 VENT TERMINAL AND COMBUSTION AIR INTAKE CAUTION Vent terminal must be installed as shown in Figure 8 ...

Page 18: ...ampers 4 Follow the lighting instructions Place the appliance being inspected in operation Adjust thermostat so appliance shall operate continuously 5 Test for draft hood equipped appliance spillage at the draft hood relief opening after 5 minutes of main burner operation Use the flame of a match or candle 6 After it has been determined that each appliance connected to the venting system properly ...

Page 19: ... electrical ground could result in electric shock or fire 15 WIRING MAIN POWER Refer to unit rating plate for wire sizing information and maximum fuse or HACR type circuit breaker size Each outdoor unit is marked with a Minimum Circuit Ampacity This means that the field wiring used must be sized to carry that amount of current All models are suitable only for connection with copper wire Each unit ...

Page 20: ...e range for the 240V and 208V taps are 460 VOLT UNITS All models are equipped with single primary voltage transformers and no rewiring is required TABLE 3 THERMOSTAT WIRE SIZE r e m r o f s n a r T A V A L F e g u a G e r i W m u m i x a M e c n a t s i D t e e F n I 0 5 1 2 e g u a g 0 2 e g u a g 8 1 e g u a g 6 1 e g u a g 4 1 e g u a g 2 1 5 4 0 6 0 0 1 0 6 1 0 5 2 FIGURE 9 INSTALLATION OF FLE...

Page 21: ... W2 Thermostat Low Voltage Wiring No Ventilation Package 1 R C G Y Unit Control Panel Block R C W1 F Thermostat Subbase E Y2 Y1 2 3 R C W Y2 RC W2 Y G L Y1 D YO Y2 A Part 8403 060 O B G Terminal Part 8403 058 W1 E Unit 24V MIS 2330 C FIGURE 10A LOW VOLTAGE WIRING NO VENT ...

Page 22: ...LOWER IS ON Block R C W1 F E CONTROL Y2 Y1 2 3 R C W Y2 RC W2 Y G L Y1 D YO Y2 A MUST INSTALL JUMPER FOR 8403 058 OR OTHER THERMOSTAT THAT DOES NOT W1 E C R Terminal Part 8403 058 Thermostat Subbase Factory Installed Thermostat G BLACK Jumper Part 8403 060 Y Unit Control Panel ORANGE O B W2 Thermostat G 1 Unit 24V 2 PINK PURPLE 1 2 MIS 2433 B FIGURE 10B LOW VOLTAGE WIRING COMMERCIAL ROOM VENTILATO...

Page 23: ...M ECONOMIZER Part 8403 058 1 G Part 8403 060 O B G Block R C W1 F W2 E Y2 Y1 2 3 R C W Y2 RC W2 Y G L Y1 D YO Y2 Thermostat PLUG THERMISTOR WGSEIFM 5 Terminal A W1 E C Thermostat Subbase Unit Control Panel Y WIRES BLACK BLUE PINK YELLOW PURPLE ORANGE RED RED MIS 2432 B FIGURE 10C LOW VOLTAGE WIRING ECONOMIZER ...

Page 24: ... R C W1 W2 E Y2 Y1 2 3 R C W Y2 RC W2 Y G L Y1 D YO Y2 MUST INSTALL JUMPER FOR 8403 058 OR OTHER THERMOSTAT THAT DOES NOT Terminal A W1 E C R Part 8403 058 1 G Thermostat Subbase Thermostat WIRES FROM BLUE Part 8403 060 Factory Installed Jumper Y BLACK O B 2 Unit Control Panel W2 G Thermostat Unit 24V 1 PLUG ORANGE 1 2 MIS 2434 B FIGURE 10D LOW VOLTAGE WIRING ENERGY RECOVERY VENTILATOR ...

Page 25: ...Manual 2100 483E Page 25 of 59 FIGURE 11 GAS PIPE CONNECTION ...

Page 26: ...0 0 0 0 0 5 0 5 0 0 0 6 5 0 0 0 5 1 1 0 0 0 5 1 2 0 0 0 0 4 4 0 6 0 0 0 0 5 0 0 0 5 0 1 0 0 0 5 9 1 0 0 0 0 0 4 0 7 0 0 0 6 4 0 0 0 6 9 0 0 0 0 8 1 0 0 0 0 7 3 0 8 0 0 0 3 4 0 0 0 0 9 0 0 0 0 7 1 0 0 0 0 5 3 0 0 1 0 0 0 8 3 0 0 0 9 7 0 0 0 0 5 1 0 0 0 5 0 3 TABLE 6 GAS PIPE SIZES NATURAL GAS CHECKING THE GAS PIPING Before turning gas under pressure into piping all openings from which gas can escap...

Page 27: ... kits may be purchased from your local distributor 5 Slowly open equipment shut off valve in gas supply line just ahead of furnace Start furnace following Operating Instructions on front door 6 Slowly open 1 8 NPT manual shut off valve leading to manometer 7 Read manifold pressure on manometer 8 Adjust manifold pressure by turning gas control regulator adjusting screw clockwise to increase pressur...

Page 28: ...s the furnace gas input PROPANE LP GAS INPUT RATE 1 Make sure you have proper main burner orifices 2 Gas supply pressure must be between 11 and 13 inches W C for propane LP gas 3 Start furnace following Operating Instructions on front door 4 Let furnace warm up for 6 minutes 5 Adjust manifold pressure to 10 0 W C 0 3 inches W C See Section 19 Manifold Pressure Adjustment WARNING Propane LP gas ins...

Page 29: ...0 2 2 4 0 0 5 7 6 0 0 5 7 6 0 4 3 5 6 0 8 1 3 6 0 2 0 1 6 0 0 4 9 5 0 2 3 8 5 0 7 9 6 5 0 0 0 5 7 0 0 0 5 7 0 0 6 2 7 0 0 2 0 7 0 0 8 7 6 0 0 0 6 6 0 0 8 4 6 0 0 3 3 6 0 0 0 0 9 0 0 0 0 9 0 2 1 7 8 0 4 2 4 8 0 6 3 1 8 0 0 2 9 7 0 6 7 7 7 0 6 9 5 7 0 0 0 0 0 1 0 0 0 0 0 1 0 0 8 6 9 0 0 6 3 9 0 0 4 0 9 0 0 0 8 8 0 0 4 6 8 0 0 4 4 8 0 0 5 2 1 1 0 0 5 2 1 1 0 0 9 8 0 1 0 0 3 5 0 1 0 0 7 1 0 1 0 0 0 9 ...

Page 30: ... d e s a B t e e F 0 0 0 0 1 o t 1 0 0 8 h c t i w S e r u s s e r P s e r i u q e R e c i f i r O d n a e g n a h C e g n a h C t n e t n o C U T B n o d e s a B U T B 0 0 5 2 2 r e n r u B r e P 9 4 7 0 0 7 5 7 2 0 7 2 0 6 2 9 9 7 0 5 7 0 7 2 0 6 2 0 5 2 9 4 8 0 0 8 0 6 2 0 5 2 9 9 8 0 5 8 0 5 2 5 4 2 0 4 2 9 4 9 0 0 9 0 4 2 5 3 2 0 3 2 9 9 9 0 5 9 5 3 2 0 3 2 5 2 2 9 4 0 1 0 0 0 1 0 3 2 5 2 2 0...

Page 31: ...roximately 2 feet from furnace Locate thermometer tip in center of plenum to insure proper temperature measurement 6 Place second thermometer in return air duct approximately 2 feet from furnace Locate thermometer tip in center of duct to insure proper temperature measurement 7 Set room thermostat on highest temperature setting Operate furnace 10 minutes Record supply air and return air temperatur...

Page 32: ...h no power interruptions the compressor will operate on demand with no delay HIGH PRESSURE SWITCH AND LOCKOUT SEQUENCE Standard Feature If the high pressure switch opens the compressor contactor will de energize immediately The lockout timer will go into a soft lockout and stay in soft lockout until the high pressure switch closes and the delay on make time has expired If the high pressure switch ...

Page 33: ...ition occurs reverse two of the supply leads to the unit Do not reverse any of the unit factory wires as damage may occur Optional Low Ambient Control An optional low ambient control is available for both factory and field installed options The low ambient control is to be applied to the WG3S WG4S WG5S models when operation below 50 outdoor conditions are anticipated Without this device the evapor...

Page 34: ...Manual 2100 483E Page 34 of 59 26 LIGHTING AND SHUTDOWN INSTRUCTIONS FIGURE 14 INSTRUCTION LABEL ...

Page 35: ...ght on small mirror or an extension handle Remove the screws securing the inducer and collector box Now inspect the upper tubes of the heat exchanger Check the exterior of the heat exchanger and the interior flue gas passages for any evidence of deterioration due to corrosion cracking or other causes If signs of sooting exist remove the burners and clean the heat exchanger as required MIS 165 FIGU...

Page 36: ...e sure the supply and return air flange sleeves or duct work are securely fastened to unit and physically sound d Supply and return grilles must be open and free from obstructions e Inspect to make sure the unit is securely fastened to the wall Seal any possible leaks between unit and wall with appropriate exterior sealing material f Inspect burners heat exchanger induced draft blower and induced ...

Page 37: ...the economizer will not operate or close and Step 1 of the compressor will operate If Stage 2 cooling call is issued the compressor will shift to Step 2 full cooling capacity operation FIGURE 16 SEQUENCE OF OPERATION ELECTRONIC BLOWER CONTROL N O I T C A E S N O P S E R M E T S Y S t a e h r o f s l l a c t a t s o m r e h T d e z i g r e n e s i l a n i m r e t W d e z i g r e n e s i r e w o l b...

Page 38: ...g a t S d n 2 M F C g n i l o o C M F C g n i t a e H 6 5 U T B 0 0 0 0 5 t u p n I U T B 0 0 0 5 7 t u p n I U T B 0 0 0 0 0 1 t u p n I U T B 0 0 0 5 2 1 t u p n I 1 S 3 G W 5 1 0 0 5 0 0 0 8 0 0 8 0 0 1 1 0 2 0 1 0 5 2 1 5 6 3 1 0 1 4 1 1 S 4 G W 0 2 0 0 5 0 5 2 8 0 0 1 1 0 0 5 1 0 2 0 1 0 5 2 1 5 6 3 1 0 1 4 1 1 S 5 G W 0 2 0 0 5 0 0 5 8 0 0 3 1 0 0 7 1 0 2 0 1 0 5 2 1 5 6 3 1 0 1 4 1 FIGURE 1...

Page 39: ...t c e l e s e h t r o f e t a r e p o l l i w r e w o l b r i a t r o f m o c e h t e t a r e p o o t e u n i t n o c l l i w r e w o l b r i a t r o f m o c e h t n o i t a r e p o S T I N U Y T E F A S t u o l l o R t i m i l h g i H h c t i w s e r u s s e r P t l o V 4 2 n i T S P S k c e h c t r a t s e f a s T S P S L O R T N O C N A F T R O F M O C n a F d e e p S g n i t a e H n o i t a r ...

Page 40: ... band type heater located around the bottom of the compressor This heater is controlled by the auxiliary contacts on the side of the compressor contactor The heater is only energized when the compressor is not running Crankcase heat is essential to prevent liquid refrigerant from migrating to the compressor preventing oil pump out on compressor start up and possible bearing or scroll vane failure ...

Page 41: ...this time there will be no negative impact on the durability of the compressor However reverse operation for over one hour may have a negative impact on the bearing due to oil pump out NOTE If compressor is allowed to run in reverse rotation for several minutes the compressor s internal protector will trip All three phase ZPS compressors are wired identically internally As a result once the correc...

Page 42: ...e measured dc voltage at the female connectors in the plug should be around 15 to 27 vdc Resistance check Measure the resistance from the end of one molded plug lead to either of the two female connectors in the plug One of the connectors should read close to zero ohms while the other should read infinity Repeat with other wire The same female connector as before should read zero while the other c...

Page 43: ...if it s air noise cabinet duct or motor noise interview customer if necessary Air noise High static creating high blower speed Is airflow set properly Does removing filter cause blower to slow down Check filter Use low pressure drop filter Check correct duct restrictions Symptom Cause Procedure Noisy blower or cabinet Check for loose blower housing panels etc High static creating high blower speed...

Page 44: ...er to the manufacturer s authorized replacement list USING THE WRONG CONTROL WILL RESULT IN IMPROPER OR NO BLOWER OPERATION Orient the control module so that the 3 wire motor plug can be inserted into the socket in the control Carefully insert the plug and press it into the socket until it latches A SLIGHT CLICK WILL BE HEARD WHEN PROPERLY INSERTED 8 Reverse the steps 5 4 3 to reconnect the motor ...

Page 45: ...8 3 1 4 1 1 1 4 3 4 1 8 3 4 5 4 1 5 6 4 6 4 1 2 9 4 8 4 1 9 1 5 B D 5 8 B W 2 7 E D I S W O L E D I S H G I H 7 3 1 6 1 2 9 3 1 7 3 2 0 4 1 8 5 2 1 4 1 9 7 2 2 4 1 0 0 3 3 4 1 1 2 3 6 4 1 6 4 3 8 4 1 0 7 3 1 5 1 5 9 3 3 5 1 9 1 4 5 5 1 7 4 4 7 5 1 4 7 4 8 5 1 2 0 5 0 6 1 9 2 5 G N I L O O C Y T I C A P A C W O L F E E R G E D L I O C R O O D T U O G N I R E T N E E R U T A R E P M E T R I A L E D ...

Page 46: ...x screens can result in improper operation and malfunction of the burner system FIGURE 23 LOW NOX INSERT R 410A 34 REFRIGERANT CHARGE The correct system R 410A charge is shown on the unit rating plate Optimum unit performance will occur with a refrigerant charge resulting in a liquid line temperature the cooling expansion device as shown in Table 13 or by pressures as shown in Table 12 Page 42 The...

Page 47: ...5 8 0 4 0 0 0 0 0 1 B 0 4 1 5 8 0 4 A 1 4 1 5 8 0 4 0 0 0 5 2 1 B 2 4 1 5 8 0 4 A 3 4 1 5 8 0 4 1 S 4 G W 0 0 0 0 5 3 0 6 0 3 2 8 0 2 B 0 4 2 5 8 0 4 A 1 4 2 5 8 0 4 0 0 0 5 7 B 2 4 2 5 8 0 4 A 3 4 2 5 8 0 4 0 0 0 0 0 1 B 0 4 2 5 8 0 4 A 1 4 2 5 8 0 4 0 0 0 5 2 1 B 2 4 2 5 8 0 4 A 3 4 2 5 8 0 4 1 S 4 G W 0 0 0 0 5 3 0 6 0 6 4 B 1 6 3 5 8 0 4 A 2 6 3 5 8 0 4 0 0 0 5 7 B 3 6 3 5 8 0 4 A 4 6 3 5 8 0 ...

Page 48: ... TRANSFORMER 18 GROUND TERMINAL 25 POS TEMP COEFFICIENT RELAY CAPACITOR 19 LOW PRESSURE SWITCH INDUCED DRAFT BLOWER RELAY MODULE 5 4 2 1 3 C FAN H E R M 240V 208V COM R CONTROL 23 HEATER C IF ANY ORIGINAL WIRE AS SUPPLIED WITH THE APPLIANCE MUST BE 50 WIRES CONNECT IF OPTION NOT USED PINK PINK BLUE BLUE L1 L2 5 4 3 BLUE GR BLUE BLUE BLUE 1 2 3 4 5 6 8 9 7 12 10 11 A BLUE A PURPLE PURPLE PURPLE C M...

Page 49: ... Diagram A Dual Can Motor H F C T1 L1 Line 1 Low Voltage Term Block Terminal Capacitor C NC Outdoor Fan Contactor Aux Compressor Compressor Contactor Terminal BLOWER MOTOR Block Start Kit 2 4 INDUCED DRAFT CONTROL OPT R CONTROL MODULE COMPRESSOR CONTACTOR COMPRESSOR LOW PRESSURE CONTROL LPC LPC C ALR Y HPC CC Y1 2 R FURNACE CONTROL BOARD K3 K4 K4 K2 COOL INDUCED DRAFT BLOWER RELAY LOW AMBIENT Heat...

Page 50: ...IP 11 CIRCUIT BREAKER 28 MOVE RED WIRE TO TRANSFORMER OPERATION RELAY 21 POS TEMP COEFFICIENT 208V TAP FOR 208V GROUND TERMINAL MODULE 5 4 2 1 3 C FAN H E R M 240V INDUCED DRAFT 18 208V IF ANY ORIGINAL WIRE AS SUPPLIED WITH THE APPLIANCE MUST BE 50 WIRES CONNECT IF OPTION NOT USED PINK PINK 10 11 BLUE BLUE BLUE L1 L2 5 4 3 BLUE GR BLUE BLUE BLUE 1 2 3 4 5 6 8 9 7 A 12 A PURPLE PURPLE PURPLE C MV N...

Page 51: ...or Terminal A Dual Can Motor H F C T1 L1 Line 1 Low Voltage Term Block C Capacitor Outdoor Fan NC Compressor Contactor Aux Compressor Block Contactor Terminal BLOWER MOTOR 2 Start Kit INDUCED DRAFT 4 INDUCED DRAFT CONTROL OPT R CONTROL MODULE COMPRESSOR CONTACTOR COMPRESSOR LOW PRESSURE CONTROL LPC LPC C ALR Y HPC CC Y1 2 R FURNACE CONTROL BOARD K3 K4 K4 K2 COOL D1 BLOWER RELAY LOW AMBIENT Heater ...

Page 52: ...S CONNECT TERM BLOCK GRAY LOW AMBIENT 32 CONTROL OPT A 32 A 61 CONTACTOR COMPRESSOR DRAFT BLOWER INDUCED 51 VALVE GAS 20 32 52 37 35 35 40 40 35 35 32 32 32 32 32 32 34 32 32 62 28 28 28 37 28 27 27 42 44 41 38 36 47 41 33 28 28 LIMIT FLAME LIMIT PRIMARY 28 ROLLOUT SPARK IGNITOR 38 FLAME SENSOR SECONDARY 39 SWITCH PRESSURE 32 32 28 35 38 51 51 51 46 46 46 T3 48 T1 47 T2 52 Optional High Voltage 32...

Page 53: ...C Y1 2 R FURNACE CONTROL BOARD K3 K4 K4 K2 COOL D1 L1 HIGH PRESSURE 208 24VAC 240 COM Transformer Use for 208V Operation BOARD CONTROL FURNACE VALVE GAS 1 SWITCH PRESSURE K1 K1 K4 K1 K2 K3 12 11 3 6 8 10 7 9 5 4 2 LIMIT SEC 2 L3 ROLLOUT FLAME Capacitor Low Ambient BLOWER MOTOR BLOWER RELAY Y2 HIGH SPEED Power Source 4 5 3 L1 Compressor Contactor L1 L3 L2 INDUCED DRAFT L3 LIMIT BLOWER RELAY 5 Pin P...

Page 54: ...F OPTION NOT USED 62 High Voltage 47 Factory A WIRES CONNECT 31 Field 30 CONTACTOR COMPRESSOR DRAFT BLOWER INDUCED 51 VALVE GAS 20 32 52 37 35 35 40 40 35 35 32 32 32 32 32 32 34 32 32 62 28 28 28 37 28 27 27 42 44 41 38 36 47 41 33 LIMIT 28 FLAME 28 LIMIT PRIMARY 28 ROLLOUT SPARK IGNITOR 38 FLAME SENSOR SECONDARY 39 SWITCH PRESSURE 32 32 28 35 38 51 51 51 46 46 46 T3 48 T1 47 T2 52 32 15 32 60 A ...

Page 55: ...RNACE CONTROL BOARD K3 K4 K4 K2 COOL D1 L1 HIGH PRESSURE 208 24VAC 240 COM Transformer Use for 208V Operation BOARD CONTROL FURNACE VALVE GAS 1 SWITCH PRESSURE K1 K1 K4 K1 K2 K3 12 11 3 6 8 10 7 9 5 4 2 LIMIT SEC ROLLOUT FLAME LIMIT PRIM L1 Low Ambient BLOWER MOTOR W2 CONTROL BLOWER RELAY Y2 HIGH SPEED Power Source 4 5 3 L1 Compressor Contactor L2 L3 L2 L3 L1 C NC L3 L2 INDUCED DRAFT L2 L2 L3 SOLE...

Page 56: ...LTAGE LOW DISCONNECT 28 TRANSFORMER PHASE MONITOR 21 GROUND TERMINAL INDUCED DRAFT CONTROL 18 0V IF ANY ORIGINAL WIRE AS SUPPLIED WITH THE APPLIANCE MUST BE 50 WIRES CONNECT IF OPTION NOT USED PINK PINK 10 11 BLUE BLUE BLUE BLUE 5 4 3 GR BLUE BLUE 1 2 3 4 5 6 8 9 7 12 BLUE PURPLE PURPLE PURPLE C MV NO MV YELLOW ORANGE L1 YELLOW BLACK RED YELLOW YELLOW BLACK BROWN WHITE YELLOW RED YELLOW YELLOW YEL...

Page 57: ...D K3 K4 K4 K2 COOL D1 L1 HIGH PRESSURE 208 24VAC 240 COM Transformer Use for 208V Operation BOARD CONTROL FURNACE VALVE GAS 1 SWITCH PRESSURE K1 K1 K4 K1 K2 K3 12 11 3 6 8 10 7 9 5 4 2 LIMIT SEC ROLLOUT FLAME LIMIT PRIM W2 CONTROL INDUCED DRAFT BLOWER RELAY Y2 HIGH SPEED SOLENOID 460 60 3 Power Source 4 5 3 L1 Compressor Contactor L2 L3 L2 L3 L1 C NC L2 L1 L3 A Compressor Outdoor Fan Motor 5 Pin P...

Page 58: ... PHASE MONITOR CAPACITOR 19 LOW PRESSURE SWITCH INDUCED DRAFT BLOWER RELAY CONTROL V COM R 23 C MODULE IF ANY ORIGINAL WIRE AS SUPPLIED WITH THE APPLIANCE MUST BE 50 WIRES CONNECT IF OPTION NOT USED PINK PINK BLUE BLUE BLUE 5 4 3 GR BLUE BLUE 1 2 3 4 5 6 8 9 7 12 10 11 BLUE BLUE PURPLE PURPLE PURPLE C MV NO MV YELLOW ORANGE YELLOW YELLOW BLACK BROWN WHITE YELLOW RED YELLOW YELLOW YELLOW YELLOW L2 ...

Page 59: ...D K3 K4 K4 K2 COOL D1 L1 HIGH PRESSURE 208 24VAC 240 COM Transformer Use for 208V Operation BOARD CONTROL FURNACE VALVE GAS 1 SWITCH PRESSURE K1 K1 K4 K1 K2 K3 12 11 3 6 8 10 7 9 5 4 2 LIMIT SEC ROLLOUT FLAME LIMIT PRIM W2 CONTROL INDUCED DRAFT BLOWER RELAY Y2 HIGH SPEED SOLENOID 460 60 3 Power Source 4 5 3 L1 Compressor Contactor L2 L3 L2 L3 L1 C NC L2 L1 L3 A Compressor Outdoor Fan Motor 5 Pin P...

Reviews: