


Bareknuckle Welterweight - Airless Paint Sprayer
OPERATING INSTRUCTIONS & SAFETY MANUAL
24 |
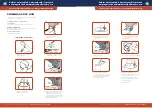
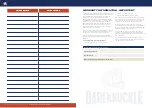
PAINT PROJECT
PAINT COLOUR
The Bareknuckle Welterweight Airless Spray Machine comes
with a 12 month limited warranty. This warranty is against
any manufacturing defect in material or workmanship
under normal use as defined in the Bareknuckle
Welterweight Airless Sprayer Operating Instructions and
Safety Manual. This warranty does not cover replacement
of items as a result of normal operating wear and tear,
malfunction, damage or wear caused by misusing this
machine or maintenance not carried out as per this
manual, or any abuse or negligence, misuse, accident,
substitution of non genuine parts.
This product is designed and intended for DIY / household
use only. This warranty will be void if the product is used
for commercial use or income producing purposes.
In the event of a warranty claim, the product shall be
returned to the place of purchase with the original proof of
purchase:
For a warranty claim, we reserve the right to:
• repair or replace the goods (or part thereof)
• resupply a refurbished machine
• repair any item that is deemed necessary
If the resultant inspection of the product does not show a
defect in the material or workmanship, repair to the item
will be made at a reasonable cost to you. This cost may
include the costs of parts, labor and transportation.
The warranty becomes void if the correct operating,
cleaning and storage instructions have not been followed
by the user as defined by these Bareknuckle Welterweight
Operating Instructions and Safety manual.
A 12 month limited warranty ( from the original date or
purchase) is provided with this machine. Please retain
proof of purchase for any warranty claims and return to the
place of purchase.
In no event will HDI Trading Pty Ltd be liable for any
indirect, incidental or consequential damages resulting
from the sale or use of this product.
WARRANTY INFORMATION - IMPORTANT
Bareknuckle Welterweight Airless Paint Sprayer
Original Date of Purchase:
Place Purchased:
Please retain a copy of the receipt as proof of purchase.


