


Operation and Maintenance Manual
Last Updated - 08/31/2016
495B ML TM (S)
66
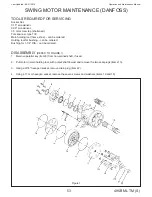
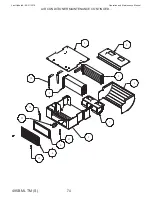
1. Remove the hex lock nuts and washers at the top of the brush holding stud along with the outboard bearing, if
used. This will allow the brush assemblies to be removed. NOTE: Some smaller collectors use cap screws or
may be equipped with socket screw-type set collars instead of hex nuts.
2. Carefully remove the brushes without over-stretching the brush springs and arrange in order of removal with the
spacers.
3. Replace the damaged brush assembly and then reassemble the brushes and spacers in reverse of the removal
order. This will ensure the correct spacing between electrically live parts, which is critical on higher voltages of
110VAC or more.
4. Be sure that all brushes are snapped in tight and making full contact with their corresponding brass ring.
5. Check that all springs are hooked correctly through the brush arm.
NOTE: Special care should be used when handling or replacing the 7.5 amp brush/arm/spring assemblies. Because
of their small size, they can be broken if forced up or down. In the correctly installed position, the possibility of
breakage is minimal.
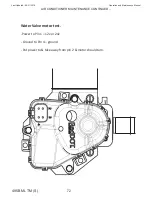
LUBRICATION
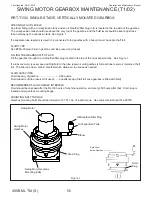
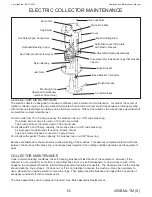
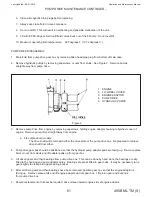
Electric collectors with spun aluminum covers can be mounted either upright or inverted.
UNITS MOUNTED IN STANDARD UPRIGHT POSITION:
Units mounted upright (with the cover on top, as shown in illustration) have a nylon bearing in the base, eliminating
the need for lubrication.
UNITS MOUNTED IN THE INVERTED POSITION:
Units mounted in the inverted position have a grease seal and a shortened nylon bearing in the base (not shown),
which keeps most contaminants and fluids from running down the mounting tube into the collector assembly. A liquid-
tight connector for the brush harness exit is also supplied in the base of a collector to be used in the inverted position.
NOTE: Previous to 1987, some electrical collectors supplied for inverted mounting were equipped with bases
containing o-rings rather than a nylon bearing.
Lubricate the seal (or o-ring) with GE G322L Versi-lube or equivalent silicone grease before insertion of the mounting
tube.
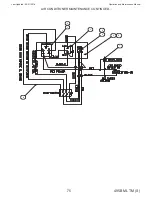
ELECTRIC COLLECTOR MAINTENANCE CONTINUED...
Summary of Contents for 495B SD
Page 3: ...Introduction...
Page 7: ......
Page 16: ...Maintenance...
Page 19: ...Operation and Maintenance Manual 495B ML TM S 19 Last Updated 08 31 2016 SERVICE SCHEDULE...
Page 29: ...Hydraulic...
Page 57: ...Electrical...
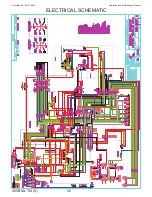
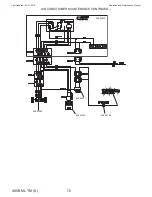
Page 58: ...Operation and Maintenance Manual Last Updated 08 31 2016 495B ML TM S 58 ELECTRICAL SCHEMATIC...
Page 78: ...Maintenance...
Page 88: ...Operation and Maintenance Manual Last Updated 08 31 2016 495B ML TM S 88 Structural...
Page 95: ...Trouble Shooting...


