page 70
page 70
page 70
page 70
page 70
475 A CRL
800-00167
INTRODUCTION
INTRODUCTION
INTRODUCTION
INTRODUCTION
INTRODUCTION
This manual is a step-by-step guide to assembly and disassembly of torque-hub units. It is designed for the customer
or shop mechanic who is repairing a particular model of torque-hub final drive.
Users of this manual should note that each part mentioned is followed by an identification number enclosed in
parentheses. These part numbers may be referred to in the Parts List section of this manual and on the cross-
sectional view of this unit.
Any specialized tools normally used to assemble this unit are noted in the assembly procedures. However, it is not
mandatory that these tools be used in this unit’s assembly. Bearing cups and cones can be pressed using a punch
and hammer along their top edges. Seals can be pressed by laying a board flat on top of the seal and them hammering
the board down until it meets the hub. Studs can be hammered into stud holes. Should you use these methods,
be very careful not to damage parts when using a punch and/or hammer.
Users should familiarize themselves with the procedures for roll and leak testing and bolt tightening and torquing
found on the following two pages before getting started.
SAFETY
SAFETY
SAFETY
SAFETY
SAFETY
Standard safety practices should be followed during the disassembly and assembly procedures described. Safety
glasses and safety shoes should be worn. Heavy, heat resistant gloves should be used when heated components
are handled. Be especially alert when you see the word CAUTION. This indicates that a particular operation could
cause personal injury if not performed properly or if certain safety procedures are not followed.
ROLL AND LEAK TESTING
ROLL AND LEAK TESTING
ROLL AND LEAK TESTING
ROLL AND LEAK TESTING
ROLL AND LEAK TESTING
Torque-hub units should always be roll and leak tested before disassembly and after assembly to make sure that
the unit’s gears and sealants are working properly. The following information briefly outlines what to look for when
performing these tests.
THE ROLL TEST
THE ROLL TEST
THE ROLL TEST
THE ROLL TEST
THE ROLL TEST
The purpose of a roll test is to determine if the unit’s gears are rotating freely and properly. You should be able to
rotate the gears in your unit by applying a constant force to the roll checker. If you feel more drag in the gears only
at certain points, then the gears are not rolling freely and should be examined for proper installation or defects. Some
gear packages roll with more difficulty than others. Do not be concerned if the gears in your unit seem to roll hard
as long as they roll with consistency.
THE LEAK TEST
THE LEAK TEST
THE LEAK TEST
THE LEAK TEST
THE LEAK TEST
The purpose of a leak test is to make sure the unit is air tight. You can tell if your unit has a leak if the pressure gauge
reading on your air checker starts to fall once the unit has been pressurized. Leaks will most likely occur at the main
seal or wherever o-rings or gaskets are located. The exact location of a leak can usually be detected by brushing
a soap and water solution around the main seal and where o-rings or gaskets meet the exterior of the unit then
checking for air bubbles. If a leak is detected in a seal, o-ring, or gasket, the part must be replaced.
TIGHTENING AND TORQUING BOLTS
TIGHTENING AND TORQUING BOLTS
TIGHTENING AND TORQUING BOLTS
TIGHTENING AND TORQUING BOLTS
TIGHTENING AND TORQUING BOLTS
If an air impact wrench is used to tighten bolts, extreme care should be taken to insure that the bolts are not tightened
beyond their indicated torque specification. Never use an impact wrench to tighten should bolts; all shoulder bolts
should be tightened by hand.
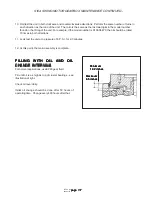
The following steps describe the proper procedure for tightening and torquing bolts or socket head cap screws in a
bolt circle.
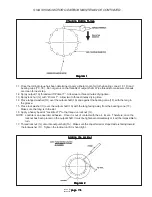
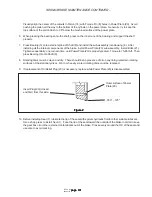
1. Tighten (but do not torque) bolt “A” until snug.
2. Go to the opposite side of the bolt circle and tighten bolt “B” until equally snug.
3. Continue around the bolt circle and tighten the remaining bolts.
SWING MOTOR GEARBOX MAINTENANCE (S10A)
SWING MOTOR GEARBOX MAINTENANCE (S10A)
SWING MOTOR GEARBOX MAINTENANCE (S10A)
SWING MOTOR GEARBOX MAINTENANCE (S10A)
SWING MOTOR GEARBOX MAINTENANCE (S10A)


