13-27
®
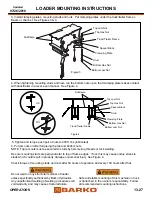
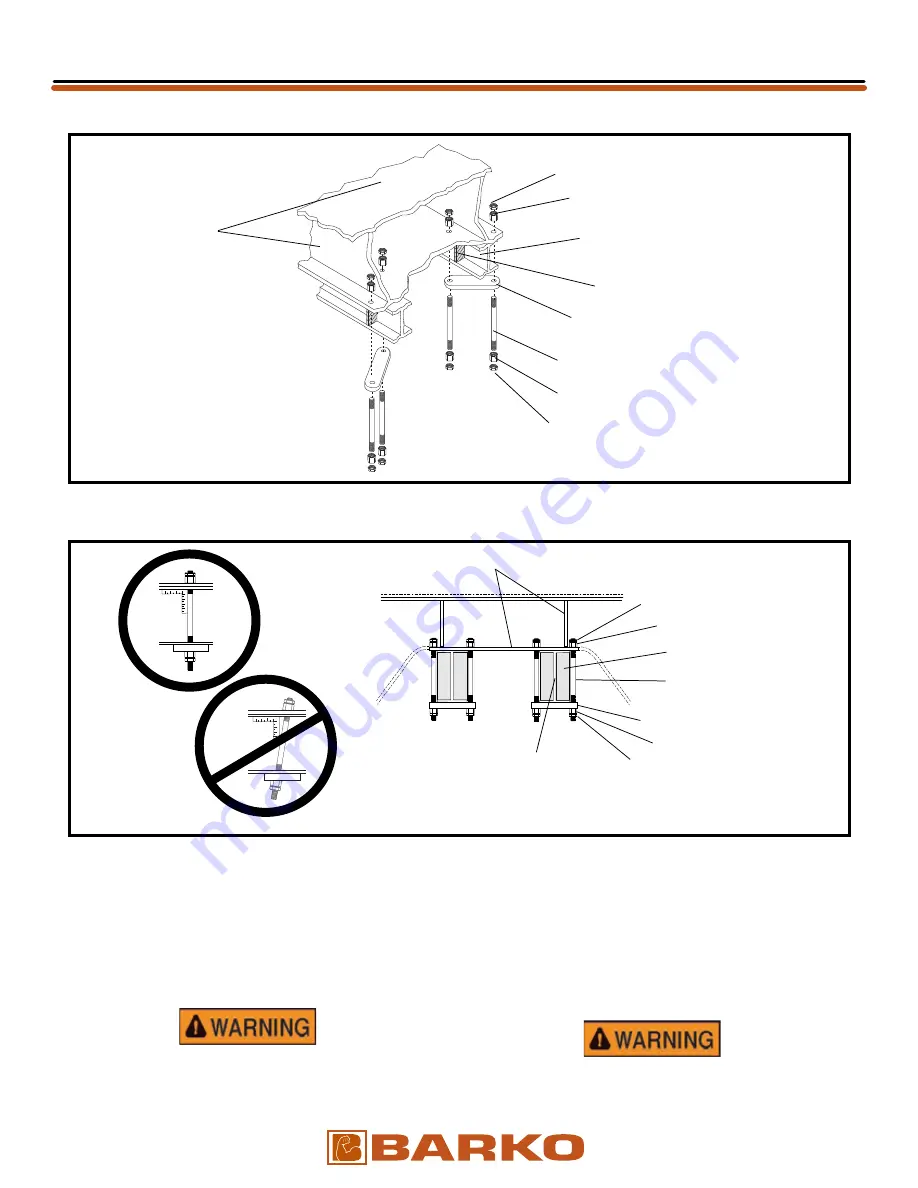
Figure 4
Subframe
Bottom Jam Nut
Truck/Trailer Frame
Bottom Hex Nut
Clamping Plate
Top Jam Nut
Top Hex Nut
Spacer Block
Stud
Subframe
Truck/Trailer Frame
Top Jam Nut
Top Hex Nut
Bottom Jam Nut
Bottom Hex Nut
Figure 3
Clamping Plate
Spacer Block
Stud
OK
NO
LOADER MOUNTING INSTRUCTIONS
3. Install clamping plates, mounting studs and nuts. Put clamping plates under the truck/trailer frame I-
Beam or channel. See Figures 3 & 4.
4. When tightening mounting studs and nuts, run the bottom nuts up so that clamping plate makes contact
with truck/trailer in a level, even manner. See Figure 4.
Do not weld on any structural member of loader
unless specifically authorized by Barko Hydraulics.
Any unauthorized welding of welding procedures will
void warranty and may cause structural failure.
Safe and stable mounting of this machine on truck
or trailer bed in the owner’s responsibility. Follow
all recommended mounting instructions.
5. Tighten and torque each pair of nuts to 600 ft. lbs (lubricated)
NOTE: Top jam nuts must be secured to studs by hammering threads or tack welding.
6. Put jam nuts on after torqueing the top and bottom nuts.
Be sure mounting studs are perpendicular to top of frame edges. If not, this may cause undue stress to
studs which could result in property damage or personal injury. See Figure 4.
Check torque of mounting studs and nuts after 50 hours of operation and every 100 hours after that.
07/26/2018
Updated
OPERATOR’S
Summary of Contents for 295B
Page 4: ...THIS PAGE INTENTIONALLY BLANK SUPERIOR WI USA www barko com...
Page 6: ...THIS PAGE LEFT INTENTIONALLY BLANK...
Page 27: ...THIS PAGE LEFT INTENTIONALLY BLANK...
Page 60: ...THIS PAGE LEFT INTENTIONALLY BLANK...
Page 64: ...THIS PAGE LEFT INTENTIONALLY BLANK...


