7. The door can remain open until the unit has
been operating and you have checked for possi-
ble water leaks at the membrane connections.
8. Rinse membrane per the instructions in the
“Initial Operation” section of this manual.
24 LITER PER HOUR UNITS (2 MEMBRANES)
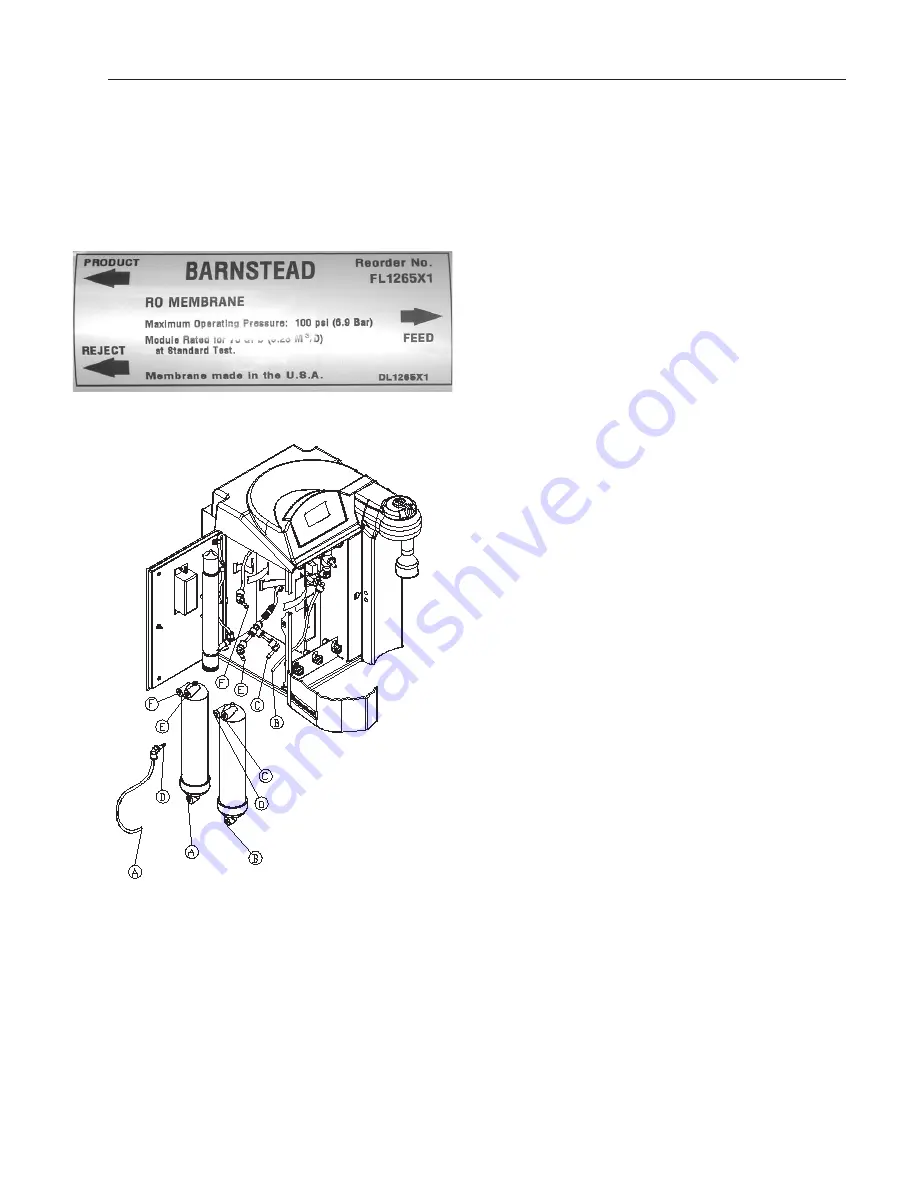
1. Remove the RO membranes from their packag-
ing. Note the location of the FEED, PRODUCT,
and REJECT connections on the membrane.
See Figure 9. The correct orientation for the
installed membrane will be vertical with the
Feed connection on the bottom. See Figure 8.
2. Open the left side door on the Diamond TII.
3. Locate the four unconnected tubes (three with
elbows, one without) labeled FEED 1, PROD-
UCT, PRODUCT and REJECT 2. Refer to
“Tubing Installation: Figure 2” and mark FEED 1
tubing 3/4” (1.9 cm) from end.
4. Find the tube with the elbow labeled FEED 2
and REJECT 1 packaged with the unit. Refer to
“Tubing Installation: Figure 2” and mark FEED 2
end of the tube 3/4” (1.9 cm) from end.
5. Make FEED 2 (A) connection by first wetting the
tube with water and pushing it firmly into the
membrane connector. See Figure 9. Using the
Velcro
®
strap secure the membrane into the left
most position against the chassis walls. See
Figure 9.
6. Make the FEED 1 (B) connection by first wetting
the tube end and push firmly into the membrane
connector. Using the Velcro
®
strap secure the
membrane into the right most position against
the bracket. See Figure 9.
7. Make the PRODUCT (C) and REJECT 1 (D)
connections on right most membrane by first
wetting the tube stem of the elbow with water
and pushing it firmly into the connector. See
Figure 9.
I
NSTALLATION
Figure 8: Membrane Housing Label
Figure 9: 24 lph RO Membrane Installation
19


