


26
holding the POWER key. After about 3 seconds
a single beep will be heard and you may
remove your finger from the POWER key. The
display will change to
OSP
.
3.
Rotate the center knob dial one position clock-
wise and the display will read
CAL
. This is the
calibration menu. Press the SET key under the
HEAT display. The display will now read
OiL
.
Press the SET key under the HEAT display
again to accept, and the display will change to
no. Rotate the center knob one position to
change the display to
yES
and press the SET
key under the HEAT display again.
4.
The HEAT display will show the temperature
that is currently measured at the probe. If the
display shows “
---”
then the probe is not con-
nected to the unit and must be connected before
continuing. The SET indicator under the HEAT
display will be flashing to let the user know that
the display is ready to be adjusted using the
center knob.
5.
Adjust the HEAT display using the center knob
until it matches the independent probe. When
this is complete, press the SET key under the
HEAT display. The unit will turn OFF automati-
cally. Calibration of the probe system is now
complete.
Thermometer Mode - Prb
This option is only available for units with heating func-
tionality. The Thermometer Mode can be used to display
temperature using the probe without the heating control
on. Stirring can also be independently used if desired
and/or available. NOTE: Heating will suspend while in
thermometer mode.
To enter Thermometer Mode follow the instructions given
below:
1.
Plug the unit into the appropriate power, but do
not turn it on (displays should be blank, unless
S
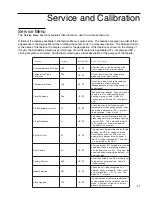
ERVICE AND
C
ALIBRATION
Summary of Contents for SUPER-NUOVA HP133420-33
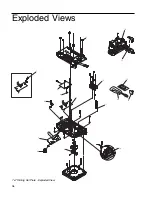
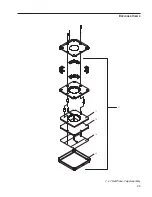
Page 38: ...38 EXPLODED VIEWS 7 x 7 Hot Plate Exploded View 5 6 7 8 10 22 12 13 16 1 2 3 4...
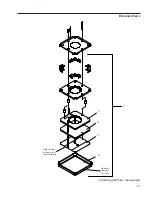
Page 39: ...39 EXPLODED VIEWS 21 17 18 19 20 7 x 7 Hot Plate Top Assembly...
Page 45: ...45...
Page 46: ...46...
Page 47: ...47...


