4
Layout installation
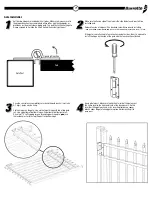
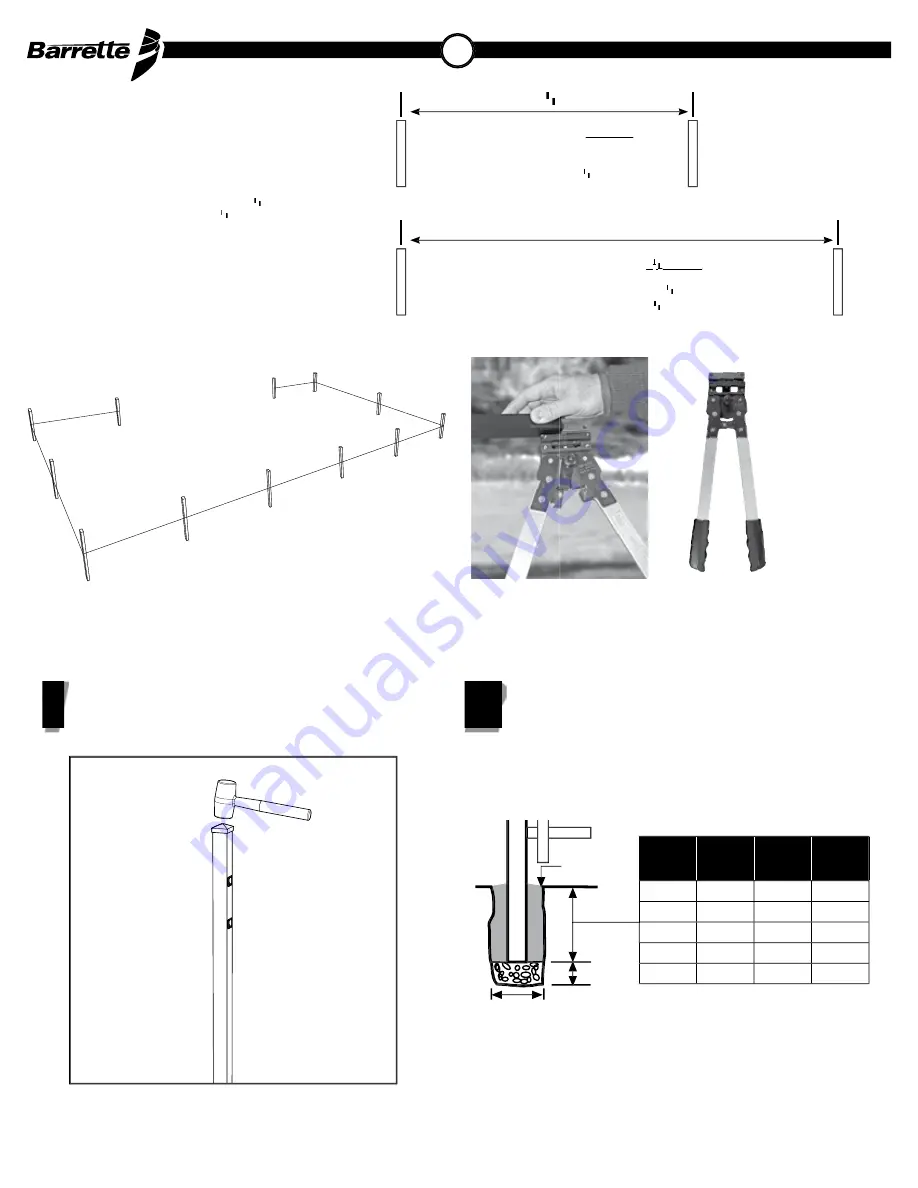
• Using the worksheet as a guide, establish your fence line by
staking out the areas you wish to enclose. Locate each point
in which you will need an end, corner or gate post and mark it
with a stake.
• To mark all other posts: For 6' sections and using 2" posts:
from the center of an end point, measure 72
13
⁄
13
13 16
⁄⁄ " and mark
with stake. For 8' sections and using 2
1
⁄
11 2
⁄⁄ " posts: from the
center of an end point, measure 96" and mark with stake.
NOTE: If you are left with a space less than a full panel, the
panel can be cut down to fi t the space by using a hacksaw.
Notch the cut ends of the horizontal rails so they will seat
inside of post. (See Illustration)
• Attach string to each stake.
NOTE: the fence will most likely need to be set back from the
property line as required by your local codes (usually 2"-4")
For 6' sections using 2" posts
2" posts
(Actual Panel size is 71")
(Center to Center post distance is 1
13
⁄
13
13 16
⁄⁄ " wider than panel)
72
13
⁄
13
13 16
⁄⁄ "
For 8' sections using 2
1
⁄⁄
11 2
⁄⁄ " posts
" posts
(Actual Panel size is 94
11
⁄
11
11 16
⁄⁄ ")
(Center to Center post distance is 1
5
⁄
55 16
⁄⁄ " wider than panel)
96"
Aluminum Fence Rail
Notcher can be purchased
separately
1
2
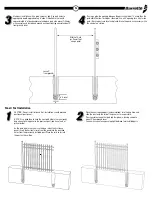
Use a rubber mallet to gently drive the post tops onto the posts.
Be careful not to damage the post top.
Mix the concrete on the dry side to allow the posts to set faster.
See chart below to determine the minimum depth for your fence.
NOTE: In areas where ground frost occurs, the concrete footing
should be extended below the frost line (generally 12" below).
This will account for frost "heave, in which ground water freezes
and expands upwards. By providing this 12" drainage you can
keep the frost heave from affecting the posts. Verify depths meet
all local building codes.
First Post Installation
Panel
Height
Post
Height
Hole
Depth
Post
goes into
ground
36"
58"
27"
21"
48"
70"
27"
21"
54"
82"
33"
27"
60"
88"
33"
27"
72"
106"
39"
33"
Leave 2"
from ground
6" Gravel
6"


