background image

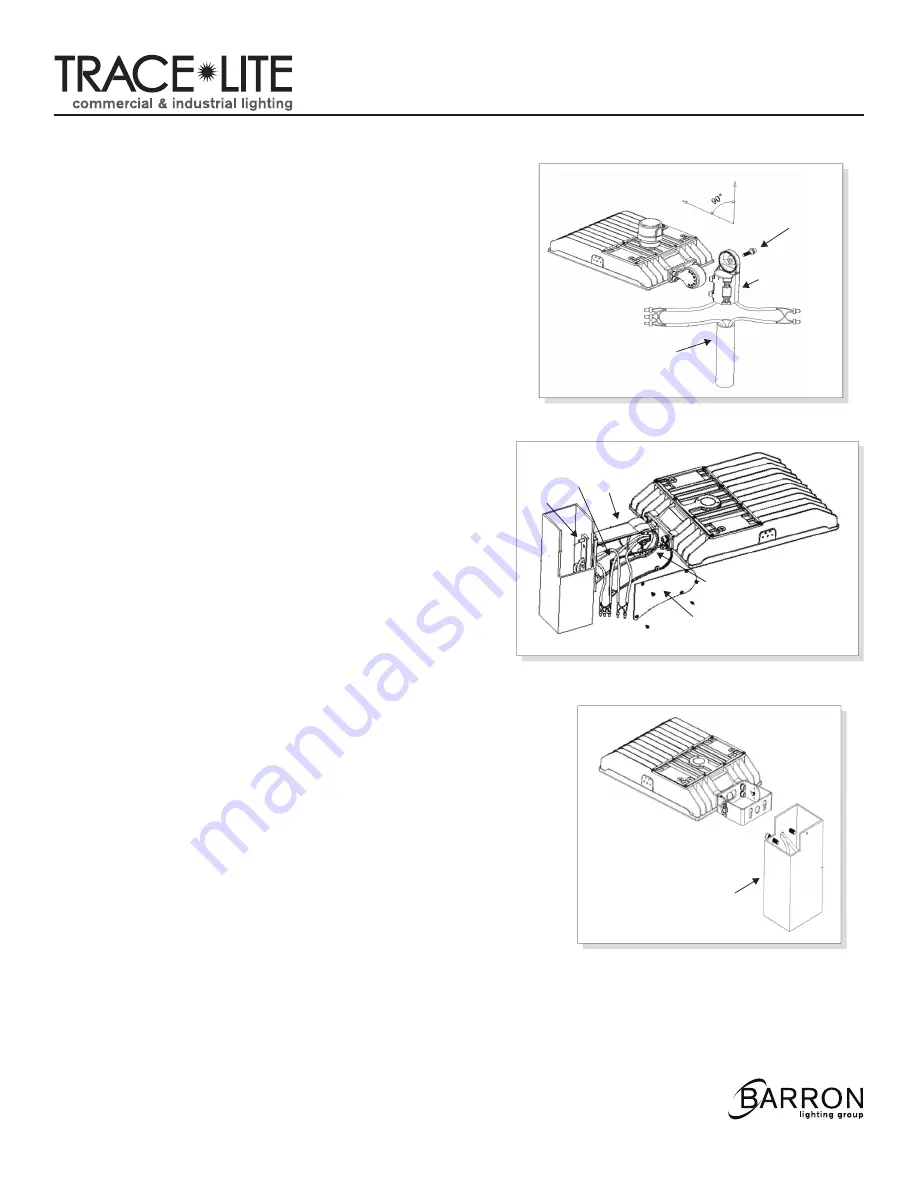
Surface/Pole Mounting

Slip-Fitter

1. Connect wires from AXL2 to supply (see 

Wiring

 section) and 

    position wires inside pole (Fig. 7)

2. Secure slip-fitter over pole and tighten. 

3. To position, loosen the adjustment bolt using a hex wrench 

    (provided by others), position head as desired, then retighten 

    the bolt. 

Notice:

 Adjustable angle is 0-90° (Fig. 7).

Arm

1. Disassemble the pole bracket from the arm.

2. If assembling to a round pole, remove and discard the adapter 

    gasket.

3. Using the pole bracket as a guide, drill holes in pole at desired 

    location.

4. Attach arm to pole with pole bracket inside pole. 

5. Feed wire leads from the ALX2 through slot in arm.

6. Attach the AXL2 head to arm using adjustment bolt. 

7. Adjust head to desired position and tighten adjustment bolt. 

8. Wiring can be made inside the arm wiring compartment or inside 

    pole (see 

Wiring

 section).

9. Secure wiring cover to arm with gasket in between (Fig. 8) 

Trunnion

1. Drill hole in mounting surface or rectangular pole. 

2. Attach luminaire to mounting surface or retangular pole (Fig. 9).

3. Make supply connection in waterproof J-box or inside pole 

    (see 

Wiring

 section).

INSTALLATION INSTRUCTIONS

800.533.3948 • www.barronltg.com 

Adjustment Bolt

Pole, round or rectangular

Slip Fitter

Pole 

Bracket

Adapter 

Gasket

Adjustment Bolt

Wiring Cover

Arm

Mounting surface 

or rectangular pole

Fig. 7

Fig. 8

Fig. 9

20070138 REV 1 - 2/19

AXL2 (80-280W)

3

Summary of Contents for Trace-Lite AXL2

Page 1: ...trical equipment basic safety precautions should always be followed including the following DISCONNECT AC POWER SUPPLY BEFORE SERVICING Installation and servicing of this equipment should be performed by qualified service personnel only Ensure that the electrical wiring conforms to the National Electrical Code NEC and local regulations if applicable Do not mount near gas or electric heaters Equipm...

Page 2: ...t in trunnion Fig 4 2 Attach trunnion to the head Fig 5 Yoke 1 Attach yoke to the head using a hex wrench provided by others Fig 6 INSTALLATION INSTRUCTIONS 800 533 3948 www barronltg com Fig 4 Fig 5 Fig 6 20070138 REV 1 2 19 AXL2 80 280W 2 ...

Page 3: ... 5 Feed wire leads from the ALX2 through slot in arm 6 Attach the AXL2 head to arm using adjustment bolt 7 Adjust head to desired position and tighten adjustment bolt 8 Wiring can be made inside the arm wiring compartment or inside pole see Wiring section 9 Secure wiring cover to arm with gasket in between Fig 8 Trunnion 1 Drill hole in mounting surface or rectangular pole 2 Attach luminaire to mo...

Page 4: ...e White Neutral Green Yellow Green Ground If dimming is used Purple Dim Gray Dim Note This fixture auto adjusts for voltages from 120 277V Cap all unused leads to prevent shorting IMPORTANT Weatherproof your outdoor installation be sure to seal all holes in fixture housing Mounting conduit plugs sensors and photo controls etc with silicone sealant 20070138 REV 1 2 19 Mounting surface or rectangula...

Reviews: