background image

4

5

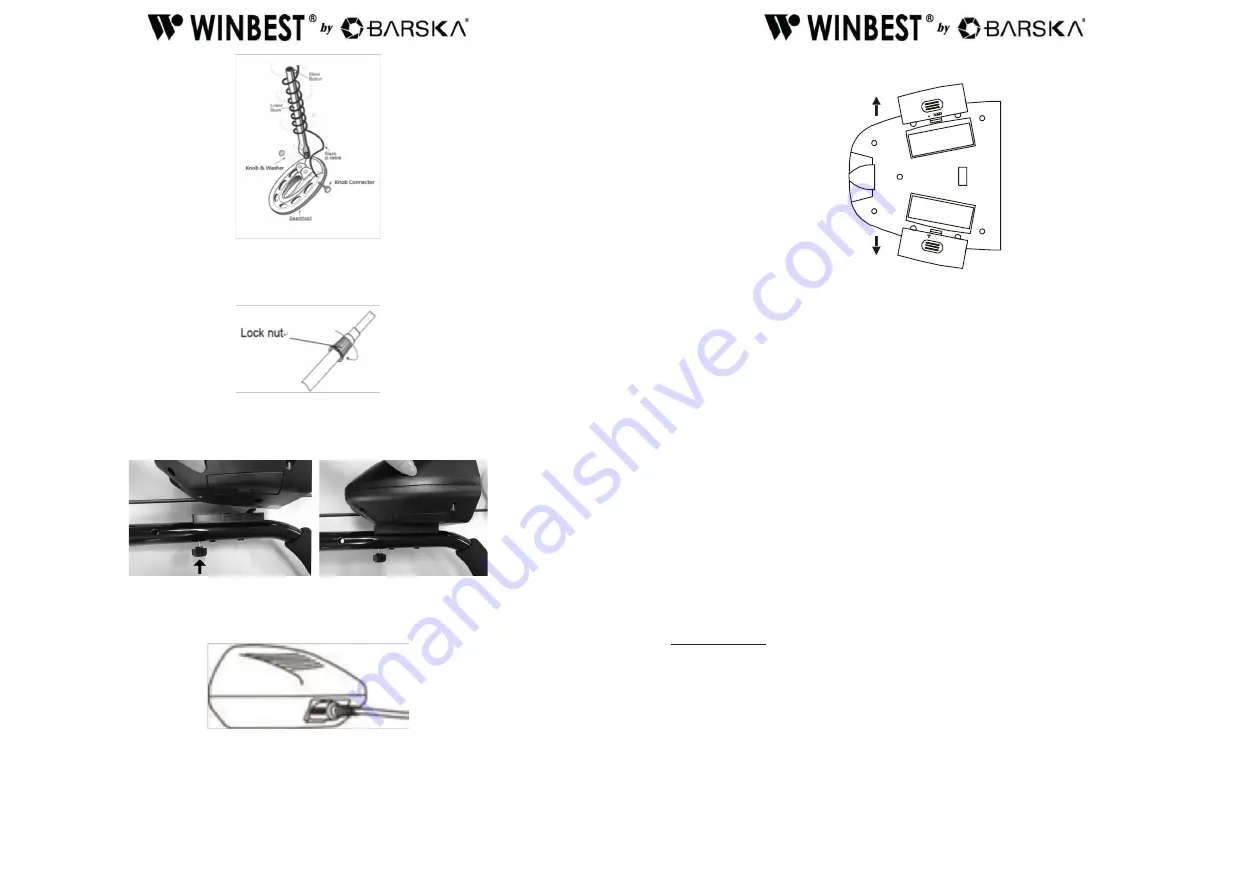
3. Loosen the middle stem’s lock nut in the direction of the arrow. Then, insert the 

    lower stem into the middle stem. Turn the stem’s lock nut in the reverse 

    direction of the arrow to lock it in place.

4. Unscrew the bolt of the control box and hitch the control box to the top stem. 

   Then, insert the bolt into the assembly hole on top stem and tighten it with the box.

5. Wind the cable around the stem. Insert the search coil cable plug into the five pin 

    jack at the bottom of control box’s housing.


Caution:

• The search coil cable plug fits into the connector only one way.

• DO NOT force the plug or you could damage it.
• DO NOT disassemble the stem lock nut.

INSTALLING THE BATTERIES

1. Turn off the power before installing the batteries.

2. Slide the left and right battery covers off in the direction of the arrow.

3. Place a 9V battery into the battery compartment matching the polarity symbols

    (+ and -) marked inside.

Warning

- Dispose of old batteries promptly and properly. Never bury or burn them.

Cautions

- Use only fresh alkaline batteries of required size.

- Do not mix the old and new batteries or different types of batteries.

- If you don’t plan to use the unit for a week or more time, remove the batteries. 

  Batteries can leak chemicals that can destroy electronic parts.

- Change the batteries if the battery indicator on the LCD lights.

USING HEADPHONES

1. It is recommended to choose the headphones with volume control.

2. Insert the headphones’ 3.5mm plug into the PHONE jack. At this time, the internal 

   speaker disconnects.

Listening Safely

- To protect your hearing, set the volume to the lowest setting.

- Before you begin listening, adjust the volume to a comfortable level.

- Do not listen at extremely high volume levels. Extended high volume listening can 

  lead to permanent hearing loss.

- Do not wear headphones while operating your detector near high-traffic areas. Pay 

  attention to traffic safety.

Summary of Contents for WINBEST Pursuit-300

Page 1: ...any returns NOTE All merchandise received without a valid RMA will be returned to shipper at his her own expense Please include all of the following when returning WINBEST by BARSKA products for serv...

Page 2: ...d in dark area PP Pinpoint Pinpoint the location of the target accurately Super Slow Sweep Identification With a very slow sweep of the search coil to discriminate different types of metal Headphone J...

Page 3: ...battery compartment matching the polarity symbols and marked inside Warning Dispose of old batteries promptly and properly Never bury or burn them Cautions Use only fresh alkaline batteries of require...

Page 4: ...Press MENU to select NOTCH Then press or to select the target to be notched The cursor above the selected target will flash Press NOTCH again and the target name below the cursor will disappear If yo...

Page 5: ...nge for 5 is 11 20 you can simply press DISC then set the DISC number to 11 by pressing or If the detector finds a coin of 5 the cursor above 5 will light d You can also ignore the unwanted target by...

Page 6: ...me will light Also LCD displays the numeric value of target as well as the depth signal strength of it Please note that the depth signal strength is only a reference not the exact depth of the target...

Page 7: ...copper items High Tone 25 10 same as for brass or silver items The detector comes with three tones for different types of metal and the built in audio identification system sounds a unique tone for e...

Page 8: ...se the level of sensitivity The level will be displayed on the LCD Note In order to detect the target deeply buried you can adjust the SENS to a high position However don t set the level of SENS to Ma...

Page 9: ...tify the target Sometimes oxidized metal also causes the excursion of target arrow and tone Five pin cable not connected well Dead battery CARE AND MAINTENANCE Handle the detector gently and carefully...

Reviews: