8
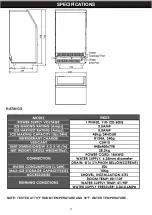
To ensure proper ventilation for your ice maker, the front of the unit must be completely unobstructed.
Allow at least 6” clearance at rear, and 2” of two sides for proper air circulation. Allow about 20 inches
high space at top to fill water freely from unit top when using manual water supply way and for proper
air circulation. The installation should allow the ice maker to be pulled forward for servicing if necessary.
When installing the ice maker under a counter, follow the recommended spacing dimensions shown above.
Place electrical and drain fixtures in the recommended locations as shown. Choose a well-ventilated area
with temperatures above 50 Fahrenheit and below 90 Fahrenheit. This unit MUST be installed in an area
protected from some elements, such as wind, rain, water spray or drips. The temperature of the water
supplying should be between 41 Fahrenheit and 77 Fahrenheit for proper operation.
ELECTRICAL REQUIREMENT & CONNECTIONS
WARNING: THIS UNIT MUST BE GROUNDED
ELECTRIC SHOCK HAZARD
Plug into a grounding wall outlet.
Never remove the ground prong.
Use separate power supply or receptacle.
Never use an adapter.
Never use an extension cord.
Failure to follow these instructions can result in death, fire, or electrical shock.
Before you move your ice maker into its final location, it is important to make sure you have the proper
electrical connection. It is recommended that a separate circuit, serving only your ice maker, be provided.
Use receptacles that cannot be turned off by a switch or pull chain. If the supply cord or plug to be replaced,
it should be done by a qualified service engineer. This appliance requires a standard 110-120Volt, 60Hz
electrical outlet with good grounding means.
RECOMMENDED GROUNDING METHOD
For your personal safety, this appliance must be properly grounded. This appliance is equipped with a
power supply cord with a grounding plug. To minimize possible shock hazard, the cord must be plugged
into a mating grounding-type wall receptacle, grounded in accordance with the National Electrical Code
and local codes and ordinances. If a mating wall receptacle is not available, it is the personal responsibility
of the customer to have a properly grounding wall receptacle installed by a qualified electrician.
CLEANING YOUR ICE MAKER BEFORE FIRST USING
1.
Open the ice taking door.
2.
Clean with diluted detergent, warm water and a soft cloth.
3.
Repeatedly clean the water contacting inner parts, use the water or the wet clothe to scrub the relevant
parts, then use the dry clothe to dry them.
4.
You can pull the Water drain pipe of the water tank indicating “H” in above illustration to drain out the
cleaned water in the water tank, then next to clean inner ice-storing bin, till all of inner parts are cleanly,
then drain out all of the cleaned water from the water drain port located at unit back indicating “8”in above
illustration. And must to install back the water drain pipe of the water tank and the cap of the unit water drain
port, otherwise, the unit will not make the ice normally. And suggest that you should discard the ice-cube
made by the first ice making cycle after cleaning. Note: Please see the section “Water Drainage” in this
manual to drain out the cleaned water.
5.
The outside of the ice maker should be cleaned regularly with a mild detergent solution and warm water.
6.
Dry the interior and exterior with a clean soft cloth.
OPERATION


