background image

Installation and operation  


370270   


19 / 26 

EN 


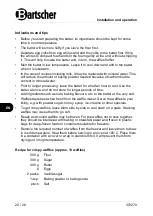
Baking Waffles 

  WARNING! 

Risk of burns! 
Touching hot baked products with bare fingers or hands may cause 
burns.  

Hot baked products should be removed only with the use of wooden or 
plastic paddle, or, if possible, tongs resistant to high temperature. 

 
1.  Open the heated appliance with the use of the grip and make sure that the 

upper tray is opened up to the limit. 

2.  Spread a small amount of vegetable oil on the bottom baking tray. 

3.  Use a ladle, a spoon or batter batching container to pour the prepared batter 

onto the bottom baking tray, starting from the middle and spreading it uniformly. 
Pay attention to the amount of batter, as an excess of batter may spill over the 
edges of the appliance.  

4.  Close the appliance and use the grip to press the upper baking tray down to 

spread the batter uniformly.  

5.  Depending on the required browning level, bake for approx. 2

–3 minutes. 

6.  Using the grip, open the appliance and carefully remove the prepared waffle 

with the help of suitable tongs or a wooden paddle.  

7.  Place the prepared waffle aside on a grate to cool down.  

Batter can be poured immediately after removing a ready waffle. 

8.  Bake the required number of waffles according to the description above. 

9.  Serve waffles until they are warm. 

10. When finished baking waffles, press the push rotary control knobs and rotate 

them until 

'00'

 is shown on the digital display. 

11. Set the ON/OFF switch to 

'O'

 position and disconnect the appliance from power 

supply outlet (pull the plug out). 


NOTE! 

For baking waffles shaped like lollipops use generally market-available 
wooden skewers that fit the cavings in the bottom baking trays.  
Put a skewer into a caving right after filling it with batter.  
Then close the top baking tray with the use of the grip. 


Summary of Contents for 370270

Page 1: ...MDI 1HW AL 1BW AL Torti 400 Lolly 400 Donut 900 Lolly 600 370270 370271 370272 370273 370274 370275...

Page 2: ...scher GmbH Franz Kleine Str 28 D 33154 Salzkotten Germany Phone 49 5258 971 0 Fax 49 5258 971 120 Technical Support Hotline 49 5258 971 197 www bartscher com Version 1 0 Date of preparation 2020 11 09...

Page 3: ...7 2 3 Declaration of Conformity 7 3 Transport Packaging and Storage 8 3 1 Delivery Check 8 3 2 Packaging 8 3 3 Storage 8 4 Technical Data 9 4 1 Technical Specifications 9 4 2 List of Components of th...

Page 4: ...s included in this manual is a prerequisite for safe and proper handling of the appliance Additionally accident prevention occupational health and safety and legal regulations in force in the area the...

Page 5: ...nt Too high a mains voltage or incorrect installation may cause electric shock The appliance may be connected only if data on the rating plate correspond with the mains voltage To avoid short circuit...

Page 6: ...h fire Never use the appliance near flammable or inflammable materials e g petrol spirit alcohol etc High temperature triggers evaporation of these materials and as a result of contact with sources of...

Page 7: ...ervised to ensure that they are not playing with or switching on the appliance Improper use Unintended or prohibited use may cause damage to the appliance The appliance may only be used in a technical...

Page 8: ...onsidered to be an unintended use The following is an intended use Baking waffles 1 4 Unintended Use An unintended use may lead to personal injuries or property damages caused by hazardous voltage fir...

Page 9: ...troduced by the user usage of unapproved spare parts We reserve the right to introduce technical modifications to the product intended for improvement of the appliance and its performance 2 2 Copyrigh...

Page 10: ...used to store the appliance when relocating or when shipping the appliance to our service point in the case of any damages The packaging and its elements are made of recyclable materials Particularly...

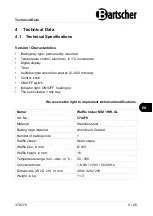
Page 11: ...witch Indicator light ON OFF heating up The set includes 1 drip tray We reserve the right to implement technical modifications Endergebnis Name Waffle maker MDI 1HW AL Art No 370270 Material Stainless...

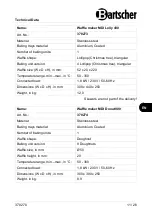
Page 12: ...50 300 Connected load 1 8 kW 230 V 50 60 Hz Dimensions W x D x H in mm 300 x 420 x 260 Weight in kg 11 1 Name Waffle maker MDI Torti 400 Art No 370272 Material Stainless steel Baking trays material Al...

Page 13: ...nge min max in C 50 300 Connected load 1 8 kW 230 V 50 60 Hz Dimensions W x D x H in mm 300 x 440 x 250 Weight in kg 12 0 Skewers are not part of the delivery Name Waffle maker MDI Donut 900 Art No 37...

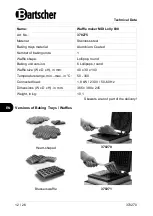
Page 14: ...ts 1 Waffle shape Lollipop round Baking unit version 6 Lollipops round Waffle size W x D x H in mm 40 x 30 x 140 Temperature range min max in C 50 300 Connected load 1 8 kW 230 V 50 60 Hz Dimensions W...

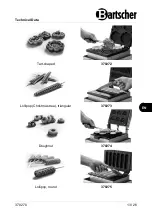
Page 15: ...Technical Data 370270 13 26 EN Tart shaped 370272 Lollipop Christmas tree triangular 370273 Doughnut 370274 Lollipop round 370275...

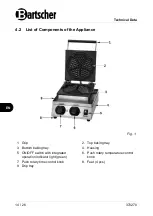
Page 16: ...ponents of the Appliance Fig 1 1 Grip 2 Top baking tray 3 Bottom baking tray 4 Housing 5 ON OFF switch with integrated operation indicator light green 6 Push rotary temperature control knob 7 Push rot...

Page 17: ...y or property damage Positioning and installation as well as repairs may be performed by authorised technical service only and in compliance with the applicable national law Unpacking Positioning Unpa...

Page 18: ...ket The power cord should be laid in a way preventing anyone from threading on it or tripping against it Do not use the appliance with an external timer or remote control 5 2 Operation Before First Us...

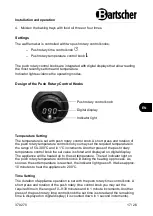
Page 19: ...ed temperature in the range of 50 300 C and in 1 C increments Another press of the push rotary temperature control knob the set value is stored and displayed on digital display The appliance will be h...

Page 20: ...trol knob is not activated through pushing it Switching the Appliance on and Heating It up WARNING Risk of burns When in use the baking trays and external surfaces of the appliance get very hot Do not...

Page 21: ...upper baking tray down to spread the batter uniformly 5 Depending on the required browning level bake for approx 2 3 minutes 6 Using the grip open the appliance and carefully remove the prepared waff...

Page 22: ...ce and do not store for longer periods of time Add ingredients such as nuts baking flavours etc to the batter at the very end Waffles taste best when fresh from the waffle maker Serve the waffles to y...

Page 23: ...ppliance with a pressurized water jet Do not use any sharp or pointed nor metal implements knife fork etc Sharp or pointed implements may damage the appliance and when in contact with live parts they...

Page 24: ...Cleaning 22 26 370270 EN 7 Clean the housing with a soft cloth and mild cleaning agent 8 Wipe all washed surfaces with a clean damp cloth 9 Then dry the appliance thoroughly...

Page 25: ...damage or faults Electric power supply safety fuse damaged Check the fuse connect the appliance to another socket No power supply Check the electric power supply Appliance is connected to the power s...

Page 26: ...ppliances must be disposed of and recycled in a correct and environmentally friendly manner You must not dispose of electric appliances with household waste Disconnect the appliance from the power sup...

Reviews: