background image


Installation Instructions 

30 / 42 

2831021 

EN 


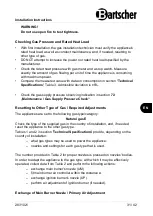
•  Maintain sufficient clearance from table edges. The appliance might turn over 

and fall down. 


•  Never place the appliance directly next to walls, furniture, or other objects made 

of flammable materials. Maintain minimum clearance of 200 mm between side 
and rear walls and the said objects and walls. Maintain clearance of at least 600 
mm between the appliance's surface and horizontal surfaces over the appliance. 

•  If keeping the minimum clearance is not possible, walls should be isolated with 

non-combustible, thermo-insulation materials (e.g., films made of heat resistant 
materials, which may sustain temperature of at least 65°C). Follow fire 
protection regulations in force. 

•  When adjusting the feet, level the appliance and set its height. Considerable 

differences in height or tilting may negatively affect the appliance's operation. 


Connection to Gas Installation 

•  Before making the connection to gas installation, make sure that the appliance 

is set to gas and pressure is available in the installation location (see rating plate 
on the appliance and packaging). If factory default settings are not suitable, the 
appliance must be adapted to the available gas type (section 

'Resetting to 

Other Type of Gas / Required Adjustments'

). 

•  The attested gas shut-off valve must be installed in an easily accessible location 

between the gas supply installation and the appliance, so that, if needed, gas 
supply may be interrupted at any time. 

•  Check if the gas cylinder (if it is included) is correctly set up and secured, and if 

it is located in a dry place. 

•  Connect the appliance to the gas supply installation, using rigid connection 

tubes or flexible steel hoses, with section suitable for the given rated power and 
length. 

•  Use only connection tubes with, at least, diameters equalling the diameter of the 

appliance's gas connection. Gas connection stub is found at the back of the 
appliance. 

•  Make sure that flexible hoses do not run on or near hot surfaces, are not subject 

to stress or pressure and do not come into contact with sharp edges or other 
objects that could damage the tube. 

•  After connecting the appliance, all connection points between the installation 

and the appliance must be subject of tightness check. To this end, use spray for 
detecting leakages or foam producing agents, which do not spur corrosion. 
Connection points should be covered with an agent - no air bubbles should be 
produced. Also the gas shut-off valves should be subject of this check. 


Summary of Contents for 700FX-G20

Page 1: ...700FX G20 700FX G40 700FX G60 2831021 2831041 2832361...

Page 2: ...er GmbH Franz Kleine Str 28 D 33154 Salzkotten Germany Phone 49 5258 971 0 Fax 49 5258 971 120 Service hotline 49 5258 971 197 www bartscher com CE 0085DL0222 Version 1 0 Date of preparation 2022 10 1...

Page 3: ...2 3 Declaration of Conformity 11 3 Transport Packaging and Storage 12 3 1 Delivery Check 12 3 2 Packaging 12 3 3 Storage 12 4 Technical Data 13 4 1 Technical Specifications 13 4 2 Functions of the App...

Page 4: ...s included in this manual is a prerequisite for safe and proper handling of the appliance Additionally accident prevention occupational health and safety and legal regulations in force in the area the...

Page 5: ...ent Too high a mains voltage or incorrect installation may cause electric shock The appliance may be connected only if data on the rating plate correspond with the mains voltage To avoid short circuit...

Page 6: ...tion WARNING Suffocation and explosion hazard due to leaking gas When you sense gas odour observe the following rules immediately close the knob s and the main gas valve provide for sufficient venting...

Page 7: ...ture remains for some time after switching the appliance off Do not touch any hot surfaces of the appliance Use the provided handling elements and holders You may transport and clean the appliance aft...

Page 8: ...y 6 42 2831021 EN The appliance may only be used when it is clean Use only original spare parts Never attempt to repair the appliance on your own Do not introduce any changes in the appliance nor modi...

Page 9: ...or is deliberately touching hot substances oil water steam Danger of falling Operator performs actions on the upper part of the device using inappropriate aids e g a ladder with rungs or climbs the de...

Page 10: ...maintenance work if you touch the internal parts of the machine frame Maintenance work may only be performed by qualified personnel equipped with appropriate personal protective equipment cut resista...

Page 11: ...Standard cleaning X Special cleaning X X Maintenance X X Dismantling X Disposal X X Personal protective equipment provided Personal protective equipment is available or must be used if required Perso...

Page 12: ...ntended use Preparing and heating up foods with the use of suitable cookware 1 6 Unintended Use An unintended use may lead to personal injuries or property damages caused by hazardous voltage fire or...

Page 13: ...ntroduced by the user usage of unapproved spare parts We reserve the right to introduce technical modifications to the product intended for improvement of the appliance and its performance 2 2 Copyrig...

Page 14: ...e used to store the appliance when relocating or when shipping the appliance to our service point in the case of any damages The packaging and its elements are made of recyclable materials Particularl...

Page 15: ...es included Hob type gas Ignition type manual Gas burner double ring burner Pilot flame Features stainless steel surface with Scotch Brite finish cast iron grates The set includes 4 height adjustable...

Page 16: ...W x D x H in mm 400 x 700 x 295 Weight in kg 25 0 We reserve the right to implement technical modifications Name Gas stove 700FX G40 Art No 2831041 Material stainless steel Number of hobs 4 Distributi...

Page 17: ...m 400 x 300 Gas connected load 28 5 kW Dimensions W x D x H in mm 1 200 x 700 x 295 Weight in kg 61 0 We reserve the right to implement technical modifications 4 2 Functions of the Appliance The 700FX...

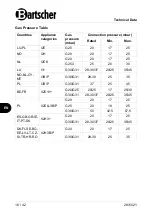
Page 18: ...0 17 25 G25 3 25 20 30 LU I3 G30 G31 28 30 37 20 25 35 45 NO NL CY MT I3B P G30 G31 28 30 25 35 PL I3B P G30 G31 37 25 45 BE FR II2E 3 G20 G25 20 25 17 25 30 G30 G31 28 30 37 20 25 35 45 PL II2ELL3B P...

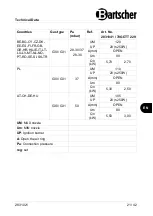
Page 19: ...r Connection pressure mbar Rated Min Max AT CH II2H3B P G20 20 17 25 G30 G31 50 42 5 57 5 HU II2HS3B P G20 25 18 33 G25 1 25 18 33 G30 G31 28 30 25 35 HU II2HS3B P G20 25 18 33 G25 1 25 18 33 G30 G31...

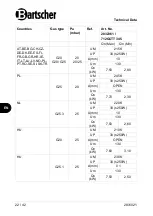
Page 20: ...HR IE IT LT LU LV NO PL PT RO SE SI SK TR G20 G20 G25 20 20 25 UM 150R UP 30 250W A mm OPEN Um 90 Qn kW 3 50 140 PL G25 20 UM 165K UP 30 250W A mm OPEN Um 90 Qn kW 3 60 1 15 NL G25 3 25 UM 155K UP 30...

Page 21: ...LU LV MT NL NO PT RO SE SI SK TR G30 G31 28 30 37 28 30 UM 95 UP 20 250W A mm OPEN Um 70 Qn kW 3 60 2 50 PL G30 G31 37 UM 90 UP 20 250W A mm OPEN Um 70 Qn kW 3 75 2 00 AT CH DE HU G30 G31 50 UM 85 UP...

Page 22: ...LU LV NO PL PT RO SE SI SK TR G20 G20 G25 20 20 25 UM 190R UP 30 250W A mm OPEN Um 110 Qn kW 5 50 2 10 PL G25 20 UM 205K UP 30 250W A mm OPEN Um 110 Qn kW 5 60 1 70 NL G25 3 25 UM 195K UP 30 250W A mm...

Page 23: ...LV MT NL NO PT RO SE SI SK TR G30 G31 28 30 37 28 30 UM 120 UP 20 250W A mm OPEN Um 90 Qn kW 5 70 2 70 PL G30 G31 37 UM 110 UP 20 250W A mm OPEN Um 80 Qn kW 5 30 2 50 AT CH DE HU G30 G31 50 UM 105 UP...

Page 24: ...LT LU LV NO PL PT RO SE SI SK TR G20 G20 G25 20 20 25 UM 215K UP 30 250W A mm 10 Um 130 Qn kW 7 50 2 80 PL G25 20 UM 245K UP 30 250W A mm OPEN Um 130 Qn kW 7 70 2 30 NL G25 3 25 UM 220K UP 30 250W A m...

Page 25: ...MT NL NO PT RO SE SI SK TR G30 G31 28 30 37 28 30 UM 140 UP 20 250W A mm OPEN Um 100 Qn kW 7 60 3 40 PL G30 G31 37 UM 130 UP 20 250W A mm OPEN Um 100 Qn kW 7 30 3 70 AT CH DE HU G30 G31 50 UM 120 UP...

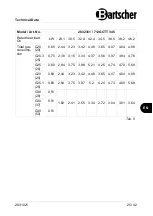
Page 26: ...1 25 0 95 1 17 1 42 1 40 1 65 1 89 G30 29 0 61 0 75 0 91 0 90 1 06 1 21 G30 37 0 61 0 75 0 91 0 90 1 06 1 21 G30 50 0 61 0 75 0 91 0 90 1 06 1 21 Tab 3 Model Art No 2831041 78GCTT 229 Rated heat load...

Page 27: ...on G20 20 0 69 2 44 3 23 3 42 4 48 3 65 4 07 4 04 4 89 G25 3 25 0 75 2 38 3 15 3 34 4 37 3 56 3 97 3 94 4 76 G25 20 0 80 2 84 3 75 3 98 5 21 4 25 4 74 4 70 5 69 G20 25 0 69 2 44 3 23 3 42 4 48 3 65 4...

Page 28: ...Technical Data 26 42 2831021 EN 4 3 List of Components of the Appliance 2831041...

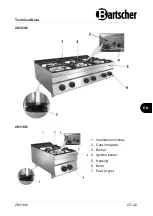
Page 29: ...Technical Data 2831021 27 42 EN 2832361 2831021 1 Ventilation chimney 2 Cast iron grate 3 Burner 4 Ignition burner 5 Housing 6 Knob 7 Feet 4 pcs...

Page 30: ...luded in DVGW G631 data sheet Place the appliance in a well ventilated room under a fume extractor if possible in order to eliminate fumes or odours generated when food is prepared see DVGW G631 data...

Page 31: ...with a protective film remove it Remove the film slowly so no glue residues are left Remove any glue residues with the use of a suitable solvent Be careful not to damage the rating plate and warning l...

Page 32: ...able the appliance must be adapted to the available gas type section Resetting to Other Type of Gas Required Adjustments The attested gas shut off valve must be installed in an easily accessible locat...

Page 33: ...3 Maintenance Gas Supply Pressure Check Resetting to Other Type of Gas Required Adjustments The appliances are set to the following gas type category Natural gas E Check the type of the supplied gas...

Page 34: ...42 2831021 EN Fig 1 Fig 2 1 Remove the knob 2 Remove cast iron grates and burners 3 Remove main burner s nozzle UM Fig 1 and exchange it with a nozzle provided in Table 2 part of the delivery 4 Re tig...

Page 35: ...erent data and indication of the new type Functional Check Before test running install the appliance in a well ventilated room and remove any flammable materials from the vicinity of the appliance Bef...

Page 36: ...nce If the malfunction persists do not use the appliance and order gas installation technician s visit Any manipulation with the appliance assembly or maintenance work may be performed exclusively by...

Page 37: ...only designated control elements The grease collection container and its contents are very hot Empty the grease collection container only when it has cooled down Fire hazard Never place any kitchen u...

Page 38: ...Operating Instruction 36 42 2831021 EN 3 Install burners 4 Correctly fix gas burner guards Fig 4 Fig 5 Fig 6 Fig 7 Fig 8 Fig 9 5 Install cast iron grates...

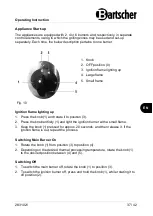
Page 39: ...quipped with 2 4 or 6 burners and respectively in separate control elements owing to which the grilling zones may be used and set up separately Each time the below description pertains to one burner 1...

Page 40: ...nce with food on top of it remove the food first Use protective gloves when moving cookware 1 Place an appropriate cookware with food on the heating plate ATTENTION Do not place an empty cookware on t...

Page 41: ...he surface 7 2 Cleaning Gas Hob 1 Clean the appliance regularly at the end of each working day and if necessary also in the meantime or when the appliance is not to be used for a longer time 2 Remove...

Page 42: ...functions Operate the appliance observing the instruction manual and indications in section Indications for the User and check gas supply pressure see next section correct switching of burners and ope...

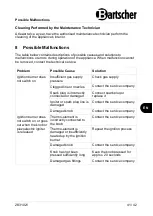
Page 43: ...essure Check gas supply Clogged line or nozzles Contact the service company Spark plug is incorrectly connected or damaged Connect spark plug or replace it Igniter or spark plug line is damaged Contac...

Page 44: ...act the service company Heating power output control is not possible Damaged knob Contact the service company 9 Disposal At the end of the appliance s operational life cycle dispose of the appliance o...

Reviews: