background image


- 43 - 

5.2.3  Gas stove 


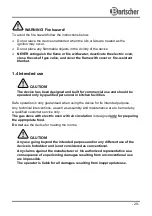
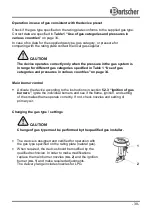
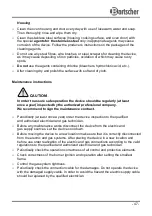
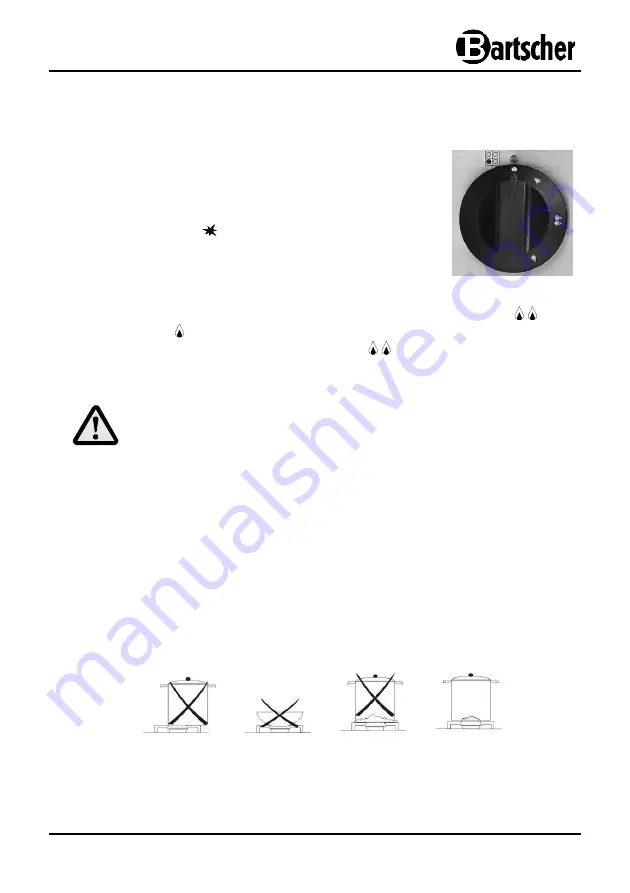
Ignition of burners 


  Make sure that all knobs are in 

 (OFF) position. 

  Open the gas valve before the device. 

  In order to ignite the burner press appropriate knob 

and rotate it counterclockwise to the position with the 
ignition flame symbol 

  Hold the knob pressed for 3-4 seconds and ignite the 

flame with the igniter.


  Hold the knob pressed for a few more seconds to obtain the flame continuity. 


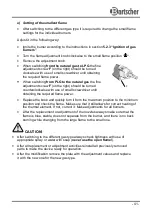
  Adjust the flame as required by turning the knob towards the large flame 

 or 

the small flame 

, whereas the knob must be positioned in the range between 

those points and never between the large flame 

 and 

 (OFF) positions. 

  In order to put out the flame turn the knob to 

 (OFF) position. 

  At the end of the work day close the gas cut-off valve. 

 CAUTION! 

In case of longer standstill or damage of the device close the main gas 
valve before the device. 


Instructions and advices 


  Avoid the flame exceeding the pot (frying pan) edge. 

  When the food starts to boil reduce the flame to the lowest level so it will not be 

extinguished by the boiling over food. 

  Never leave the device unattended during heating of fats and oils as they may 

ignite when overheated. There is the fire hazard!


  Use only pots with flat bottom. 


  Place the pots on the grate in such way that the flame is located in the centre. 


Summary of Contents for GHU 4110

Page 1: ...1008 CP 2777 GHU 4110 2819991 V1 0415...

Page 2: ......

Page 3: ...ation from page 25 to 48 Mode d emploi cuisini re gaz 4 br leurs GHU 4110 avec four lectrique par convection 1 1GN de page 49 page 72 Gebruiksaanwijzing 4 pits gasfornuis GHU 4110 met elektrische hete...

Page 4: ......

Page 5: ...7 4 Technische Daten 8 4 1 Baugruppen bersicht 8 4 2 Technische Angaben 9 5 Installation und Bedienung 11 5 1 Anweisungen f r den Installateur 11 5 1 1 Intallation 12 5 1 2 Elektroanschluss 13 5 1 3...

Page 6: ...n wenn es unsachgem oder nicht bestimmungs gem verwendet wird Alle Personen die das Ger t benutzen m ssen sich an die Angaben in der Gebrauchsanleitung halten und die Sicherheitshinweise beachten 1 1...

Page 7: ...auftreten trennen Sie das Ger t von der Stromversorgung und unterbrechen Sie die Gaszuf hr Hauptgashahn zudrehen Benachrichtigen Sie einen Kundendienst oder kontaktieren Sie den H ndler 1 2 Symbolerkl...

Page 8: ...enen Sie das Ger t niemals mit nassen oder feuchten H nden Trennen Sie das Ger t von der Stromversorgung wenn Sie das Ger t nicht benutzen wenn w hrend des Betriebes eine St rung auftritt bevor Sie da...

Page 9: ...werden Die Betriebssicherheit des Ger tes ist nur bei bestimmungsgem er Verwendung entsprechend der Angaben in der Gebrauchsanleitung gew hrleistet Alle technischen Eingriffe auch die Montage und die...

Page 10: ...r Sch den und St rungen bei Nichtbeachtung der Anweisungen zur Installation Bedienung und Reinigung nicht bestimmungsgem er Verwendung technischen nderungen durch den Benutzer Verwendung nicht zugelas...

Page 11: ...der Inbetriebnahme das u ere und innere Verpackungsmaterial vollst ndig vom Ger t HINWEIS Falls Sie die Verpackung entsorgen m chten beachten Sie die in Ihrem Land geltenden Vorschriften F hren Sie w...

Page 12: ...e Daten 4 1 Baugruppen bersicht B A A 3 5 kW A B B 7 0 kW Gusseisenroste Stellf e h henverstellbar Gasbrenner 4 Auflagerost Bedienelemente Backblech Auflageschienen Geh use Backofent r Wrasenabzug Bac...

Page 13: ...gen Innenraum B 560 x T 390 x H 340 mm Anschlusswert Gas 21 0 kW Anschlusswert Elektro 3 1 kW 220 240 V 50 60 Hz Abmessungen Ger t B 750 x T 700 x H 850 910 mm Gewicht 65 0 kg Zubeh r 2 Auflageroste E...

Page 14: ...styp Gasdruck Bestimmungsl nder I2H G20 20 mbar AT BG CH CY CZ DK EE ES FI GB GR IE IT LT LV NO PT RO SE SI SK I2E G20 20 mbar DE LU PL RO I3 G30 G31 28 30 37 mbar BE CH CY CZ ES FR GB GR IE IT LT PT...

Page 15: ...arbeiten und der Inbetriebnahme des Ger tes beginnen Sobald Sie das Ger t erhalten haben stellen Sie sicher dass es keine Transport sch den aufweist und die Verpackung nicht besch digt wurde Im Falle...

Page 16: ...betrieben werden Der Installationsraum des Ger tes muss so viel Luft enthalten wie f r die ordnungs gem e Gasverbrennung erforderlich ist F r eine korrekte Verbrennung darf der erforderliche Luftzust...

Page 17: ...diesen Gegenst nden oder W nden ein Zwischen der Ger teoberfl che und den dar ber befindlichen horizontalen Fl chen halten Sie einen Mindestabstand von 600 mm ein Sollte die Einhaltung dieser Mindest...

Page 18: ...stet Vor der Installation berpr fen ob die rtliche Gasversorgung Gasart und druck mit der Voreinstellung bereinstimmt Die Gasanschlussvorrichtung befindet sich an der rechten unteren Seite des Ger tes...

Page 19: ...des Hauptbrenners Das Ger t gem Anweisungen im Abschnitt 5 2 3 Z ndung der Gasbrenner in Betrieb nehmen die einzelnen Gasbrenner z nden und berpr fen ob die Z ndflamme die Z ndung und die Einstellung...

Page 20: ...raubendreher die D se des Z ndflammen brenners eine neue D se entsprechend der Gasart einsetzen bzw einstellen entnehmen Sie die Angaben zu den geeigneten D sen der Tabelle 2 Brenner und D seneigensch...

Page 21: ...rehen Sie ihn schnell aus der maximalen auf die minimale Position und berpr fen Sie die Flamme Stellen Sie sicher dass die Regelung ausreichend ist um die Erw rmung des Thermoelements aufrecht zu erha...

Page 22: ...l che des Ger tes befinden Ziehen Sie vor der Inbetriebnahme vorsichtig die Schutzfolie vom Ger t ab und entfernen Sie alle Kleberr ckst nde mit lauwarmem Seifenwasser oder einem geeigneten L sungsmit...

Page 23: ...chen diesen beiden Einstellungen und niemals zwischen Gro einstellung und Position AUS gedreht werden soll Zum L schen der Gasbrenner die Drehregler auf die Position AUS drehen Am Ende eines Arbeitsta...

Page 24: ...jede Speise die geeignete Temperatur und Zeit gew hlt werden Temperatureinstellung Stellen Sie f r die gew nschte Speise die erforderliche Temperatur mit Hilfe des Temperaturdrehreglers ein Folgende...

Page 25: ...Hei luftzirkulation zu gew hrleisten sollten zwischen den Speisen auf den Einschubebenen mindestens 40 mm eingehalten werden Hinweise und Tipps Die jeweiligen St ckgr en der Speisen und der Gebrauch v...

Page 26: ...enden Sie bei Bedarf ein neutrales Reinigungs mittel Mit klarem Wasser nachsp len und anschlie end gr ndlich abtrocknen o Nach der Reinigung die Abtropfschalen Gasbrennerabdeckungen und Gusseisen rost...

Page 27: ...chbetrieb berpr fen lassen Wir empfehlen einen Wartungsvertrag abzuschlie en o Lassen Sie am Ger t regelm ig mindestens einmal im Jahr Kontrollen durch einen qualifizierten Elektriker und Gasinstallat...

Page 28: ...it der Missbrauch und die damit verbundenen Gefahren ausgeschlossen sind machen Sie Ihr Altger t vor der Entsorgung unbrauchbar Dazu Ger t von der Strom und Gasversorgung trennen Das Netzanschlusskabe...

Page 29: ...check 31 3 2 Packaging 31 3 3 Storage 31 4 Technical data 32 4 1 Overview of parts 32 4 2 Technical specification 33 5 Installation and operation 35 5 1 Installation instructions 35 5 1 1 Installatio...

Page 30: ...ly applicable technological standards However the device can pose a danger if handled improperly and inappropriately All persons using the device must follow the recommendations and instructions in th...

Page 31: ...of any irregularities during the operation disconnect the device from the electric power supply and cut off the gas supply close the main gas valve Contact the service company or the vendor 1 2 Key t...

Page 32: ...ctric supply cable in water or other liquids Never operate the device with wet or moist hands Disconnect the device from the electric power supply when the device is not used in case of anomalies duri...

Page 33: ...itchen facilities Safe operation is only guaranteed when using the device for its intended purpose Any technical interventions as well as assembly and maintenance are to be made by a qualified custome...

Page 34: ...llowing the instructions for installation operation and cleaning use other than designed alterations made by user use of inadequate spare parts We reserve the right to make technical changes for purpo...

Page 35: ...The outer and inner packing material should be removed completely from the device before installation NOTE If you liked to dispose the packing consider the regulations applicable in your country Supp...

Page 36: ...cal data 4 1 Overview of parts B A A 3 5 kW A B B 7 0 kW Cast iron grate Adjustable feet Gas burners 4 Grate shelf Operation elements Baking tray Shelves guides Housing Oven door Steam extractor Oven...

Page 37: ...50 C 300 C time controller 0 120 minutes internal space dimensions W 560 x D 390 x H 340 mm Gas power 21 0 kW Electric power supply 3 1 kW 220 240 V 50 60 Hz Dimensions W 750 x D 700 x H 850 910 mm W...

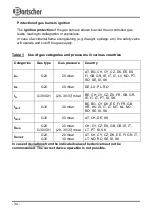
Page 38: ...ssure Country I2H G20 20 mbar AT BG CH CY CZ DK EE ES FI GB GR IE IT LT LV NO PT RO SE SI SK I2E G20 20 mbar DE LU PL RO I3 G30 G31 28 30 37 mbar BE CH CY CZ ES FR GB GR IE IT LT PT SI SK I3B P G30 30...

Page 39: ...s carefully before the installation and operation After receiving the device make sure that it has not been damaged during transport and the package is not damaged In case of damages or deficiency in...

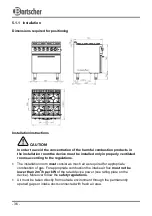
Page 40: ...d rooms according to the regulations The installation room must consist as much air as required for appropriate combustion of gas For appropriate combustion the intake air flux must not be lower than...

Page 41: ...minimum distance of 200 mm from the sides and rear Keep a minimum distance of 600 mm between the upper surface of the device and surfaces located above it Proceed according to relevant fire safety reg...

Page 42: ...and certified for operation with the gas type specified on the rating plate Before the installation make sure that the local gas supply system gas type and pressure conforms to the device preset The g...

Page 43: ...in various countries on page 34 Main burner control Activate the device according to the instructions in section 5 2 3 Ignition of gas burners ignite the individual burners and see if the flame ignit...

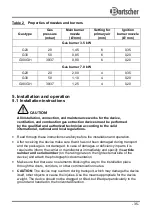
Page 44: ...move the ignition burner nozzle Replace the removed nozzle with the one designed for a given gas type and make required adjustments nozzle data are in Table 2 Properties of nozzles and burners on page...

Page 45: ...crewdriver until obtaining the required flame power Replace the knob and quickly turn it from the maximum position to the minimum position and check the flame Make sure that it still allows for correc...

Page 46: ...uipment package foils manuals Before the start up carefully remove the protective foil from the device and use the lukewarm water or appropriate solvent to remove the glue residuals Before the start u...

Page 47: ...the range between those points and never between the large flame and OFF positions In order to put out the flame turn the knob to OFF position At the end of the work day close the gas cut off valve CA...

Page 48: ...e optimal cooking baking effect select the temperature and time accordingly for each food Temperature adjustment Use the temperature controller knob to select tempera ture for a given food The followi...

Page 49: ...the sufficient air circulation leave the distance of at least 40 mm between the food placed on the shelves Instructions and advices Due to sizes of food and use of various utensils from various mater...

Page 50: ...h those parts with soft cloth or sponge moistened with warm water It is possible to use the neutral washing agent when required Rinse in clean water and dry o After cleaning the burners covers and gra...

Page 51: ...company We recommend to sign the maintenance contract o Periodically at least once a year order the device inspection to the qualified and authorized electrician and gas technician o Before any maint...

Page 52: ...service in your community WARNING To exclude any abuse and the dangers involved make the device unfit for use before disposal To do this disconnect the device from the electric and gas supply sources...

Page 53: ...llage 55 3 3 Stockage 55 4 Donn es techniques 56 4 1 Aper u des composants 56 4 2 Indications techniques 57 5 Installation et utilisation 59 5 1 Indications pour l installateur 59 5 1 1 Installation 6...

Page 54: ...lement N anmoins celui ci peut comporter des risques en cas d utilisation non conforme ou inappropri e Toute personne utilisant cet appareil doit respecter les instructions et recommandations pr sent...

Page 55: ...lectrique et couper l arriv e du gaz fermer la vanne principale de gaz Informer nos services ou contacter le vendeur 1 2 Explication des symboles Les consignes de s curit et informations techniques im...

Page 56: ...ou mouill es D brancher l appareil de l alimentation lectrique si l appareil n est pas utilis en cas de d faillances durant son utilisation avant de nettoyer l appareil Ne pas utiliser de jet d eau ou...

Page 57: ...par un personnel qualifi La s curit de fonctionnement de l appareil est garantie uniquement lors de l utilisation conforme de celui ci Toutes les interventions techniques galement le montage et la mi...

Page 58: ...tion et le nettoyage une utilisation non conforme l utilisation de base des r parations effectu es par l utilisateur l utilisation de pi ces de rechange non approuv es Nous nous r servons le droit d a...

Page 59: ...s Retirer compl tement les emballages ext rieur et int rieur avant la mise en service de l appareil INDICATION Si vous d sirez liminer l emballage respectez les consignes en vigueur dans votre pays R...

Page 60: ...composants B A A 3 5 kW A B B 7 0 kW Grilles en fonte Pieds de hauteur r glable Br leur gaz 4 Grille de four El ments de commande Bac de cuisson Rails des grilles Enceinte Porte du four Evacuation de...

Page 61: ...eur L 560 x P 390 x H 340 mm Puissance d alimentation du gaz 21 0 kW Valeurs de l alimentation lectrique 3 1 kW 220 240 V 50 60 Hz Dimensions de l appareil L 750 x P 700 x H 850 910 mm Masse 65 0 kg A...

Page 62: ...pe de gaz Pression du gaz Pays I2H G20 20 mbar AT BG CH CY CZ DK EE ES FI GB GR IE IT LT LV NO PT RO SE SI SK I2E G20 20 mbar DE LU PL RO I3 G30 G31 28 30 37 mbar BE CH CY CZ ES FR GB GR IE IT LT PT S...

Page 63: ...on et l exploitation de l appareil veuillez lire attentivement ce mode d emploi Apr s r ception de l appareil assurez vous qu il n y a pas de dommages dus au transport et que l emballage n a pas t end...

Page 64: ...tilis uniquement dans un local bien ventil La pi ce dans laquelle l appareil est install doit contenir autant d air qu il est n cessaire pour la combustion du gaz et ne peut tre inf rieur 2 m 3 h par...

Page 65: ...rales et de l arri re du four Conserver un espace minimum de 600 mm entre la surface sup rieure de l appareil et tout objet plac au dessus Proc der conform ment la r glementation incendie en vigueur S...

Page 66: ...installation v rifier que le r seau local d alimentation en gaz type et pression du gaz est adapt l appareil La prise de raccord au gaz est en bas sur le c t droit de l appareil et elle est signal e p...

Page 67: ...age 58 Contr le du br leur principal Mettre l appareil en marche selon les recommandations figurant dans la Section 5 2 3 Allumage des br leurs gaz allumer les br leurs les uns apr s les autres et v r...

Page 68: ...opri e au type donn de gaz ventuellement effectuer le r glage les donn es des buses se trouvent dans le tableau 2 Caract ristiques des buses et des br leurs page 59 Conform ment aux indications ci des...

Page 69: ...age et la tourner rapidement de la position de flamme maximale la position minimale et v rifier si le r glage est suffisant et que la flamme permet de maintenir chauff l l ment thermique Dans le cas c...

Page 70: ...d emploi Avant d allumer l appareil retirer d licatement le film de protection et liminer tous les restes de colle l aide d eau ti de et de savon ou d un dissolvant appropri Avant d allumer l apparei...

Page 71: ...s jamais entre la position grande flamme et la position OFF Pour teindre le br leur placer la molette en position OFF En fin de journ e fermer la valve d alimentation en gaz ATTENTION Si l appareil n...

Page 72: ...choisir la temp rature et la dur e appropri es de fonctionnement du four R glage de la temp rature A l aide de la molette de r glage de la temp rature r gler la temp rature appropri e au plat Les r gl...

Page 73: ...re les plats se trouvant sur diff rents niveaux Indications et conseils En fonction de la taille des portions de nourriture et de l paisseur des mat riaux des r cipients utilis s pour la cuisson c ram...

Page 74: ...l aide d un chiffon doux ou d une ponge imbib e d eau chaude Au besoin il est possible d utiliser un produit neutre nettoyant Rincer l eau claire et s cher compl tement o Apr s le nettoyage des couve...

Page 75: ...cialis Nous vous recommandons de signer un contrat de maintenance avec un service de ce type o Sur une base r guli re au moins une fois par an il convient de faire inspecter l appareil par un lectric...

Page 76: ...d limination de votre commune AVERTISSEMENT Afin d exclure l abus et les risques encourus rendre l appareil usag inutilisable avant son limination D brancher pour cela l appareil de l alimentation se...

Page 77: ...2 Verpakking 79 3 3 Bewaring 79 4 Specificaties 80 4 1 Overzicht van onderdelen 80 4 2 Technische Gegevens 81 5 Installatie en bediening 83 5 1 Technische aanwijzingen voor de installateur 83 5 1 1 I...

Page 78: ...reenstemming met zijn bestemming gebruikt wordt Alle personen die het apparaat gebruiken moeten zich houden aan de aanbevelingen en aanwijzingen uit deze gebruiksaanwijzing 1 1 Veiligheidsaanwijzingen...

Page 79: ...araat loskoppelen van het lichtnet en de gastoevoer tijdelijk afsluiten sluit de gashoofdkraan Informeer de klantenservice of neem contact op met de leverancier 1 2 Symboolverklaring Belangrijke veili...

Page 80: ...pel de stekker nooit onder in water of andere vloeistoffen Gebruik geen bijtende reinigingsmiddelen en zorg ervoor dat er geen water in het apparaat komt Het apparaat nooit bedienen met natte of vocht...

Page 81: ...overeen stemming is met zijn bestemming en in lijn met de gegevens uit de gebruiksaanwijzing Alle technische handelingen inclusief montage en onderhoud mogen uitsluitend worden uitgevoerd door een ge...

Page 82: ...ing oneigenlijk gebruik het aanbrengen van wijzigingen door de gebruiker de toepassing van ongeoorloofde reserveonderdelen Wij behouden ons het recht voor om technische veranderingen in het product aa...

Page 83: ...ntuele schade aan ons servicepunt moet sturen Verwijder voor de ingebruikname het buitenste en binnenste verpakkingsmateriaal volledig van het apparaat TIP Indien u de verpakking wilt weggooien let da...

Page 84: ...erzicht van onderdelen B A A 3 5 kW A B B 7 0 kW Gietijzeren rooster In hoogte verstelbare voetjes Gasbranders 4 Rooster Bedieningselementen Bakblik Geleiders voor de roosters Behuizing Ovendeur Stoom...

Page 85: ...uten afmetingen binnenruimte B 560 x D 390 x H 340 mm Aansluitwaarde voor gas 21 0 kW Elektrische aansluitwaarden 3 1 kW 220 240 V 50 60 Hz Afmetingen van het apparaat B 750 x D 700 x H 850 910 mm Gew...

Page 86: ...t Gasdruk Land van bestemming I2H G20 20 mbar AT BG CH CY CZ DK EE ES FI GB GR IE IT LT LV NO PT RO SE SI SK I2E G20 20 mbar DE LU PL RO I3 G30 G31 28 30 37 mbar BE CH CY CZ ES FR GB GR IE IT LT PT SI...

Page 87: ...aandachtig door voordat u het apparaat installeert en in gebruik neemt Controleer na ontvangst van het apparaat of er geen transportschade is ontstaan en of de verpakking niet is beschadigd Bij vastst...

Page 88: ...hadelijke verbrandingsproducten in de ruimte De ruimte waarin het apparaat wordt opgesteld moet de hoeveelheid lucht bevatten die nodig is voor een goede gasverbranding Voor de juiste verbranding is e...

Page 89: ...g voor een afstand van minimaal 200 mm tot de zijwanden en achterwand Houd een afstand aan van minimaal 600 mm tussen het bovenste vlak van het apparaat en de zich daarboven bevindende horizontale vla...

Page 90: ...typeplaatje Controleer v r de installatie of het plaatselijke gasnet gassoort en gasdruk overeenstemt met de parameters van het apparaat De gasaansluiting bevindt zich aan de rechteronderkant van het...

Page 91: ...e hoofdbrander Schakel het apparaat in volgens de aanwijzingen uit paragraaf 5 2 3 Aansteken van de gasbranders steek de verschillende branders aan een controleer of de waakvlam het aansteken en de in...

Page 92: ...t behulp van een platte schroevendraaier Schroef een sproeier die geschikt is voor het betreffende gas vast en stel hem indien nodig af gegevens voor de sproeier bevinden zich in tabel 2 Eigenschappen...

Page 93: ...voor de gasregeling en draai hem snel van de maximale positie naar de minimale positie en controleer de vlam Controleer of de instelling nog steeds juiste verwarming van het thermo element mogelijk ma...

Page 94: ...t u het apparaat in gebruik neemt voorzichtig de beschermingsfolie los en verwijder alle lijmresten met behulp van lauwwarm zeepwater of een geschikt oplosmiddel Controleer voor de ingebruikname of he...

Page 95: ...lam te zetten waarbij de knop zich altijd tussen deze posities in moet bevinden en nooit tussen de positie grote vlam en de positie UIT Om de brander te doven moet u de draaiknop in de positie UIT zet...

Page 96: ...t u voor elk gerecht de juiste temperatuur en werkingstijd van de oven instellen Temperatuurinstelling Stel de temperatuur die nodig is voor het gerecht in met behulp van de temperatuurregelaar De vol...

Page 97: ...dient u tussen de gerechten op de roosters een afstand aan te houden van minimaal 40 mm Adviezen en tips Door de omvang van de gerechten en de toepassing van vaatwerk van verschillende materialen en...

Page 98: ...aat schoon met een zacht doekje of een in warm water gedrenkt sponsje Indien noodzakelijk kan een neutraal schoonmaakmiddel worden toegepast Spoel af met schoon water en droog nauwkeurig af o Plaats d...

Page 99: ...een geautoriseerd vakbedrijf Wij bevelen aan hiervoor een onderhoudscontract af te sluiten o Laat het apparaat regelmatig minimaal eenmaal per jaar controleren door een gekwalificeerde elektricien en...

Page 100: ...aarmee verband houdende gevaren te voorkomen moet u het apparaat ongeschikt maken voor gebruik voordat u het voor verwijdering aanbiedt Koppel het apparaat hiertoe los van het elektriciteitsnet en de...

Page 101: ...a dostawy 103 3 2 Opakowanie 103 3 3 Magazynowanie 103 4 Parametry techniczne 104 4 1 Zestawienie podzespo w urz dzenia 104 4 2 Dane techniczne 105 5 Instalacja i obs uga 107 5 1 Wskaz wki dla instala...

Page 102: ...e li b dzie u ywane niew a ciwie lub niezgodnie z jego przeznaczeniem Wszystkie osoby kt re u ytkuj urz dzenie musz uwzgl dnia zalecenia i wskaz wki zawarte w niniejszej instrukcji obs ugi 1 1 Wskaz w...

Page 103: ...ie nale y od czy od zasilania elektrycznego i odci dop yw gazu zamkn g wny zaw r gazowy Powiadomi serwis lub skontaktowa si ze sprzedawc 1 2 Wyja nienie symboli Wa ne wskaz wki dotycz ce bezpiecze stw...

Page 104: ...cieczach Nigdy nie obs ugiwa urz dzenia mokrymi lub wilgotnymi r koma Od czy urz dzenie od zasilania elektrycznego gdy urz dzenie nie jest u ywane gdy podczas u ytkowania wyst pi zak cenia przed czys...

Page 105: ...acuje bezpiecznie tylko wtedy kiedy jest u ywane zgodnie ze swoim przeznaczeniem Wszelka ingerencja w urz dzenie jego monta oraz prace konserwacyjne musi wykonywa odpowiedni serwis specjalistyczny Kuc...

Page 106: ...stalacji obs ugi i czyszczenia u ytkowania niezgodnego z przeznaczeniem wprowadzania zmian przez u ytkownika zastosowania niedopuszczonych cz ci zamiennych Zastrzegamy sobie prawo do wprowadzania zmia...

Page 107: ...ca kowicie usun z niego zewn trzny i wewn trzny materia opakowaniowy WSKAZ WKA Przy utylizacji opakowania nale y przestrzega przepis w obowi zuj cych w danym kraju Materia y opakowaniowe nadaj ce si...

Page 108: ...enie podzespo w urz dzenia B A A 3 5 kW A B B 7 0 kW Ruszty eliwne N ki o regulowanej wysoko ci Palniki gazowe 4 Ruszt p ka Elementy obs ugi Blacha do pieczenia Prowadnice do p ek Obudowa Drzwi piekar...

Page 109: ...iary przestrzeni wewn trznej szer 560 x g 390 x wys 340 mm Moc przy czeniowa dla gazu 21 0 kW Elektryczne warto ci przy czeniowe 3 1 kW 220 240 V 50 60 Hz Wymiary urz dzenia szer 750 x g 700 x wys 850...

Page 110: ...j docelowy I2H G20 20 mbar AT BG CH CY CZ DK EE ES FI GB GR IE IT LT LV NO PT RO SE SI SK I2E G20 20 mbar DE LU PL RO I3 G30 G31 28 30 37 mbar BE CH CY CZ ES FR GB GR IE IT LT PT SI SK I3B P G30 30 mb...

Page 111: ...em prac instalacyjnych i rozpocz ciem u ytkowania nale y uwa nie przeczyta niniejsz instrukcj Po otrzymaniu urz dzenia upewni si e nie ma ono uszkodze transportowych i e opakowanie nie zosta o uszkodz...

Page 112: ...szczeniach Pomieszczenie w kt rym zostanie zainstalowane urz dzenie musi mie ci tyle powietrza ile go potrzeba do przepisowego spalania gazuDo prawid owego spalania wymagany dop ywowy strumie powietrz...

Page 113: ...cianek bocznych i cianki tylnej Pomi dzy g rn powierzchni urz dzenia i znajduj cymi si nad ni powierzchniami poziomymi nale y zachowa odst p minimum 600 mm Je li zachowanie podanych odst p w nie jest...

Page 114: ...u wymienionym na tabliczce znamionowej Przed instalacj nale y sprawdzi czy lokalna instalacja zasilania gazem rodzaj gazu i ci nienie jest zgodna z przystosowaniem urz dzenia Przy cze gazowe znajduje...

Page 115: ...gazu w krajach u ytkowania na stronie 104 Kontrola palnika g wnego Uruchomi urz dzenie wg zalece zawartych w punkcie 5 2 3 Zapalanie palnik w gazowych zapala pojedyncze palniki i sprawdza czy p omie z...

Page 116: ...onowego Wkr ci dysz odpowiedni dla danego rodzaju gazu ewentualnie wykona regulacj dane dla dysz znajduj si w tabeli 2 W a ciwo ci dysz i palnik w strona 105 Zgodnie z powy szymi wskaz wkami wymieni d...

Page 117: ...uzyskania danej mocy p omienia Ponownie zainstalowa ga k pokr t a i szybko przekr ci pokr t em od pozycji maksimum do pozycji minimum i sprawdzi p omie Upewni si e ustawienie nadal umo liwia prawid ow...

Page 118: ...je Przed uruchomieniem z urz dzenia nale y ostro nie ci gn foli ochronn i za pomoc letniej wody z myd em lub odpowiedniego rozcie czalnika usun wszystkie pozosta o ci kleju Przed uruchomieniem nale y...

Page 119: ...mi ustawieniami i nigdy pomi dzy symbolem du ego p omienia i pozycj WY W celu zgaszenia palnika ga k nale y przekr ci do pozycji WY Po zako czeniu dnia roboczego zamkn gazowy zaw r odcinaj cy OSTRO NI...

Page 120: ...a optymalnego efektu gotowania pieczenia dla ka dej potrawy nale y odpowiednio dobra temperatur i czas pracy piekarnika Regulacja temperatury Za pomoc pokr t a regulatora temperatury ustawi temperatur...

Page 121: ...cyrkulacji powietrza pomi dzy potrawami znajduj cymi si na p kach powinien by zachowany odst p co najmniej 40 mm Wskaz wki i rady W zwi zku z wielko ci porcji potraw i stosowaniem r nych naczy z r ny...

Page 122: ...urz dzenia za pomoc mi kkiej ciereczki lub g bki nas czonej ciep wod W razie potrzeby mo na zastosowa neutralny rodek czyszcz cy Op uka czyst wod i dok adnie osuszy o Po oczyszczeniu os on palnik w ta...

Page 123: ...autoryzowany zak ad specjalistyczny Zalecamy podpisanie umowy konserwacyjnej o Regularnie przynajmniej raz w roku nale y zleca przeprowadzenie kontroli urz dzenia wykwalifikowanemu elektrykowi i inst...

Page 124: ...gminy OSTRZE ENIE Przed utylizacj urz dzenia nale y je pozbawi mo liwo ci dalszego u ytkowania aby unikn zwi zanych z tym zagro e W tym celu od czy urz dzenie od zasilania elektrycznego i gazowego Od...

Reviews: