background image


Disposal 

66 / 66 

190033 

EN 

Long-term decommissioning (over one month) 

Some components may not function as intended if the appliance has been stored or 
not used for a long period of time. 

Have the coffee machine serviced, installed and cleaned before using it again after 
a long period of non-use. 
 
1.  Have the coffee machine maintained and installed by a service technician. 

2.  If the machine has been stored for more than 6 months, it may need to be 

repaired after restarting.  

Contact a service company. 


10  Disposal 


Electrical Appliance 


Electric appliances are marked with this symbol. Electrical 
appliances must be disposed of and recycled in a correct 
and environmentally friendly manner. You must not dispose 
of electric appliances with household waste. Disconnect the 
appliance from the power supply and remove power cord 
from the appliance. 

 
Electrical appliances should be returned to designated collection points. 
 

Summary of Contents for KV1 Deluxe

Page 1: ...KV1 Deluxe 190033...

Page 2: ...cher GmbH Franz Kleine Str 28 D 33154 Salzkotten Germany Phone 49 5258 971 0 Fax 49 5258 971 120 Technical Support Hotline 49 5258 971 197 www bartscher com Version 1 0 Date of preparation 2024 01 23...

Page 3: ...ge 9 4 Technical Data 10 4 1 Technical Specifications 10 4 2 Functions of the Appliance 13 4 3 List of Components of the Appliance 14 5 Installation Instructions 18 5 1 Installation 18 6 Operation and...

Page 4: ...6 190033 EN 7 2 3 Cleaning the Brew Unit When Prompted 60 7 2 4 Milk System Cleaning 61 7 2 5 Descaling When Prompted 62 7 3 Maintenance 63 8 Possible Malfunctions 63 9 Decommissioning 65 10 Disposal...

Page 5: ...included in this manual is a prerequisite for safe and proper handling of the appliance Additionally accident prevention occupational health and safety and legal regulations in force in the area the...

Page 6: ...ions Electrical Current Too high a mains voltage or incorrect installation may cause electric shock The appliance may be connected only if data on the rating plate correspond with the mains voltage To...

Page 7: ...mperature settings Materials groceries and left overs remaining in the appliance may catch fire Never use the appliance near flammable or inflammable materials e g petrol spirit alcohol etc High tempe...

Page 8: ...sensory or mental abilities and those with limited experience knowledge as long as they are under supervision or have been instructed on safe use of the device and possible risks Children should not...

Page 9: ...dered to be an unintended use The following is an intended use Preparation of various types of coffee beverages for example coffee cappuccino espresso etc 1 4 Unintended Use An unintended use may lead...

Page 10: ...nd tear As a rule with correct maintenance of the appliance the following components that are subject to wear and tear sustain dispensing of the following amounts of beverages Pump discharge valve gri...

Page 11: ...used to store the appliance when relocating or when shipping the appliance to our service point in the case of any damages The packaging and its elements are made of recyclable materials Particularly...

Page 12: ...rs 1 Coffee bean container volume in g 1 x 1000 Programs pre set individual write over possible 30 Pump pressure in bar 19 Dregs container volume no of cups approx 50 Designed for cups day 100 Max out...

Page 13: ...s of grinding thickness amount of milk video display pre brewing quantity water amount water temperature via thermoblock up to 95 C Water supply 3 options water tank fixed water connection water suppl...

Page 14: ...gram yes cleaning cycles memory Display error messages volume programs status maintenance information size 10 1 advertising recordings individually programmable Automatic switch off Dregs container is...

Page 15: ...n the case of water pressure of 3 bar and more a pressure reducer is required We reserve the right to implement technical modifications 4 2 Functions of the Appliance The appliance is designed for pre...

Page 16: ...Technical Data 14 66 190033 EN 4 3 List of Components of the Appliance Fig 1...

Page 17: ...in ON OFF switch 14 MDB interface 15 Cut out for sewage connection 16 Water connection 17 Water connection plug 18 USB connection User Interface The appliance is equipped with three different types of...

Page 18: ...he Display Settings This has been specially designed for use in self service establishments breakfast establishments and hotels The user can quickly select the language in the top right corner of the...

Page 19: ...ating status of the current brew unit Error message Current error message indicator Water flow rate Current water flow rate indicator in ml s Inactive A beverage is inactive and cannot be prepared Men...

Page 20: ...nstallation Unpacking Positioning Unpack the appliance remove all external and internal packaging elements and shipment safeguards CAUTION Choking hazard Prevent children from accessing package materi...

Page 21: ...nce should be installed only in a room in which ambient temperature falls in the range of 5 35 C When in operation the appliance may not be installed in a cabinet Unpacking and Installing Coffee Bean...

Page 22: ...d We recommend the following products from our range Water filtering system for coffee machines art No 109881 Water filtering system for coffee machines art No 109847 Water softener TKD 13400 FB art N...

Page 23: ...2 thread to the water connection at the back of the appliance and the second end with the water mains system connection The water pressure must be 2 3 bar for water pressures above 3 bar a pressure r...

Page 24: ...a or sugar as this might cause damage to the appliance The coffee container may be filled only with roasted coffee beans Rice soy beans cocoa beans nuts sugar spices etc are prohibited Always store co...

Page 25: ...n for the first time the start program settings may be accessed Proceed the following way 1 Press the mains switch at the back of the appliance 2 Press the screen start button The screen is switched o...

Page 26: ...ean container cover 3 Fill the coffee bean container with coffee beans 4 Re attach the cover and lock it if required ATTENTION Never put any objects into the coffee bean container or the grinder Other...

Page 27: ...the appliance 2 Fill the tank with fresh water 3 Re attach the water tank into the appliance 4 Make sure that the water tank is installed in correct position ATTENTION The water tank can only be fill...

Page 28: ...o the milk container ATTENTION Ensure that the milk hose is properly seated on the connector so that it cannot suck in air at the connection point NOTE If possible set the milk container in the milk c...

Page 29: ...ogram settings may be accessed Proceed the following way 1 Place a suitable cup under the beverage outlet 2 Touch the symbol of your chosen beverage The selected beverage is prepared By touching or yo...

Page 30: ...ser Interface 1 Place a suitable cup under the beverage outlet 2 Touch the symbol of your chosen beverage The selected beverage is prepared Interrupt beverage preparation by touching Stop Touch Order...

Page 31: ...age The selected beverage is prepared Status indicator Interrupt beverage preparation The queue function can be used when one beverage is being prepared and another beverage is selected in the meantim...

Page 32: ...PIN code has been assigned you can confirm directly with the Complete key 3 Select the destination menu NOTE PIN codes can be set in the start program If no PINs have been assigned the standard codes...

Page 33: ...paration Advertising Advanced settings User Administrator PIN code Maintenance PIN code Maintenance rights Language Statistics Overview Beverages Cleaning Descaling and emptying the system Help Inform...

Page 34: ...xternal milk hose Remove the milk hose from the milk bag and insert it into the drip grate Perform the rinse Cleaning Brew unit cleaning with tablet Perform the brew unit cleaning program immediately...

Page 35: ...N If descaling is not carried out in time the appliance screen will be blocked after the default forced descaling time has elapsed and it will only be possible to use the appliance again once the desc...

Page 36: ...e USB stick can be used as the beverage icon 2 Beverage name change Change the name of the beverage after clicking the edit symbol The input method can be used to enter a new name for the beverage 3 B...

Page 37: ...mple Latte recipe When the Latte icon is touched this takes you to the recipe page where you can change the beverage parameters Checking the current recipe The order from left to right corresponds to...

Page 38: ...cally entered in the list of beverage recipes 2 The range of beverage recipes that can be added 1 6 3 The special range of values that can be set must correspond to the limitations of the software 4 E...

Page 39: ...ng 150 ml Water temperature High medium low cold Default setting High Water for tea Parameter Setting values Remarks Water amount 25 450 ml Default setting 100 ml Water temperature High medium low col...

Page 40: ...vated The option to set is displayed when the beverage symbol is touched The function for setting the power in self service mode is available when personalised preferences are activated The option to...

Page 41: ...Menu cards The beverages in the beverages list can be sorted into different menu cards Menu card numbers 2 7 1 Touch the title picture of a menu card to replace it with a new one The new title photo c...

Page 42: ...System Water supply Maintenance Accessory Switching Off Reset Water supply mode Rinsing Automatic switch off Beverage reset Water hardness Cleaning Automatic switch off after time setting Factory sett...

Page 43: ...from the water tank Water hardness This is where you set the degree of water hardness for the appliance Standard setting 15 dH Setting maintenance parameters Rinsing The parameters for rinsing are set...

Page 44: ...d must first be cleaned descaled before further use Descaling Water hardness water shortage and whether or not to install a water filter which determine the water flow in litres and the time remaining...

Page 45: ...here and click Completed if a barrelled water should be used The appliance will restart to complete the settings The standard setting is Not connected Water filter 1 If a water filter is not being ins...

Page 46: ...ing values Remarks Countdown to automatic switching off 1 24 hours no switching off Default setting 30 minutes Automatic switching off after a given hour Here you can set the time for automatic switch...

Page 47: ...Scenarios Selection of the user interface displayed on the screen For a detailed introduction to each user interface displayed on the screen refer to the section User Interfaces Home screen User func...

Page 48: ...will not be displayed Service number Options Active or Inactive 1 Select the Active option The service number is displayed in the lower right corner of the screen 2 To prevent the service number from...

Page 49: ...ions Active or Inactive 1 If Active is selected beverage recipes can be adjusted by touching the left and right arrow keys while the beverage is in production 2 If Inactive is selected beverage recipe...

Page 50: ...ameter Setting values Remarks Stand by time 0 100 seconds Default setting 60 sec Volume 0 100 Default setting 20 Cycle type Single shot Infinite loop exit after playback Automatic exit after playback...

Page 51: ...tion 1 280x800 Preparing beverages Set advertising images when the beverage is in production Parameter Setting values Remarks Volume 0 100 Default setting 30 Single image play time 0 100 seconds Defau...

Page 52: ...code Administrator PIN code Set the administrator PIN code which consists of 5 digits The administrator PIN code allows access to the appliance settings Maintenance PIN code Set the maintenance PIN co...

Page 53: ...Maintenance level PIN rights can be set here Languages The available languages are displayed here Select the language The default setting is English Statistics Here you can view the history of the va...

Page 54: ...rom a specific time can be customised Data can be presented in two ways tables and graphs Cleaning Here you can see specific time records for the various cleaning processes These include start time en...

Page 55: ...uding Ctr version PCB software HMI version screen software Android version Calibration version Machine serial number Information on the IMEI number of the appliance Available screen memory Software up...

Page 56: ...rp or pointed nor metal implements knife fork etc Sharp or pointed implements may damage the appliance and when in contact with live parts they may cause electric shock For cleaning do not use any sco...

Page 57: ...ng with tablets Place to insert the tablet Add tablet for cleaning the brewing group Milk system cleaning agent Milk system cleaning Descaling powder liquid Descaling 7 2 1 Daily Cleaning Brew Unit Mi...

Page 58: ...s Container ATTENTION The dregs container should be emptied at least once a day 1 Remove the drip tray from the appliance 2 Remove the dregs container and pour out the dregs 3 Wash the dregs container...

Page 59: ...y the drip tray 2 Wash the drip tray thoroughly with fresh water 3 Clean the drip grate and the support for dregs container 4 Thoroughly dry all cleaned elements 5 Assemble all parts 6 Insert the drip...

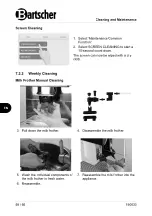
Page 60: ...to start a 15 second count down The screen can now be wiped with a dry cloth 7 2 2 Weekly Cleaning Milk Frother Manual Cleaning 3 Pull down the milk frother 4 Disassemble the milk frother 5 Wash the...

Page 61: ...he lid 3 Unlock the coffee bean container by rotating the stainless steel lever on the coffee bean container counter clockwise 4 Pull the coffee bean container upwards 5 Empty the coffee bean containe...

Page 62: ...x 20 minutes 1 Go to the Maintenance Cleaning menu 2 Touch the Start field 3 Touch the Confirm key to start cleaning 4 Perform each step according to the message displayed on the screen NOTE If the cl...

Page 63: ...ntenance Cleaning menu 2 Touch the Start field 3 Touch the Confirm key to start cleaning 4 Perform each step according to the message displayed on the screen WARNING When cleaning and descaling a hot...

Page 64: ...screen will be blocked after the default forced descaling time has elapsed and it will only be possible to use the appliance again once the descaling process has been completed 1 Go to the Maintenance...

Page 65: ...tributor or Bartscher service directly after dispensing of 15 000 beverages or once a year 8 Possible Malfunctions M gliche The table below contains descriptions of possible causes and solutions to ma...

Page 66: ...sages still appear clean and dry the two metal water level sensors on the drip tray Fill the bean hopper Fill the bean hopper with coffee beans Use lower temperature milk Use milk with a temperature o...

Page 67: ...mixing valve error E402 Brew unit error 9 Decommissioning Preparations for decommissioning 1 Clean the appliance observing indications in section Cleaning and Maintenance 2 After emptying clean the co...

Page 68: ...ce technician 2 If the machine has been stored for more than 6 months it may need to be repaired after restarting Contact a service company 10 Disposal Electrical Appliance Electric appliances are mar...

Reviews: