background image


KV2 Premium 


190086 


Summary of Contents for KV2 Premium

Page 1: ...KV2 Premium 190086...

Page 2: ...cher GmbH Franz Kleine Str 28 D 33154 Salzkotten Germany Phone 49 5258 971 0 Fax 49 5258 971 120 Technical Support Hotline 49 5258 971 197 www bartscher com Version 1 0 Date of preparation 2022 12 29...

Page 3: ...ge 9 4 Technical Data 10 4 1 Technical Specifications 10 4 2 Functions of the Appliance 13 4 3 List of Components of the Appliance 14 5 Installation Instructions 18 5 1 Installation 18 6 Operation and...

Page 4: ...2 78 190086 EN 7 2 3 Cleaning the Brew Unit When Prompted 71 7 2 4 Milk System Cleaning 72 7 2 5 Descaling When Prompted 73 8 Possible Malfunctions 74 9 Decommissioning 77 10 Disposal 78...

Page 5: ...included in this manual is a prerequisite for safe and proper handling of the appliance Additionally accident prevention occupational health and safety and legal regulations in force in the area the...

Page 6: ...ions Electrical Current Too high a mains voltage or incorrect installation may cause electric shock The appliance may be connected only if data on the rating plate correspond with the mains voltage To...

Page 7: ...ch fire Never use the appliance near flammable or inflammable materials e g petrol spirit alcohol etc High temperature triggers evaporation of these materials and as a result of contact with sources o...

Page 8: ...xperience and or limited knowledge Children should be supervised to ensure that they are not playing with or switching on the appliance Improper use Unintended or prohibited use may cause damage to th...

Page 9: ...dered to be an unintended use The following is an intended use Preparation of various types of coffee beverages for example coffee cappuccino espresso etc 1 4 Unintended Use An unintended use may lead...

Page 10: ...troduced by the user usage of unapproved spare parts We reserve the right to introduce technical modifications to the product intended for improvement of the appliance and its performance 2 2 Copyrigh...

Page 11: ...used to store the appliance when relocating or when shipping the appliance to our service point in the case of any damages The packaging and its elements are made of recyclable materials Particularly...

Page 12: ...g 2 x 1 200 Number of topping containers 1 Topping container volume in g 1 600 Programs pre set individual write over possible 30 Pump pressure in bar 19 Dregs container volume no of cups approx 45 De...

Page 13: ...level amount of milk amount of powder accurate to the gram thanks to calibration video display pre brewing quantity water amount water temperature via boiler up to 98 C Water supply 3 options water ta...

Page 14: ...dually savable via USB up to 10 GB of data can be stored during coffee preparation and during breaks 1 video may be selected for all processes Hot water function yes separate drain tap Hot milk functi...

Page 15: ...cut out have been adapted for automatic residue removal the coffee bean container topping container and brew unit can be removed without tools The set includes 1 milk hose 36 cm 1 water supply hose 1...

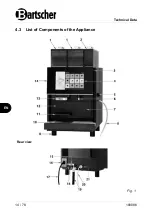
Page 16: ...Technical Data 14 78 190086 EN 4 3 List of Components of the Appliance Rear view Fig 1...

Page 17: ...t 14 Housing 15 USB connection 16 Electric connection 17 Power cord 18 MDB and water pump connection 19 Water drain hose 20 Water supply tube 21 Water connection User Interface The appliance is equipp...

Page 18: ...n quickly select the language in the top right corner of the screen without entering the menu Fig 3 Professional User Interface This is typically used in commercial establishments Setting options are...

Page 19: ...low rate indicator in ml s Inactive A beverage is inactive and cannot be prepared Menu Setting Symbols Symbol Name Description Exit Return to the home screen and enter the PIN code to re enter the men...

Page 20: ...nstallation Unpacking Positioning Unpack the appliance remove all external and internal packaging elements and shipment safeguards CAUTION Choking hazard Prevent children from accessing package materi...

Page 21: ...C When in operation the appliance may not be installed in a cabinet Unpacking and Installing the Coffee Bean Container and Coffee Container 1 Unpack the coffee bean container and the topping containe...

Page 22: ...pH TDS 30 150 ppm mg l Electrical conductivity 50 200 S cm microsiemens Iron content 0 3 mg l ATTENTION Make sure that the correct water hardness is always entered in the appliance settings Tap Water...

Page 23: ...ump is the ideal alternative for the supply of water in large quantities wherever a mains water connection is not available Accessories not included in the delivery KV2 Premium water pump Material pla...

Page 24: ...e attachment material provided Fit the pump 2 Connect the pump to a suitable connection 2 3 Connect the water supply hose 3 Drain Hose Connection The distance between the water drain and the coffee ma...

Page 25: ...a or sugar as this might cause damage to the appliance The coffee container may be filled only with roasted coffee beans Rice soy beans cocoa beans nuts sugar spices etc are prohibited Always store co...

Page 26: ...ee machine is switched on for the first time the start program settings may be accessed Proceed the following way 1 Lift the front control panel and press the mains switch 2 Press the screen start but...

Page 27: ...86 25 78 EN 5 Optionally input PIN code 6 Select user interface 7 Set screen messages 8 Press Complete to save the settings Filling with Coffee Beans 1 Unscrew the bean container cover using the key p...

Page 28: ...grinder Otherwise splinters may be ejected which may lead to injury NOTE When filling with coffee beans take care that they do not fall into the gap between bean containers Never pour ground coffee i...

Page 29: ...if required NOTE Never fill the topping container with ground coffee Do not pour any liquids into the topping container Water Tank Filling 1 Remove the water tank from the appliance 2 Fill the tank wi...

Page 30: ...ffee machine Connecting the Milk Hose 1 Connect the milk hose to the coffee machine 2 Insert both the milk hose and the sensor into the milk container NOTE If possible set the milk container in the mi...

Page 31: ...thoroughly and dry it 6 Re attach the bean container 7 Press the locking slide until it engages NOTE Make sure that the bean container is always completely dry after cleaning and before using it again...

Page 32: ...g Container 1 Unlock the control panel with the key if required 2 Lift the front control panel 3 Pull the locking slide forward as far as possible 4 Pull the bean topping upwards 5 Empty the topping c...

Page 33: ...hat the topping container is always completely dry after cleaning and before using it again Switching the Appliance ON The process of switching the appliance on is described in section First Start Up...

Page 34: ...ogram settings may be accessed Proceed the following way 1 Place a suitable cup under the beverage outlet 2 Touch the symbol of your chosen beverage The selected beverage is prepared By touching or yo...

Page 35: ...vice User Interface 1 Place a suitable cup under the beverage outlet 2 Touch the symbol of your chosen beverage The selected beverage is prepared Interrupt beverage preparation by touching Stop Touch...

Page 36: ...verage is being prepared and another beverage is selected in the meantime 3 Touch the Espresso symbol to prepare another coffee The Espresso is displayed in the queue as shown below beverage setti ngs...

Page 37: ...has been assigned you can confirm directly with the Complete key 3 Select the destination menu NOTE PIN codes can be set for the first time in the start program If no PINs have been assigned the stan...

Page 38: ...Beverage settings Beverage selection display System Water supply Maintenance Accessory ON OFF Reset Control panel User interface Home screen Beverage preparation Advertising Advanced settings User Ad...

Page 39: ...e appliance OFF Mixer rinsing Rinsing Brew unit rinsing Rinse the brew unit Select the Brew unit rinsing function and perform the rinse before switching the appliance off Milk frother rinsing Rinse th...

Page 40: ...m should be done daily for hygiene and health reasons The total time is approximately 10 minutes Descaling Coffee circuit Start the descaling program when the message Coffee circuit descaling appears...

Page 41: ...descaling time has elapsed and it will only be possible to use the appliance again once the descaling process has been completed Common functions Screen cleaning After touching the Screen cleaning fie...

Page 42: ...Personalised settings Column per row Price Beverage settings Inputting settings for Overview 1 Beverage icons change Change the beverage icon after clicking the edit symbol The image uploaded from th...

Page 43: ...e beverage in question is blocked and cannot be prepared 4 Deleting a beverage Click Delete under a beverage to remove the beverage from the beverage list 5 Adding a new beverage Click Add to select t...

Page 44: ...from left to right corresponds to the order in which the beverage is poured Hot milk Hot frothed milk Coffee Changing the recipe order Press the recipe symbol e g Coffee and drag to change the positio...

Page 45: ...cipe parameter that can be set is shown as in the left figure Recipe parameters that can be added Coffee Parameter Setting values Remarks Coffee bean container Left or right Standard left Ground coffe...

Page 46: ...Standard left Water temperature High medium low cold Default setting High Water for tea Parameter Setting values Remarks Water amount 25 450 ml Default setting 100 ml Water temperature High medium lo...

Page 47: ...vated The option to set is displayed when the beverage symbol is touched The function for setting the power in self service mode is available when personalised preferences are activated The option to...

Page 48: ...Menu cards The beverages in the beverages list can be sorted into different menu cards Menu card numbers 2 7 1 Touch the title picture of a menu card to replace it with a new one The new title photo c...

Page 49: ...ection Maintenance Accessory Switching Off Reset Water supply mode Rinsing Barrelled water Automatic switch off Beverage reset Water hardness Cleaning Milk chiller Automatic switch off after time sett...

Page 50: ...n in the accessory settings Water hardness This is where you set the degree of water hardness for the appliance Standard setting 15 dH Setting maintenance parameters Rinsing The parameters for rinsing...

Page 51: ...and must first be cleaned descaled before further use Descaling Water hardness water shortage and whether or not to install a water filter which determine the water flow in litres and the time remain...

Page 52: ...ery Barrelled water tank 1 Select Not connected if the machine is not connected to a barrelled water 2 Select Connect here and click Completed if a barrelled water should be used The appliance will re...

Page 53: ...ting values Remarks Countdown to automatic switching off 1 24 hours no switching off Default setting 10 hours Automatic switching off after a given hour Here you can set the time for automatic switchi...

Page 54: ...Usage Scenarios Selection of the user interface displayed on the screen For a detailed introduction to each user interface displayed on the screen refer to the section User Interfaces Home screen User...

Page 55: ...will not be displayed Service number Options Active or Inactive 1 Select the Active option The service number is displayed in the lower right corner of the screen 2 To prevent the service number from...

Page 56: ...ions Active or Inactive 1 If Active is selected beverage recipes can be adjusted by touching the left and right arrow keys while the beverage is in production 2 If Inactive is selected beverage recipe...

Page 57: ...ameter Setting values Remarks Stand by time 0 100 seconds Default setting 60 sec Volume 0 100 Default setting 20 Cycle type Single shot Infinite loop exit after playback Automatic exit after playback...

Page 58: ...0 Preparing beverages Set advertising images when the beverage is in production Parameter Setting values Remarks Volume 0 100 Default setting 30 Single image play time 0 100 seconds Default setting 5...

Page 59: ...ainer are illuminated 2 Click the desired lighting setting position e g on the left coffee bean container 3 Enter the colour menu to set the colour for Stand by and alarm lighting 4 Select the desired...

Page 60: ...code Administrator PIN code Set the administrator PIN code which consists of 5 digits The administrator PIN code allows access to the appliance settings Maintenance PIN code Set the maintenance PIN co...

Page 61: ...Maintenance level PIN rights can be set here Languages The available languages are displayed here Select the language The default setting is English Statistics Here you can view the history of the va...

Page 62: ...rom a specific time can be customised Data can be presented in two ways tables and graphs Cleaning Here you can see specific time records for the various cleaning processes These include start time en...

Page 63: ...uding Ctr version PCB software HMI version screen software Android version Calibration version Machine serial number Information on the IMEI number of the appliance Available screen memory Software up...

Page 64: ...fork etc Sharp or pointed implements may damage the appliance and when in contact with live parts they may cause electric shock For cleaning do not use any scouring agents that contain solvents nor co...

Page 65: ...Brew unit cleaning with the on screen message Milk system cleaning with the on screen message Descaling with the on screen message Water filter replacement with the on screen message Preparation of c...

Page 66: ...takes place automatically when the pre set condition is reached at the latest when the machine is switched off 2 Immediate rinsing can be selected manually Go to the Maintenance Rinsing menu and touc...

Page 67: ...gs container and put it back in the machine Drip tray cleaning NOTE The drip tray is located under the dregs container Clean the drip tray as required at least once a day 1 Remove the drip tray 2 Pour...

Page 68: ...rectly Screen cleaning 1 Select Maintenance Common function 2 Select SCREEN CLEANING to start a 15 second count down The screen can now be wiped with a dry cloth 7 2 2 Weekly Cleaning Milk frother man...

Page 69: ...brew unit 1 Switch the appliance off and pull the plug out 2 Remove the dregs container and drip tray The brew unit is now fully accessible 3 With one hand reach into the slot under the brew unit push...

Page 70: ...lid from the coffee bean container 3 Open the display board with the key and lift it upwards 4 To unlock the container pull the locking plate of the coffee bean container 5 Pull out the coffee bean c...

Page 71: ...ntainer pull the locking plate of the topping container 5 Pull out the topping container 6 Empty the topping container 7 Clean the topping container with a soft damp cloth 8 Dry the topping container...

Page 72: ...th the button and lift it upwards 3 Loosen the locking plate in the mixer to unlock it 4 Pull the mixer forward by the handle 5 Pull the hose off that leads from the mixer to the outlet and remove it...

Page 73: ...ng with a tablet The total cleaning time is approx 10 minutes 1 Go to the Maintenance Cleaning menu 2 Touch the Start field 3 Touch the Confirm key to start cleaning 4 Perform each step according to t...

Page 74: ...ntenance Cleaning menu 2 Touch the Start field 3 Touch the Confirm key to start cleaning 4 Perform each step according to the message displayed on the screen WARNING When cleaning and descaling a hot...

Page 75: ...ce screen will be blocked after the default forced descaling time has elapsed and it will only be possible to use the appliance again once the descaling process has been completed 1 Go to the Maintena...

Page 76: ...splay an error message indicated by a red triangle in the top right corner of the control panel Click on this symbol for more information Display message Possible solution Insert the water tank Check...

Page 77: ...ure of 2 10 C Install brew unit Install the brew unit Error Code Messages ATTENTION A message with an error code is automatically displayed when the entire system is affected by an error If serious pr...

Page 78: ...contact customer service E7 Thermoblock heating too fast E8 Boiler heating too slow E9 Thermoblock heating too slow E10 Boiler heating error E11 Thermoblock heating error E12 Water tank error detected...

Page 79: ...e machine emptied by a service technician 2 Disconnect the appliance from mains power supply 3 Close the water supply 4 Switch the accessories off e g milk chiller and disconnect them from the electri...

Page 80: ...ppliances must be disposed of and recycled in a correct and environmentally friendly manner You must not dispose of electric appliances with household waste Disconnect the appliance from the power sup...

Reviews: