26
7. Assembly
The room thermostat consists of two parts that are held to-
gether by clips. The switching logic with temperature sensor,
display and control panel is in the front part. The supply bat-
teries (2x AA 1.5 V, not included) are placed inside this part.
Always change both batteries and replace them with two
new batteries of same size, brand, type and age.
Please pay attention to the correct polarity (plus/+ and
minus/-) when inserting the batteries.
Separate the parts by carefully opening the clips in the wall-mounted part and detaching the front
part with logic and display. You find the clips in the midst at the left and right. Press below the clips
and pull on the front part of the room thermostat.
• Check whether the place where you intend to install the thermostat has wires and cables under
its surface. These can get damaged by drilling.
Switch off the main switch and secure against being switched on again. Check that the
wires are volt-free.
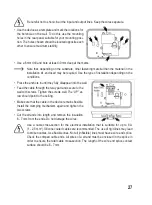
• Remove the terminal block on the rear of the relay part
and the cover of the screw contacts. Route the cables
(from the rear) through the opening of the relay part be-
hind it. The “UP” arrow should point to the ceiling.


