background image

This is a publication by Conrad Electronic SE, Klaus-Conrad-Str. 1, D-92240 Hirschau (www.conrad.com). 
All rights including translation reserved. Reproduction by any method, e.g. photocopy, microfilming, or the capture in 

electronic data processing systems require the prior written approval by the editor. Reprinting, also in part, is prohibited. 

This publication represent the technical status at the time of printing.  
© Copyright 2019 by Conrad Electronic SE. 

1629437_1613363_V1_0419_02_m_VTP_en

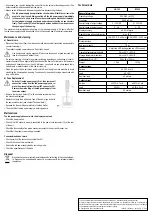
•  If necessary, you can also readjust the current limit or the value for the voltage control, if the 

output sockets are disconnected from the mains.

•  Always switch off loads and lab power supply before disconnecting the loads.

  The lab power supply has a protection circuit which will limit the current in the 

event of a short circuit. Always switch off the lab power supply immediately 

in the event of a short circuit to avoid overheating and disconnect the loads. 

Let the lab power supply cool down and make sure that the air can circulate 

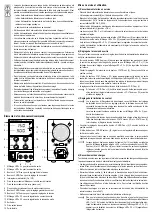
freely. The air outlet (13) should always be clean and dust-free; do not cover 

the openings of the housing.

The maximum uninterrupted operating time of the lab power supply is 24 hours. After that 

the lab power supply should be switched off until it has cooled down to ambient temperature.

Maintenance and cleaning

a) General care

•  Disconnect the product from the mains socket and disconnect all connected devices before 

you start cleaning it.

•  The product requires no maintenance; Do not take it apart.

  Live components may be exposed, if the covers are opened or parts removed (un-

less this can be done without tools).

•  Do not use scouring, chemical or aggressive cleaning agents such as benzene, alcohol or 

similar chemicals. These might attack the surface of the device. Furthermore, the fumes are 

explosive and hazardous to your health. Moreover, you should not use sharp-edged tools, 

screwdrivers or metal brushes, or the like for cleaning 

•  Clean the product with a soft, clean and dry cloth. Do not apply too much pressure to avoid 

scratching the housing when cleaning. You can easily remove dust using a clean brush with 

long, soft bristles.

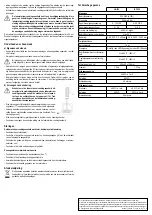
b) Fuse Replacement

  Switch off the lab power supply first, then remove all 

connection cables from the lab power supply and re-

move the mains plug from the rear IEC connector (14). 

Remove the mains plug of the lab power supply from 

the mains socket. 

•  Remove the rear fuse holder (17) with a suitable screwdriver from 

the bracket, as displayed.

•  Replace the faulty fuse with a new fuse of the same type and with 

the same rated current (see chapter “Technical data”).

•  Squeeze the fuse cartridge carefully into the fuse holder.
•  Then check that the lab power supply is working properly.

Malfunctions

The lab power supply does not work, the displays are blank.
•  Check the power switch.
•  Check if the IEC socket is properly connected to the power cord connector (14) at the rear 

of the unit.

•  Check the functionality of the mains connection (sockets, fuses, circuit breaker, etc.).
•  Check that the proper mains voltage is applied.

Connected loads don’t work.
•  Check polarity of the connection sockets (5 and 7).
•  Check if the current limit is activated.
•  Reduce the lab power supply load by removing a load.
•  Check the specifications of the loads.

Disposal

  Electronic devices are recyclable materials and do not belong in the household was-

te. Dispose of an unserviceable product in accordance with the relevant statutory 

regulations.

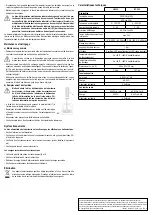
Technical data

LB-153

BT-305

General information

Operating voltage

230 V/AC (±10%)

Frequency

50 Hz (±2 Hz)

Control range of output voltage

0 – 15 V/DC

0 – 30 V/DC

Control range of output current

0 – 3 A

0 – 5 A

Display accuracy

±0,5% ±1 digits

Operating time without interruption

max. 24 h

Fuse

1.0 A, 250 V - 5 x 25 mm 3.0 A/250 V - 5 x 25 mm

Protection class

I

Power cord length

1.8 m

Display

  3-digit, red LED (voltage) and red LED (current)

Operating temperature/ humidity

0 bis +40 ºC, <80% rF

Storage temperature/ humidity

0 bis +40 ºC, <80% rF

Dimensions (W x H x D)

226 x 82 x 138 mm

Weight

1,2 kg 

1,27 kg

Output voltage
No-load

≤0.03% ± 1 mV

Load

≤0.33% 

Residual ripple

≤3 mVrms

Output current
No-load

≤0.03% ± 1 mA

±0.01% ± 1 mA

Load

≤0.33%

±0.2% ± 5 mA

Residual ripple

≤3 mArms


Summary of Contents for 1613363

Page 1: ...en Netzstecker niemals mit nassen Händen an Gießen Sie nie Flüssigkeiten über elektrische Geräte aus und stellen Sie keine mit Flüssigkeit gefüllten Gegenstände neben das Gerät Sollte dennoch Flüssigkeit oder ein Gegenstand ins Geräteinnere gelangt sein schalten Sie in einem solchen Fall die zugehörige Netzsteckdose stromlos z B Sicherungsautomat abschalten und ziehen Sie danach den Netzstecker au...

Page 2: ...nnungsregelung des Aus gangs oder die LED Anzeige CC 11 für die Stromregelung des Ausgangs Das Labornetzgerät ist nun bereit zur Einstellung der Ausgangsspannung und der Strom begrenzung b Einstellen der Ausgangsspannung Damit die korrekte Ausgangsspannung eingestellt werden kann muss der Ausgang des Labor netzgeräts im spannungsgeregelten Zustand betrieben werden Drehen Sie den Drehregler CURR Co...

Page 3: ...zu viel Druck aus um ein Verkratzen zu vermeiden Sie können Staub mit einem langhaarigen weichen und sauberen Pinsel leicht entfernen b Sicherungswechsel Schalten Sie zuerst das Labornetzgerät aus entfer nen Sie alle Anschlusskabel vom Labornetzgerät und ziehen den Netzstecker aus dem rückseitigen Kaltge räteanschluss 14 Ziehen Sie anschließend den Netz stecker des Labornetzgeräts aus der Netzstec...

Page 4: ... the mains plug when your hands are wet Never pour any liquids over electrical devices or put objects filled with liquid right next to the device If liquid or an object enters the interior of the device never theless first power down the respective socket e g switch off circuit breaker and then pull the mains plug from the mains socket Do not operate the product anymore afterwards but take it to a...

Page 5: ...ither the CV LED display 12 for the output voltage control or the CC LED display 11 for the output current control will light up The lab power supply is now ready and you can set the output voltage and the current limit b Setting the output voltage The output of the lab power supply must be in the voltage controlled state in order to set the correct output voltage Turn the CURR Coarse knob 9 clock...

Page 6: ...n and dry cloth Do not apply too much pressure to avoid scratching the housing when cleaning You can easily remove dust using a clean brush with long soft bristles b Fuse Replacement Switch off the lab power supply first then remove all connection cables from the lab power supply and re move the mains plug from the rear IEC connector 14 Remove the mains plug of the lab power supply from the mains ...

Page 7: ...tous les dispositifs connectés contre les dysfonctionnements ainsi que les arrivées de surtension En cas de montage en série de plusieurs blocs d alimentation une tension peut se produire qui est dangereuse en cas de contact et qui dans certaines circonstances peut entraîner la mort Observez dans ce cas la directive de basse tension Le fonctionnement du bloc d alimentation de laboratoire génère de...

Page 8: ...e tension actuellement réglée En fonction de la position de la commande rotative CURR Coarse 9 par rapport à la limi tation du courant de sortie l affichage LED CV 12 apparaît pour la régulation de tension de la sortie ou l affichage LED CC 11 apparaît pour la régulation du courant de la sortie Le bloc d alimentation de laboratoire est maintenant prêt à régler la tension de sortie et la limitation...

Page 9: ...ppliquer trop de pression pour éviter les rayures Il est possible de facilement enlever la poussière à l aide d une brosse à poils longs douce et propre b Remplacement des fusibles Mettez d abord le bloc d alimentation de laboratoire hors tension retirez tous les câbles de raccordement du bloc d alimentation de laboratoire et débranchez la fiche d alimentation de la prise froide arrière 14 Débranc...

Page 10: ... niet naast het apparaat Indien er toch vloeistof of een voorwerp in het apparaat zou terechtkomen schakel dan de bijbehorende con tactdoos stroomvrij bijv automatische zekering uitschakelen en trek vervolgens de netstekker uit de contactdoos Het product mag daarna niet meer worden ge bruikt breng het naar een elektrotechnisch bedrijf Tijdens het gebruik van het apparaat draag geen geleidende meta...

Page 11: ...e uitgangsspanning en de stroombegren zing in te stellen b Instellen van de uitgangsspanning Om de juiste uitgangsspanning in te stellen moet de uitgang van de laboratorium voedingseen heid in spanningsgestuurde toestand worden gebruikt Draai de draaiknop CURR Coarse knop 9 naar de uitgangsstroomlimiet met de klok mee vanaf de linkerstop tot de LED display CC 11 voor de stroombegrenzing uitgaat en...

Page 12: ...huizing niet te veel druk om krassen te voorkomen U kunt stof gemakkelijk verwijderen met een langharige zachte en schone borstel b Vervangen van de zekering Schakel eerst de laboratorium voedingseenheid uit verwijder alle verbindingskabels van de laboratorium voedingseenheid en haal de stekker uit het stopcon tact aan de achterzijde van het apparaat 14 Trek vervolgens de stekker van de laboratori...

Reviews: