3-8
BE1-79A Functional Description
9310200990 Rev G
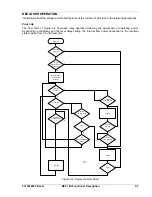
Reset
A reclosing sequence may be initiated only when the relay is in the reset state. Reset is indicated by the
front panel Reset LED. In order for the relay to reach reset, the controlled breaker must be closed during
a three-second period when the reset timer expires. If the breaker opens prior to this time, the relay will
proceed to the next reclosing attempt. If the number of programmed reclosing attempts has been
exhausted, the relay will drive to lockout.
A reset time of zero is used if no reset is desired after a specific reclosing attempt. As an example, for a
first reclose/reset time delay setting of SP-79A1=10,0, the 0 indicates that the BE1-79A will not reset until
after the next non-zero reset time. If the second reclose/reset time delay setting is SP-79A2=30,40, then
the relay will reset at the 40 second point in the timing sequence.
Lockout
Lockout, a state inhibiting relay operation, may be produced by four conditions:
•
Reclose
failure
•
Number of breaker openings exceeds the number of programmed reclosure attempts
•
The EXIT command is entered to terminate RS-232 communication
•
Communication access has timed out
Lockout is indicated by the front panel Lockout LED. The S-ALM command allows output C3 to be
programmed to close for a lockout condition. Lockout is terminated when the controlled breaker is closed
(manually or by other means) and remains closed for the duration of the final reset time delay setting.
Reclosing Sequences
A reclosing sequence is initiated by the closure of a 52b contact. A reclosing sequence is indicated by the
In Sequence LED located on the front panel. The BE1-79A provides up to four automatic reclosures.
Each reclose setting is adjustable and has a setting range of 0 to 300 seconds. The number of reclosing
attempts may be limited by adjusting any one of the reclose time delay settings (after the first reclose) to
zero. When a breaker trip occurs at this point in the reclosing sequence, the BE1-79A will time toward
lockout. An instantaneous first reclose is enabled on BE1-79A relays configured for ACR11B operation by
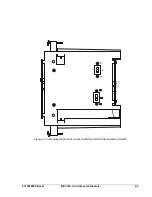
an external jumper connected across case terminals 13 and 17 or by switch S4 located on the right side
of the relay cradle.
Each of the four reclose settings has a corresponding reset timer. A final reset controls the time between
lockout and reset. Each reset setting is adjustable and has a setting range of 0 to 300 seconds. Pressing
the front panel Reset pushbutton will clear a reclosing sequence and return the relay to the reset state.
The numbering and labeling of reclose and reset timer settings of Basler reclosing relays such as the
BE1-79 and BE1-79M are based on the breaker opening that immediately precedes each reclose and
reset setting. This is not the case with the BE1-79A. Each reclose and reset timer setting begins at time
zero when the breaker opens the first time and initiates the first reclose timer. Typically, this makes the
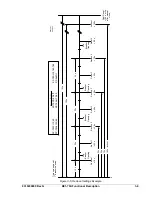
first reclose setting the shortest time setting and the fourth reclose setting the longest time setting. Figure
3-5 illustrates a BE1-79A reclosing sequence and the relationship of each reclose setting to the breaker
openings.
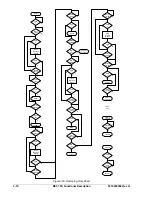
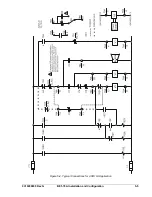
The flow chart of Figure 3-6 is a simplified representation of reclosing sequence initiation and
progression.
If a reclosing sequence is interrupted by removing power supply voltage from terminal 5 or 6, this will
“freeze” the timing cycle at that point in the reclosing sequence. Freezing the timing sequence will result
in contact C10 and the RS contact returning to their de-energized state when the BE1-79A power supply
is de-energized. Once voltage is restored to the power supply, timing resumes from the point in the
reclosing sequence that the power supply was de-energized.
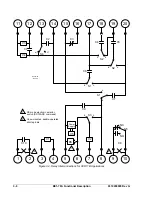
External restrictions such as “hot-bus, dead-line” should be connected between terminals 7 and 8 of the
BE1-79A to avoid de-energizing the power supply and “freezing” the timing sequence.
Summary of Contents for BE1-79A
Page 1: ...INSTRUCTION MANUAL FOR RECLOSING RELAY BE1 79A Publication 9310200990 Revision G 02 08...
Page 2: ......
Page 8: ...vi BE1 79A Introduction 9310200990 Rev G This page intentionally left blank...
Page 10: ...ii BE1 79A General Information 9310200990 Rev G This page intentionally left blank...
Page 16: ...ii BE1 79A Controls and Indicators 9310200990 Rev G This page intentionally left blank...
Page 20: ...2 4 BE1 79A Controls and Indicators 9310200990 Rev G This page intentionally left blank...
Page 22: ...ii BE1 79A Functional Description 9310200990 Rev G This page intentionally left blank...
Page 34: ...ii BE1 79A Communication Commands 9310200990 Rev G This page intentionally left blank...
Page 40: ...ii BE1 79A Installation and Configuration 9310200990 Rev G This page intentionally left blank...
Page 52: ...ii BE1 79A Testing 9310200990 Rev G This page intentionally left blank...
Page 58: ...6 6 BE1 79A Testing 9310200990 Rev G This page intentionally left blank...
Page 60: ...ii BE1 79A RS Contact Application 9310200990 Rev G This page intentionally left blank...
Page 66: ...ii BE1 79A Terminal Communication 9310200990 Rev G This page intentionally left blank...


