BE1-81 Testing
5-3
TD
39
1
57
TD
40
57
TD
0.701
second, ±0.020 second of calculated delay time.
NOTE
The delay time accuracy should be as specified above or within the accuracy of the
test equipment, whichever is greater.
NOTE
The timing required between lighting of the TIMING LED and contact closure will be
long. As the frequency is decreased below the threshold setting, the time required for
the output to change states is reduced.
For example:
DELAY CYCLES setting
= 39
TRIP FREQUENCY hertz below setting
= 3.00
Applied Trip Frequency
= 57 hertz:
Step 14.
Repeat Steps 10 through 13 several times to verify relay time delay setting.
INVERSE TIME DELAY (OPTION D1 TEST PROCEDURE
To verify/set underfrequency 50 hertz (Style T2) or 60 hertz (Style T1) relays equipped with inverse time
delay, perform the following steps.
Step 1.
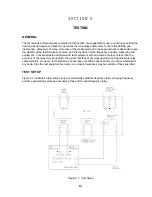
Connect the relay as shown in Figure 5-1.
Step 2.
Apply appropriate ac or dc voltage to terminals 3 and 4 for relay styles equipped with external
power supply. Apply 120 Vac, 50 hertz or 60 hertz as applicable, at terminals 6 and 7 for
relay styles equipped with sensing input power supply (option 1-2).
Step 3.
Set test frequency select switch to 50 or 60 hertz position.
Step 4.
Set relay front panel TRIP FREQUENCY Hz BELOW (50 or 60) thumbwheel switches for the
desired underfrequency pickup point.
Step 5.
Set front panel TRIP TIME ADJUST control at 0 position.
Step 6.
Adjust the variable test frequency source to a frequency above the threshold frequency set in
Step 4.
Step 7.
Set the test frequency select switch to the variable position and slowly adjust the test variable
frequency down toward pickup threshold until the front panel TIMING LED lights, indicating
that the relay pickup point has been exceeded.
Summary of Contents for BE1-81
Page 1: ... 05647 6 10 07 14 6 70 4 4 37 0 4 1 2WDNKECVKQP 4GXKUKQP ...
Page 7: ...BE1 81 General Information 1 2 Figure 1 1 Inverse Time Curves 50 Hertz Option ...
Page 8: ...BE1 81 General Information 1 3 Figure 1 2 Inverse Time Curves 60 Hertz Option ...
Page 13: ...BE1 81 Controls And Indicators 2 2 Figure 2 1 Location Of Controls And Indicators Option E1 ...
Page 14: ...BE1 81 Controls And Indicators 2 3 Figure 2 2 Location Of Controls And Indicators Option D1 ...
Page 15: ...BE1 81 Controls And Indicators 2 4 Figure 2 3 Location Of Assemblies ...
Page 22: ...BE1 81 Installation 4 3 Figure 4 3 S1 Case Single Ended Semi Flush Mounting Side View ...
Page 25: ...BE1 81 Installation 4 6 Figure 4 6 S1 Case Single Ended Projection Mounting Rear View ...
Page 26: ...BE1 81 Installation 4 7 Figure 4 7 S1 Case Single Ended Projection Mounting Side View ...
Page 27: ...BE1 81 Installation 4 8 Figure 4 8 S1 Case Double Ended Semi Flush Mounting Side View ...
Page 30: ...BE1 81 Installation 4 11 Figure 4 11 S1 Case Double Ended Projection Mounting Rear View ...
Page 31: ...BE1 81 Installation 4 12 Figure 4 12 S1 Case Double Ended Projection Mounting Side View ...
Page 33: ...BE1 81 Installation 4 14 Figure 4 14 DC Control Connections ...
Page 34: ...BE1 81 Installation 4 15 Figure 4 15 Internal Connections Style Number T E 1 A0S5 ...
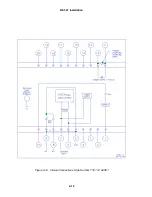
Page 35: ...BE1 81 Installation 4 16 Figure 4 16 Internal Connections Style Number T E 1C A2S5 ...


