BE1-81 Testing
5-4
NOTE
The front panel TRIP TIME ADJUST control is continuously variable and the time dial
settings are therefore approximations. To set the time dial for the desired delay
characteristics on or between the plotted curves for the inverse time delay, perform the
following procedures.
Step 8.
Read the trip frequency as indicated by the frequency source, or by an external frequency
measuring device. The pickup point should be within 0.035 hertz of the selected pickup
frequency set in Step 4 for the 50 hertz (T2) relays or 0.030 hertz for the 60 hertz (T1) relays,
or within the test set accuracy, whichever is greater. Be sure the target indicator has tripped.
Return the test frequency select switch to the 50 or 60 hertz position. Reset target (if
supplied).
Step 9.
Repeat Steps 6 through 8 several times to verify the relay threshold setting.
Step 10.
The steps below may be used to verify/set the inverse time delay.
Step 11.
Set test frequency select switch to the 50 or 60 hertz position, as applicable.
Step 12.
Set front panel TRIP TIME ADJUST control to the desired position.
Step 13.
Set front panel TRIP FREQUENCY thumbwheel switches at 1.00.
Step 14.
Adjust the variable frequency source for either 48.0 hertz (T2) or 58.0 hertz (T1 ) output.
Step 15.
Switch test frequency select switch to the variable position.
Step 16.
Read the trip delay time indicated by the counter. Record the delay time and compare it to
the applicable delay curve shown in Section 1 to determine if the delay time is within the
specified 15 percent tolerance.
Step 17.
Using the 60 hertz 0 TIME curve in Section 1 as an example, the time delay recorded in Step
16 for a 60 hertz relay should be 0.230 seconds ±15 percent. To read this time on the curve,
first subtract the input test frequency of 58.0 hertz from the nominal 60 hertz, which gives 2.0
hertz below pickup. Then subtract the front panel TRIP FREQUENCY thumbwheel setting (in
this case 1.00) from the 2.0 hertz, leaving a normalized 1.0 hertz below pickup. Look along
the 0 TIME curve (lower curve) until curve intersects the vertical 1.0 HERTZ BELOW PICKUP
grid line. At the intersection read 0.230 seconds (±15 percent) delay time on the TRIP TIME
(SECONDS) scale.
Step 18.
Adjust TRIP TIME ADJUST control as necessary for the above tolerance.
Step 19.
Set the test frequency select switch to the 50 hertz or 60 hertz position, as applicable.
Step 20.
Adjust the variable frequency source for either a 47.0 hertz (T2) or 57.0 hertz (T1) output.
Step 21.
Switch the test frequency select switch to the variable position.
Step 22.
Read the trip time delay indicated by the counter. Record the delay time and compare it to
the applicable delay curve to determine if the delay time is within the specified ±15 percent
tolerance.
Summary of Contents for BE1-81
Page 1: ... 05647 6 10 07 14 6 70 4 4 37 0 4 1 2WDNKECVKQP 4GXKUKQP ...
Page 7: ...BE1 81 General Information 1 2 Figure 1 1 Inverse Time Curves 50 Hertz Option ...
Page 8: ...BE1 81 General Information 1 3 Figure 1 2 Inverse Time Curves 60 Hertz Option ...
Page 13: ...BE1 81 Controls And Indicators 2 2 Figure 2 1 Location Of Controls And Indicators Option E1 ...
Page 14: ...BE1 81 Controls And Indicators 2 3 Figure 2 2 Location Of Controls And Indicators Option D1 ...
Page 15: ...BE1 81 Controls And Indicators 2 4 Figure 2 3 Location Of Assemblies ...
Page 22: ...BE1 81 Installation 4 3 Figure 4 3 S1 Case Single Ended Semi Flush Mounting Side View ...
Page 25: ...BE1 81 Installation 4 6 Figure 4 6 S1 Case Single Ended Projection Mounting Rear View ...
Page 26: ...BE1 81 Installation 4 7 Figure 4 7 S1 Case Single Ended Projection Mounting Side View ...
Page 27: ...BE1 81 Installation 4 8 Figure 4 8 S1 Case Double Ended Semi Flush Mounting Side View ...
Page 30: ...BE1 81 Installation 4 11 Figure 4 11 S1 Case Double Ended Projection Mounting Rear View ...
Page 31: ...BE1 81 Installation 4 12 Figure 4 12 S1 Case Double Ended Projection Mounting Side View ...
Page 33: ...BE1 81 Installation 4 14 Figure 4 14 DC Control Connections ...
Page 34: ...BE1 81 Installation 4 15 Figure 4 15 Internal Connections Style Number T E 1 A0S5 ...
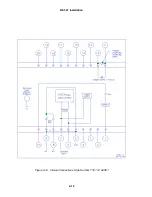
Page 35: ...BE1 81 Installation 4 16 Figure 4 16 Internal Connections Style Number T E 1C A2S5 ...


