BE1-BPR Installation
7-1
SECTION 7 • INSTALLATION
GENERAL
When not shipped as part of a control or switchgear panel, BE1-BPR Breaker Protection Relays (BPR) are
shipped in sturdy cartons to prevent damage during transit. Upon receipt, check the part number against the
requisition and packing list to see that they agree. Visually inspect it for damage that may have occurred
during shipment. If there is evidence of damage, immediately file a claim with the carrier and notify the
Regional Sales Office, or contact the Sales Representative at Basler Electric, Highland, Illinois.
In the event the unit is not to be installed immediately, store it in its original shipping carton in a moisture and
dust free environment. It is strongly recommended that an operational test (described in Section 8) always
be performed prior to installation.
OPERATING PRECAUTIONS
Before installation or operation, note the following precautions.
1.
Always be sure that external operating (monitored) conditions are stable before removing a BE1-BPR
unit for inspection, testing, or servicing.
2.
BE1-BPR relays are solid-state devices and have been type tested in accordance with the
requirements defined below under
Dielectric Test. If a wiring insulation test is required on the
switchgear or panel assembly of which this unit is a part, see
Dielectric Test below.
3.
Be sure that the BE1-BPR case is hard wired to earth ground using the ground terminal on the rear
of the unit.
4.
When the unit is in service, the controls should be protected by the plastic cover supplied. This limits
access to the control settings.
Dielectric Test
All output and power supply terminals have MOV suppressors. Maximum applied voltage must be no greater
than 300 volts where MOV suppressors are used. Surge suppression capacitors are installed between
terminal pairs and between terminals and chassis ground. When testing with 1,500 Vac, leakage current
(approximately eight milliamperes per terminal) is expected. 1,500 Vac (RMS) at 45 to 65 hertz or 2,121 Vdc
for one minute may be applied between circuit groups, and between circuit groups and chassis ground in
accordance with IEC 255-5 and ANSI/IEEE C37.90-1989 (Dielectric Tests).
MOUNTING
General
BE1-BPR relays are designed to be mounted in either 19 inch racks or conventional panels. Overall
dimensions for the rack unit are shown in Figure 7-1. The rack unit may be panel mounted at any convenient
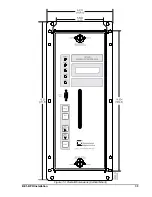
angle, using the cutout dimensions of Figure 7-2 as a guide. Figures 7-3 and 7-4 show the dimensions for
the vertical panel mount. The cutout dimensions for the vertical panel mount are shown in Figure 7-5. When
panel mounting the rack unit, an optional escutcheon plate can be installed to cover variations in panel
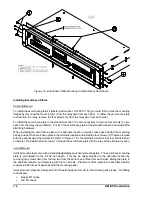
cutouts. Figure 7-6 shows the mounting flanges removed and the escutcheon plate installed. Figure 7-7
shows the mounting flange and alternate location that requires less mounting depth.
Summary of Contents for BE1-BPR
Page 31: ...BE1 BPR Application 2 17...
Page 42: ...3 4 BE1 BPR Human Machine Interface Figure 3 4 BE1 BPR Relay Vertical Mount Front View...
Page 43: ...BE1 BPR Human Machine Interface 3 5 Figure 3 5 BE1 BPR Relay Vertical Mount Rear View...
Page 49: ...4 6 BE1 BPR Functional Description Figure 4 2 Enhanced BE1 BPR Menu Display Screens...
Page 50: ...BE1 BPR Functional Description 4 7 Figure 4 3 Standard BE1 BPR Menu Display Screens...
Page 94: ...5 4 BE1 BPR BESTlogic Figure 5 1 BESTlogic Function Blocks...
Page 121: ...BE1 BPR Installation 7 3 Figure 7 3 Overall Dimensions Vertical Mount...
Page 122: ...7 4 BE1 BPR Installation Figure 7 4 Overall Dimensions Side View Vertical Mount...
Page 123: ...BE1 BPR Installation 7 5 Figure 7 5 Panel Drilling Diagram Vertical Mount...

