8-38
BE1-CDS240 Application
9365200990 Rev F
Protection Elements
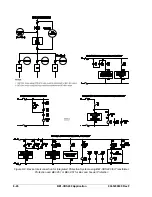
Referring to Figure 8-11, the 87, 150/151, 50/51 protection elements are connected to CT Input 1 and the
Feeder Side of the 87 protection element is connected to Input 2. The 87, 150/151, and 50/51 protection
elements are logic enabled to provide a trip by the settings shown in Table 8-11. Protection elements set
to 0 are setting disabled and will not provide a trip output even if logic enabled.
As shown in Figure 8-11, the CDS240-BSBU-A-BE scheme is typically applied with a BE1-851 on the
feeder circuits and a BE1-CDS240 on the transformer (not shown) supplying the bus. The transformer
BE1-CDS240 provides an independent backup for bus faults with a coordination interval of 18 to 20
cycles. This combination provides independent, overlapping backup protection in the event of a common
mode failure (refer to the discussion in
Details Of Preprogrammed Logic Schemes
).
Typically, the 87 protection element provides high-speed percent restrained, phase, and ground
protection for faults inside the differential zone. For the CDS240-BSBU-A-BE application shown in Figure
8-11, the percent-restrained differential protection function is the only function of the 87 protection
element required. Set the pickup of the 2
nd
, 5
th
, and 87U functions to 0 (setting disabled). The 87U
function has a setting only when the 2
nd
and 5
th
harmonic restraint functions are set for transformers (refer
to the discussion in
Overview Of Preprogrammed Logic Schemes
).
Typically, the 150 and 151 protection elements are coordinated with the bus and feeder protection to
provide Phase, Neutral, and Negative Sequence instantaneous and timed backup protection for bus and
feeder faults.
Typically, the 51 protection element is coordinated with the low-side feeder protection to provide Phase,
Neutral, and Negative Sequence timed backup protection for feeder faults should feeder protection be out
of service. When a
Feeder Relay Out of Service
signal is detected through IN7 of the BE1-CDS
CDS240-BSBU-A-BE scheme, the relay switches from normal mode to feeder backup mode. The 251
protection element is reset from setting group 0 to setting group 1 to provide time overcurrent feeder
replacement protection.
Typically, the 50T protection element is set to provide high-speed bus fault protection (2-4 cycles
coordination interval) when used with 851 feeder protection inputs as part of a bus-interlocking scheme
(IN5 of the Bus BE1-CDS240). For normal mode, the 250T protection element should have a pickup
setting greater than the highest feeder instantaneous element to ensure that it will not pickup before any
feeder relay. When a
Feeder Relay Out of Service
signal is detected through IN7 of the BE1-CDS240
CDS240-BSBU-A-BE, the relay switches from normal mode to feeder backup mode. The 250T protection
element is reset from setting group 0 to setting group 1 to provide instantaneous overcurrent feeder
replacement protection.
Integration of Protection, Control, and I/O Elements
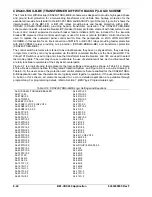
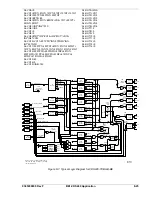
The logic settings in Table 8-25 also include the logic equations that establish the control connections or
logic wiring between elements of the CDS240-BSBU-A-BE scheme. For example, the two underlined
equations in the settings of Table 8-25 provide the electrical connection between the 87 element (trip
enabled by the settings) and trip outputs 1 and 4. Referring to Figures 8-11 and 8-12, during the normal
mode, the 87, 50, and 51 protection elements (each trip enabled by the settings) trip through Outputs 1
and 4. The 150 and 151 protection elements and the 101 Virtual Switch element (also trip enabled by the
settings) trip through Output 4. During the feeder backup mode, the 50T and 51 protection elements are
rerouted from Output 1 and Output 4, to Output 3 to provide feeder protection. Protection elements set at
0 are setting disabled and will not provide a trip output even if logic enabled.
As shown in Figure 8-11, IN7 of the CDS240-BSBU-A-BE signals the scheme that a feeder relay is out of
service. This input instructs the BE1-CDS240 relay to switch from the normal mode of interlocked bus
protection to the feeder backup mode.
As shown in Figure 8-11, IN5 of the CDS240-BSBU-A-BE scheme is hard wired to the feeder protection
relays (BE1-851). This signal path provides the intelligence that allows the CDS240-BSBU-A-BE to
determine if a fault is on the bus or on a feeder circuit. When any feeder overcurrent elements are picked
up and timing, a signal at IN5 of the BE1-CDS240 bus blocks the 50T protection elements. The pickup of
the 50T protection element is delayed 2 to 4 cycles to allow time for the feeder protection to detect,
pickup, and start timing. If the fault is not on a feeder, the 50T protection element of the BE1-CDS240 bus
is not blocked and trips in 2 to 4 cycles through Outputs 1 and 4 as previously discussed. The overlapping
250T protection element from the transformer BE1-CDS240 (not shown in Figure 8-11) does not get
blocked when the feeder relays are picked up. Therefore, the 250T protection element must be set with a
time delay long enough to allow the feeder breaker to interrupt the fault.
Summary of Contents for BE1-CDS240
Page 2: ......
Page 8: ...vi BE1 CDS240 Introduction 9365200990 Rev F This page intentionally left blank ...
Page 38: ...1 28 BE1 CDS240 General Information 9365200990 Rev F This page intentionally left blank ...
Page 40: ...ii BE1 CDS240 Quick Start 9365200990 Rev F This page intentionally left blank ...
Page 152: ...ii BE1 CDS240 Metering 9365200990 Rev F This page intentionally left blank ...
Page 226: ...iv BE1 CDS240 Application 9365200990 Rev F This page intentionally left blank ...
Page 286: ...ii BE1 CDS240 Security 9365200990 Rev F This page intentionally left blank ...
Page 290: ...9 4 BE1 CDS240 Security 9365200990 Rev F This page intentionally left blank ...
Page 292: ...ii BE1 CDS240 Human Machine Interface 9365200990 Rev F This page intentionally left blank ...
Page 306: ...10 14 BE1 CDS240 Human Machine Interface 9365200990 Rev F This page intentionally left blank ...
Page 308: ...ii BE1 CDS240 ASCII Command Interface 9365200990 Rev F This page intentionally left blank ...
Page 342: ...11 34 BE1 CDS240 ASCII Command Interface 9365200990 Rev F This page intentionally left blank ...
Page 349: ...Figure 12 5 Horizontal Rack Mount Front View 9365200990 Rev F BE1 CDS240 Installation 12 5 ...
Page 361: ...Figure 12 17 Typical DC Connection Diagrams 9365200990 Rev F BE1 CDS240 Installation 12 17 ...
Page 372: ...12 28 BE1 CDS240 Installation 9365200990 Rev F This page intentionally left blank ...
Page 468: ...13 92 BE1 CDS240 Testing and Maintenance 9365200990 Rev F This page intentionally left blank ...
Page 512: ...14 42 BE1 CDS240 BESTCOMS Software 9365200990 Rev F This page intentionally left blank ...
Page 544: ...ii BE1 CDS240 Terminal Communication 9365200990 Rev F This page intentionally left blank ...
Page 550: ...ii BE1 CDS240 Settings Calculations 9365200990 Rev F This page intentionally left blank ...
Page 578: ...D 28 BE1 CDS240 Settings Calculations 9365200990 Rev F This page intentionally left blank ...
Page 579: ......


