


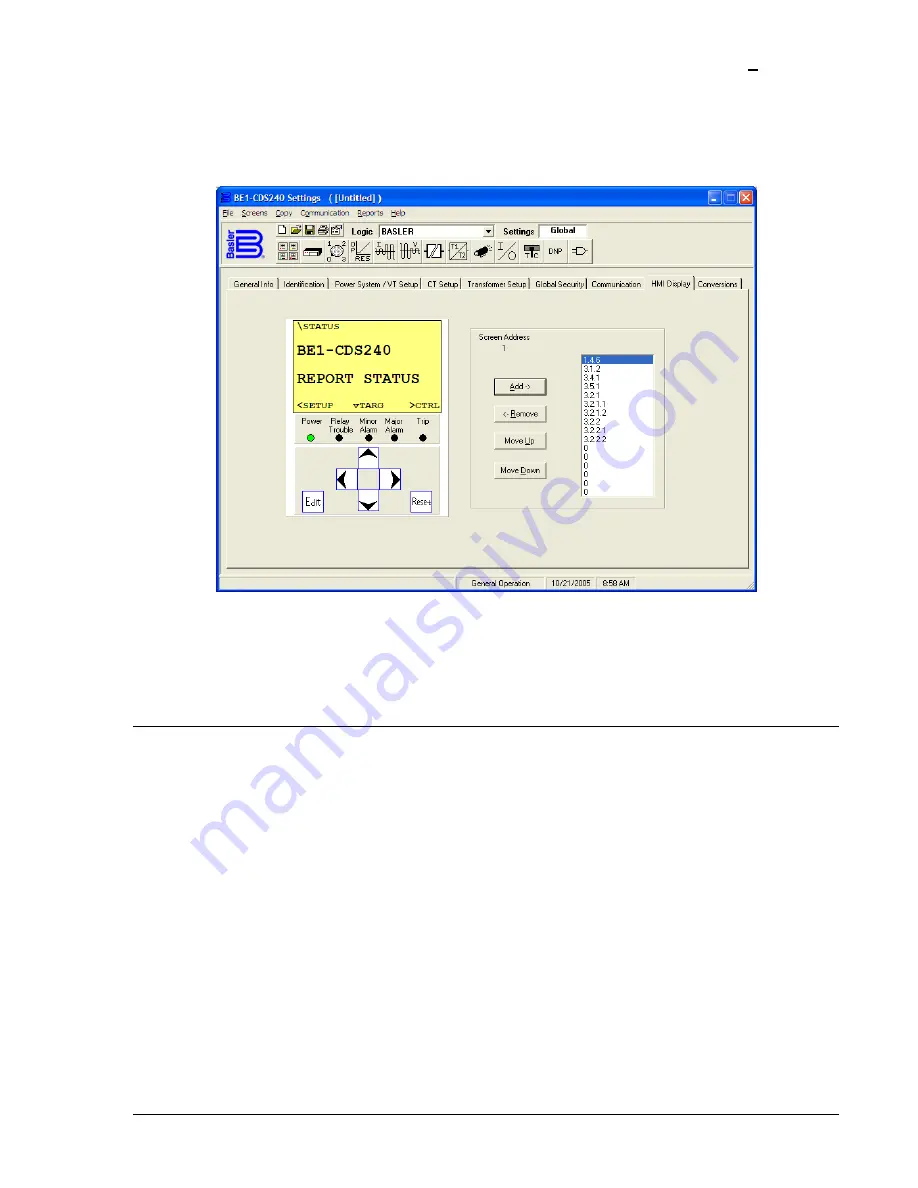
To edit the automatic scrolling list using BESTCOMS, select
General Operation
from the
Screens
pull-
down menu. Then select the
HMI Display
tab. Refer to Figure 10-10. The screen numbers listed exhibit
the default scrolling list. The list of numbers on the right represents the screen numbers and the order in
which they will be displayed when automatic scrolling begins. The number closest to the top will be
displayed first. The four buttons on the screen can be used to add or remove screens from the list. They
can also be used to change a selected screens position in the list.
Figure 10-10. General Operation Screen, HMI Display Tab
To add a screen to the list, select the screen on the HMI simulation by clicking the mouse pointer on the
arrows. Select the
Add->
button to add the screen to the list.
Alternately, these settings may be made using the SG-SCREEN ASCII command.
HMI OPERATIONS
The following paragraphs describe how the HMI is used to set and control relay functions.
Entering Settings
Settings for protection functions can be edited from menu branch 5,
PROTECTION
of the LCD HMI.
Control functions can be edited from menu branch 2,
CONTROL.
Settings for general and reporting
functions can be edited from menu branch 6,
GENERAL SETTINGS.
To edit a setting using the manual
scrolling pushbuttons, perform the following procedures:
1. Scroll to the screen that displays the function to be edited.
2. Press
the
Edit
pushbutton to gain access. If password security has been initiated for settings, you
will be prompted to enter the appropriate password. See the paragraphs,
Entering Passwords,
for
details on entering passwords from the HMI. Once access has been gained, the Edit LED will be
lighted and a cursor will appear in the first settings field on the screen.
3. Press
the
UP
or
DOWN
scrolling key to select the desired setting. Some settings require entering
a number one character at a time. For example, to enter a 51 pickup as 7.3 amps, you would
press the
UP
pushbutton until the 7 is showing. Then, press the
RIGHT
pushbutton to move the
cursor over and press the
UP
pushbutton until the “.” is showing. Then, press the
RIGHT
pushbutton to move the cursor over and press the
UP
pushbutton until the 3 is showing. Other
settings require scrolling through a list of selections. For example, you would move the cursor
over to the CRV field and then scroll through a list of available TCC curves.
9365200990 Rev F
BE1-CDS240 Human-Machine Interface
10-11
Summary of Contents for BE1-CDS240
Page 2: ......
Page 8: ...vi BE1 CDS240 Introduction 9365200990 Rev F This page intentionally left blank ...
Page 38: ...1 28 BE1 CDS240 General Information 9365200990 Rev F This page intentionally left blank ...
Page 40: ...ii BE1 CDS240 Quick Start 9365200990 Rev F This page intentionally left blank ...
Page 152: ...ii BE1 CDS240 Metering 9365200990 Rev F This page intentionally left blank ...
Page 226: ...iv BE1 CDS240 Application 9365200990 Rev F This page intentionally left blank ...
Page 286: ...ii BE1 CDS240 Security 9365200990 Rev F This page intentionally left blank ...
Page 290: ...9 4 BE1 CDS240 Security 9365200990 Rev F This page intentionally left blank ...
Page 292: ...ii BE1 CDS240 Human Machine Interface 9365200990 Rev F This page intentionally left blank ...
Page 306: ...10 14 BE1 CDS240 Human Machine Interface 9365200990 Rev F This page intentionally left blank ...
Page 308: ...ii BE1 CDS240 ASCII Command Interface 9365200990 Rev F This page intentionally left blank ...
Page 342: ...11 34 BE1 CDS240 ASCII Command Interface 9365200990 Rev F This page intentionally left blank ...
Page 349: ...Figure 12 5 Horizontal Rack Mount Front View 9365200990 Rev F BE1 CDS240 Installation 12 5 ...
Page 361: ...Figure 12 17 Typical DC Connection Diagrams 9365200990 Rev F BE1 CDS240 Installation 12 17 ...
Page 372: ...12 28 BE1 CDS240 Installation 9365200990 Rev F This page intentionally left blank ...
Page 468: ...13 92 BE1 CDS240 Testing and Maintenance 9365200990 Rev F This page intentionally left blank ...
Page 512: ...14 42 BE1 CDS240 BESTCOMS Software 9365200990 Rev F This page intentionally left blank ...
Page 544: ...ii BE1 CDS240 Terminal Communication 9365200990 Rev F This page intentionally left blank ...
Page 550: ...ii BE1 CDS240 Settings Calculations 9365200990 Rev F This page intentionally left blank ...
Page 578: ...D 28 BE1 CDS240 Settings Calculations 9365200990 Rev F This page intentionally left blank ...
Page 579: ......


