View Fault Details
To view the fault record details, select an event by clicking on the event number or anywhere on the event
line. The event grays-out while the information is being retrieved from the relay. View the fault details in
the associated window.
View Fault Sequence of Events
To view the fault record sequence of events, click on the radio button by the
View Fault Sequence of
Events
. View the fault sequence of events in the associated window.
Download Oscillography File
To download an oscillography file, select the type of file to download:
Binary
or
ASCII
and
1991
or
1999
Comtrade Format
. Click on the
Download
button in the
View/Download Relay Fault Files
dialog box. Use
normal Windows
techniques to select the computer folder that is to receive the download file. You may
create a new folder at this time by clicking on the
New Folder
button. Okay the file save and the
Fault
Record Filenames
dialog box opens. Use the default
Base Filename
or enter a new file name. As you
change the file name, the names for the
Header File, Fault Sequence
, and
Fault Summary
also change
automatically.
OK
the file names and then exit the dialog box. You have now downloaded the
oscillography file. You may view this oscillography file using
Basler Electric's BESTwave
software.
METERING
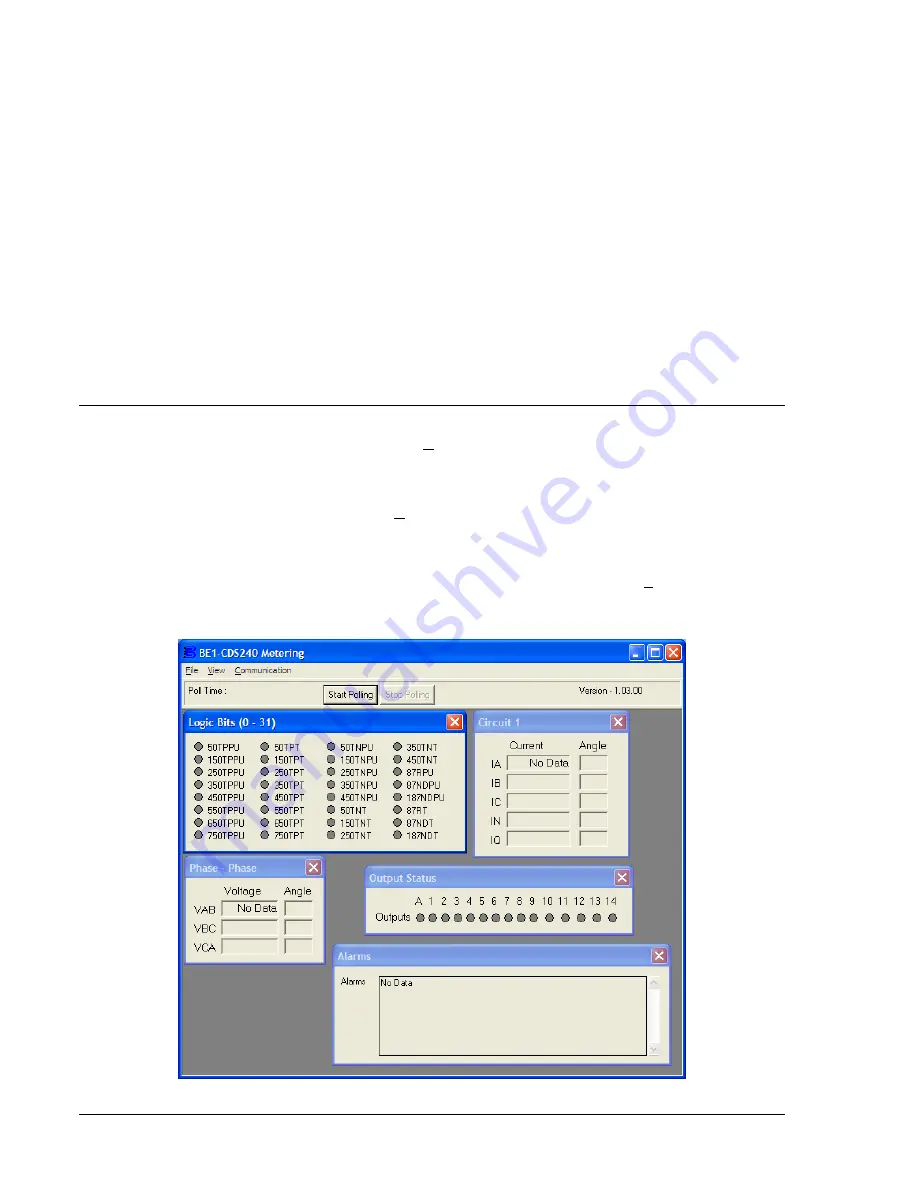
To observe the system metering, pull down the
Reports
menu from the pull-down menu and select
Metering
. When the
Metering
dialog box (Figure 14-54) opens, click on the
Start Polling
button. If
BESTCOMS is not configured to the relay communication settings, you will receive a Communications
Error. The
Metering
dialog box has two pull-down menus:
File
and
Communication
. To configure
communication with the relay, pull down the
Communication
menu and select
Configure
. Choose the
Com Port
and
Baud Rate
, as required. If you have communication with the relay, click on the
Start Polling
Button
. Metering values are displayed in the various screen windows. If you select
Configure
with polling
in progress, you will get the
Polling Active
dialog box. You must stop polling before you can change
configuration. To stop polling, click on the
Stop Polling
button. To exit, pull down the
File
menu and select
Exit
. You may also use the Windows
techniques and click on the close icon (X) in the upper right-hand
corner of the
Metering
dialog box.
Figure 14-54. Metering from Reports Pull-Down Menu
14-38
BE1-CDS240 BESTCOMS Software
9365200990 Rev F
Summary of Contents for BE1-CDS240
Page 2: ......
Page 8: ...vi BE1 CDS240 Introduction 9365200990 Rev F This page intentionally left blank ...
Page 38: ...1 28 BE1 CDS240 General Information 9365200990 Rev F This page intentionally left blank ...
Page 40: ...ii BE1 CDS240 Quick Start 9365200990 Rev F This page intentionally left blank ...
Page 152: ...ii BE1 CDS240 Metering 9365200990 Rev F This page intentionally left blank ...
Page 226: ...iv BE1 CDS240 Application 9365200990 Rev F This page intentionally left blank ...
Page 286: ...ii BE1 CDS240 Security 9365200990 Rev F This page intentionally left blank ...
Page 290: ...9 4 BE1 CDS240 Security 9365200990 Rev F This page intentionally left blank ...
Page 292: ...ii BE1 CDS240 Human Machine Interface 9365200990 Rev F This page intentionally left blank ...
Page 306: ...10 14 BE1 CDS240 Human Machine Interface 9365200990 Rev F This page intentionally left blank ...
Page 308: ...ii BE1 CDS240 ASCII Command Interface 9365200990 Rev F This page intentionally left blank ...
Page 342: ...11 34 BE1 CDS240 ASCII Command Interface 9365200990 Rev F This page intentionally left blank ...
Page 349: ...Figure 12 5 Horizontal Rack Mount Front View 9365200990 Rev F BE1 CDS240 Installation 12 5 ...
Page 361: ...Figure 12 17 Typical DC Connection Diagrams 9365200990 Rev F BE1 CDS240 Installation 12 17 ...
Page 372: ...12 28 BE1 CDS240 Installation 9365200990 Rev F This page intentionally left blank ...
Page 468: ...13 92 BE1 CDS240 Testing and Maintenance 9365200990 Rev F This page intentionally left blank ...
Page 512: ...14 42 BE1 CDS240 BESTCOMS Software 9365200990 Rev F This page intentionally left blank ...
Page 544: ...ii BE1 CDS240 Terminal Communication 9365200990 Rev F This page intentionally left blank ...
Page 550: ...ii BE1 CDS240 Settings Calculations 9365200990 Rev F This page intentionally left blank ...
Page 578: ...D 28 BE1 CDS240 Settings Calculations 9365200990 Rev F This page intentionally left blank ...
Page 579: ......


