background image

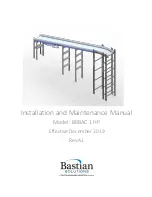
Installation & Maintenance Manual: BRBAC 1 HP


Published December 2019 

Rev.A1 


13 


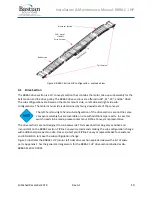
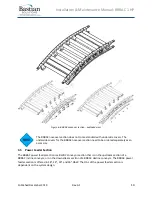
Figure 5: BRBAC bed section - exploded view 


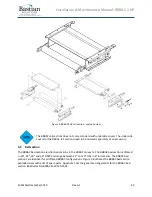
The BRBAC bed sections does not come standard with underside covers. The 
underside covers for the BRBAC bed sections need to be ordered separately as an 
accessory. 

3.4


Noseover Section 

The BRBAC noseover section is a 42” conveyor section that is vertically sectioned to allow for 

angular 

adjustment between 0 to 25 degrees. The angular adjustment can be made by adjusting the hardware in 
the bottom of the channel in the side frame on both sides. The BRBAC noseover section is offered in 

18”, 24”, 30” and 36” OAW.

 The BRBAC noseover section is identical for all BRBAC configurations.  


The BRBAC noseover section is a recommended conveyor section for a BRBAC 
incline/decline conveyor. An incline/decline BRBAC conveyor without a noseover 
section can result in damage to the package conveyed due to rough transitions 
between incline/decline and straight sections. 

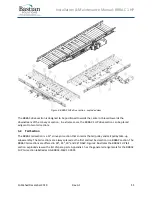
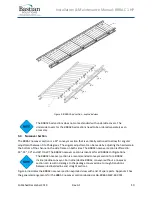
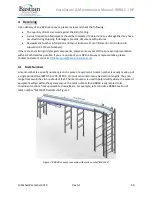
Figure 6 illustrates the BRBAC noseover section exploded view with a list of spare parts. Appendix 1 has 
the general arrangements for the BRBAC noseover section labelled as GA-BRBAC-MW-42-0001. 

Summary of Contents for BRBAC 1 HP

Page 1: ...Installation and Maintenance Manual Model BRBAC 1 HP Effective December 2019 Rev A1...

Page 2: ...ntributions ROLE NAME TITLE Author Rajarshi Choudhuri Design and Cost Engineer Checker Ben Baker Senior Design Engineer Approver Chris Perry Engineering Manager Revision History DATE REVISION REVISION...

Page 3: ...CCW Counter clockwise Center Drive Drive format of AC conveyor where the drive unit is mounted at any point along the length of the conveyor CW Clockwise Discharge The point where cartons cases or tot...

Page 4: ...rive and or tension the belt Return Idlers Belt routing rollers on the underside of any given AC conveyor Roller Powered or unpowered cylindrically shaped material handling component used for mechanic...

Page 5: ...3 Installing the AC Belt 20 5 4 Tensioning and Tracking the AC belt 23 5 5 Installing and Adjusting Noseover section angle 25 5 6 Installing Underside Covers 26 6 Maintenance and Operation 28 6 1 Saf...

Page 6: ...BRBAC 1 HP drive take up view 23 Figure 17 Belt tracking by adjusting snub rollers 24 Figure 18 BRBAC Noseover section angle adjustment bracket and corresponding hardware 25 Figure 19 BRBAC noseover s...

Page 7: ...50000441 Habasit Holding AG Habasit Heavy Conveyor Belts UMS130SC B H250000560 Habasit Holding AG Habasit Product Data Sheet RGLIDE T Habasit Holding AG Habasit Fabric Conveyor Belts Installation and...

Page 8: ...explicitly described in this manual are considered out of scope Please contact Bastian Solutions ZiPline Conveyor for any questions or support that is not clearly addressed in this document ZiPline C...

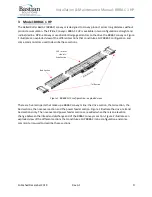
Page 9: ...and some common terms used to describe these sections Figure 1 BRBAC 1HP configuration exploded view There are five main parts that make up a BRBAC conveyor line the drive section the tail section the...

Page 10: ...me conveyor assembly but are reversible on site with additional spare parts In case this switch needs to be made please contact your ZiPline Conveyor representative The drive sections are not designed...

Page 11: ...ction The BRBAC tail section is a 12 conveyor section that contains the tail pulley and tail pulley take up subassembly The tail sections are always placed as the first and last bed section in a BRBAC...

Page 12: ...C bed section are idler bed sections in the BRBAC conveyor The BRBAC bed section is offered in 18 24 30 and 36 OAW and range between 12 to 120 OAL in 6 increments The BRBAC bed sections are identical...

Page 13: ...justing the hardware in the bottom of the channel in the side frame on both sides The BRBAC noseover section is offered in 18 24 30 and 36 OAW The BRBAC noseover section is identical for all BRBAC con...

Page 14: ...s for the BRBAC noseover section need to be ordered separately as an accessory 3 5 Power Feeder Section The BRBAC power feeder section is a BLVDC conveyor section that is on the upstream section of a...

Page 15: ...ion is a recommended conveyor section for a BRBAC incline decline conveyor An incline decline BRBAC conveyor without a power feeder section can result in damages to the package conveyed due to rough t...

Page 16: ...r representative with as much detail as possible If you are unsure of your ZiPline Conveyor representative please contact Customer Service at ZiPlineSupport BastianSolutions com 4 1 Mark Numbers A mar...

Page 17: ...ckers on the side frame One sticker on the upstream side of the conveyor frame and the other sticker on the downstream side of the conveyor frame Each sticker contains the following information ZiPlin...

Page 18: ...skid label These stickers are placed on the surface of each skid Figure 9 Skid Sticker BRBAC conveyor may arrive in multiple skids for the same mark number The number of skids shipped is dependent on...

Page 19: ...on 5 5 to install and adjust the angle of the noseover section Do not lift the drive section of the conveyor using the lifting lug on the AC motor and gearbox This will cause damage to the gearbox and...

Page 20: ...ust for square accordingly Turnbuckles are typically installed to the bottom mounting holes of the sideframe of a BRBAC section ZiPline Conveyor does not supply turnbuckle kits for additional section...

Page 21: ...lengths of the AC belt are custom to each mark number Therefore AC belts for a specific mark number cannot generally be used for a different mark number 3 Loosen the drive take up mechanism This step...

Page 22: ...routing BRBAC 1 HP tail with noseover section view 6 Splice the ends of the belt by installing the provided splice pin Figure 15 illustrates the splice pin installation The splice pin comes in a pre...

Page 23: ...p tensioning the belt when the belt is taut along its routing and the belt does not slip on the drive pulley when the motor is turned on 6 Once the belt is tensioned correctly measure the position of...

Page 24: ...t on both ends of the snub roller to begin adjustments 10 If the belt is tracking towards the right move the left side of the snub roller forward If the belt is tracking towards the left move the righ...

Page 25: ...travelling from a horizonal section to an angled section in an incline decline BRBAC The following instructions outline the installation and adjustment procedure for the BRBAC noseover section 1 Prio...

Page 26: ...y on a skid The only exception is the underside covers installed on the BRBAC drive sections The overall width of the underside cover is approximately 1 8 less than the between frame width of the BRBA...

Page 27: ...Figure 21 illustrates the orientation of this operation The torque requirement for the 3 8 carriage bolt and serrated flange nut is 31 ft lbs Figure 21 Installing the underside cover to the BRBAC bed...

Page 28: ...rive 5 Ensure that all areas are clear of objects prior to loading and unloading 6 No personnel should ever ride climb step sit on or otherwise put body weight on the conveyor Doing so puts both perso...

Page 29: ...nt procedure 1 Ensure that the power to the AC motor is switched off ZiPline Conveyor recommends using Lockout Tagout LOTO procedures for this operation 2 Mark measure the position of the tensioner ro...

Page 30: ...tail section Figure 23 illustrates the hex head cap screw that holds the tail pulley on one side of the tail section Figure 23 BRBAC 1 HP tail pulley take up hardware 7 Lift up the tail pulley through...

Page 31: ...e drive section to its original position 13 Run the conveyor to ensure that the belt is properly tensioned and tracked If the AC belt requires tensioning and tracking refer to section 5 4 of this manu...

Page 32: ...injury 7 Remove the underside cover closest to the drive pulley from the drive section The underside cover closest to the drive pulley is attached by 4 3 8 carriage bolts and serrated flange nuts and...

Page 33: ...ss to remove the drive pulley Figure 27 illustrates the location of the drive pulley guard and the corresponding hardware on the motor side The non motor side is identical except for the shaft length...

Page 34: ...earing The set screws used in the drive pulley bearings cause an indent on the shaft on install ZiPline Conveyor advises caution when removing the bearings to avoid damage 11 Pull the drive pulley out...

Page 35: ...within the drive side frame The longer side of the drive pulley shaft should have a keyway and is on the side of the motor mount 18 Once the drive pulley surface is centered within the drive section...

Page 36: ...ually on both sides of the conveyor This relaxes the belt tension across the conveyor To loosen the take up pulley move the take up bearings towards upstream side of the conveyor 5 Remove the belt spl...

Page 37: ...operation with an exploded view Figure 31 BRBAC 1 HP drive take up pulley bearing motor side 10 Pull out the take up pulley bearing on the non motor side Figure 32 illustrates this operation with an e...

Page 38: ...side of the conveyor towards the motor 15 Insert the take up bearings on both sides of the take up pulley Do not tighten the set screws in this step 16 Install the 2 1 2 hex head cap screw and hex nut...

Page 39: ...The snub roller has a spring loaded hex shaft Using a punch or similar tool push the hex of the snub roller into the side frame Reach under the side frame and pull the roller down and out of the frame...

Page 40: ...rame 1 To replace the BRBAC tail pulley bearings refer to section 6 4 and follow all the steps until the tail pulley is removed from the side frame Instead of replacing the pulley replace the bearings...

Page 41: ...the AC motor gearbox The torque requirement for the 7 16 hex head cap screw is 48 ft lb 6 11 AC Belt Replacement The following instructions outline the AC motor replacement procedure 1 Ensure that the...

Page 42: ...y Verify the wiring of the motor Scraping sounds The bearing shields have been displaced during installation maintenance Re adjust bearing shield remove bearing shield or order replacement bearing bas...

Page 43: ...P DRIVE CONFIG 6in OD MULTIPLE WIDTHS TAKE UP PULLEY 1 HP DRIVE CONFIG 4 OD MULTIPLE WIDTHS TAIL PULLEY 1 HP TAIL CONFIG 2 4 OD MULTIPLE WIDTHS DRIVE PULLEY BEARING 1 HP DRIVE CONFIG 1 1 4 BORE TAKE U...

Page 44: ...Installation Maintenance Manual BRBAC 1 HP Published December 2019 Rev A1 44...

Page 45: ...Installation Maintenance Manual BRBAC 1 HP Published December 2019 Rev A1 45...

Page 46: ...Installation Maintenance Manual BRBAC 1 HP Published December 2019 Rev A1 46...

Page 47: ...Installation Maintenance Manual BRBAC 1 HP Published December 2019 Rev A1 47...

Page 48: ...tions It may not be duplicated used or disclosed without written permission from Bastian Solutions It may not be used in whole or in part for any purpose other than its intended purpose as an operatio...

Reviews: