Installation & Maintenance Manual: BRBAC 1 HP
Published December 2019
Rev.A1
40
2.
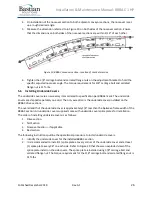
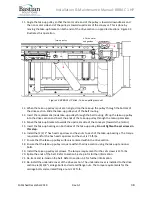
Mark/measure the position of the tensioner rods on the drive section of the conveyor.
3.
Loosen the take-up equally on both sides of the conveyor. This relaxes the belt tension across
the conveyor. To loosen the take-up pulley, move the take-up bearings towards upstream side
of the conveyor.
4.
The idler roller has a spring-loaded hex shaft. Using a punch or similar tool, push the hex of the
idler roller into the side frame.
5.
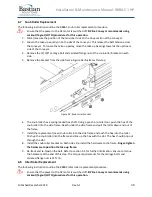
If the idler roller is on the conveying surface, reach over the side frame and pull the idler up and
out of the frame.
6.
If the idler roller is under the conveyor as a belt return roller, reach under the side frame and
pull the idler down and out of the frame.
7.
Install the replacement (new) idler roller into the side frame and push the hex into the roller.
8.
If the idler roller is on the conveying surface, route the roller under the belt and push down the
idler roller into the frame and line up the hex with the hex slot. The hex should pop out through
the hex slot.
9.
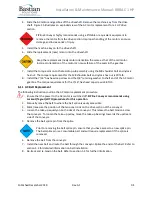
If the idler roller is under the conveyor as a belt return roller, route the roller against the belt
and push up the idler roller into the frame and line up the hex with the hex slot. The hex should
pop out through the hex slot.
10.
Re-track and re-tension the belt. Refer to section 5.4 for further information.
6.9
Bearing Replacement and Maintenance
The BRBAC tail pulleys, drive pulleys and take-up pulleys have bearings that mount the pulleys to the
side frame.
1.
To replace the BRBAC tail pulley bearings, refer to section 6.4 and follow all the steps until the
tail pulley is removed from the side frame. Instead of replacing the pulley, replace the bearings
and follow the steps in that section to re-install the bearings to the conveyor.
2.
To replace the BRBAC drive pulley bearings, refer to section 6.5 and follow all the steps until the
drive pulley is removed from the side frame. Instead of replacing the pulley, replace the
bearings and follow the steps in that section to re-install the bearings to the conveyor.
3.
To replace the BRBAC take-up pulley bearings, refer to section 6.6 and follow all the steps until
the take-up pulley is removed from the side frame. Instead of replacing the pulley, replace the
bearings and follow the steps in that section to re-install the bearings to the conveyor.
To keep the bearings working efficiently with minimum downtime, a bearing inspection and lubrication
schedule must be followed. ZiPline conveyor recommends a visual and auditory inspection every 5-6
weeks and lubrication of the bearings every 10-12 weeks. For bearing lubrication, use a No. 2 Lithium
complex base grease. The bearings provided on site have already been greased and are ready for
operation.
6.10
AC Motor Replacement
The following instructions outline the AC motor replacement procedure.
1.
Ensure that the power to the AC motor is switched off.
ZiPline Conveyor recommends using
Lockout/Tagout (LOTO) procedures for this operation.
2.
Remove the cap from the end of the AC motor
gearbox. Remove the 7/16” hex head cap screw
and the 3/8” retaining washer from the shaft end of the AC motor gearbox.
3.
Remove the M8 shoulder bolt and nylock nut holding the torque arm to the motor.
Summary of Contents for BRBAC 1 HP
Page 1: ...Installation and Maintenance Manual Model BRBAC 1 HP Effective December 2019 Rev A1...
Page 44: ...Installation Maintenance Manual BRBAC 1 HP Published December 2019 Rev A1 44...
Page 45: ...Installation Maintenance Manual BRBAC 1 HP Published December 2019 Rev A1 45...
Page 46: ...Installation Maintenance Manual BRBAC 1 HP Published December 2019 Rev A1 46...
Page 47: ...Installation Maintenance Manual BRBAC 1 HP Published December 2019 Rev A1 47...

