background image

8

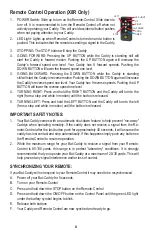
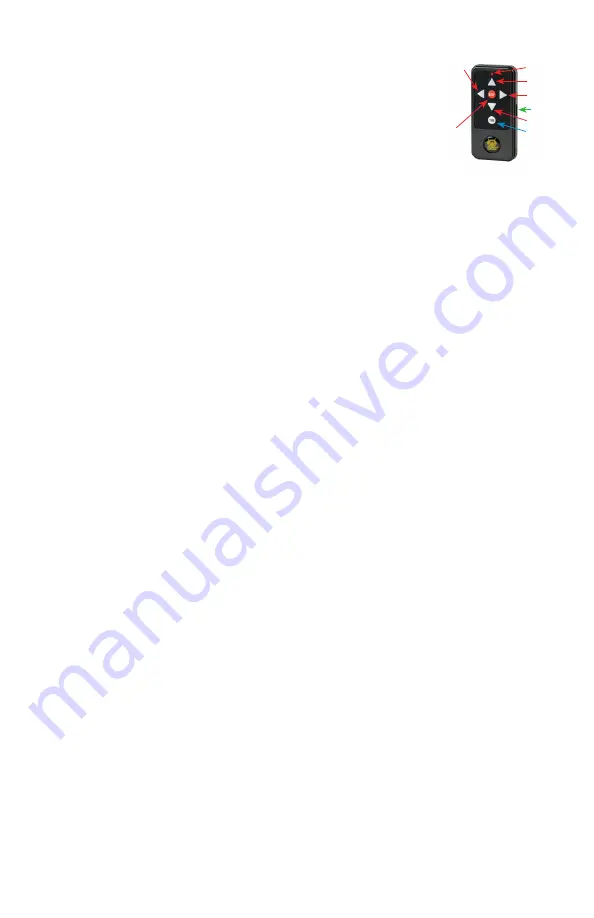
Remote Control Operation (X8R Only)

1.

POWER Switch: Slide up to turn on the Remote-Control. Slide down to

turn off. It is recommended to turn the Remote-Control off when not

actively operating your Caddy. This will avoid accidental button pushes

when not paying attention to your Caddy.

2.

LED L

ight: Lights up when Remote-Control is turned on and a button is

pushed. This indicates that the remote is sending a signal to the Caddy.

3.

STOPPING: The

 STOP

 button will stop

 the Caddy

4.

GOING  FORWARD:  Pressing  the  UP  BUTTON  w

hile the Caddy is standing still will


start  the  Caddy  in  forward  motion.  Pushing  the  UP  BUTTON  again  will  increase  the


Caddy’s  forward  speed  one  level.  Your  Caddy  has  9  forward  speeds.  Pushing  the


DOWN BUTTON will lower the forward speed one level.

3. GOING  BACKWARD:  Pressing  the  DOWN  BUTTON  while  the  Caddy  is

 standing

still will start the Caddy in reverse motion. Pushing the DOWN BUTTON again will increase

the Caddy’s reverse speed one level. Your Caddy has 9 reverse speeds. Pushing the UP

BUTTON will lower the reverse speed one level.

4. TURNING RIGHT: Press and hold the RIGHT BUTTON and the Caddy will tu

rn to the

right (from a stop and while in motion) until the button is released.

5. TURNING LEFT: Press and hold the LEFT BUTTON and the Caddy will turn to the left

(from a stop and while in motion) until the button is released.

LED LIGHT

POWER

UP

LEFT

STOP

TIMER

RIGHT

DOWN

IMPORTANT SAFETY NOTES:

1.

Your Bat-Caddy comes with an automatic shut-down feature to help prevent “run-away”

Caddys when operating remotely. If the caddy does not receive a signal from the Re

-

mote-Control after the last button push for approximately 40 seconds, it will assume the

caddy has lost contact and stop automatically. If this happens simply push any button on

the Remote-Control to resume operation.

2.

While the maximum range for your Bat-Caddy to receive a signal from your Remote-

Control is 80-100 yards, this range is in perfect “laboratory” conditions. It is strongly

recommended that you operate your Bat-Caddy at a maximum of 20-30 yards. This will

help prevent any signal interference and/or loss of control.

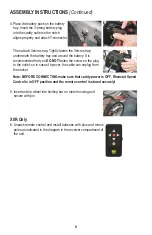
SYNCHRONIZING YOUR REMOTE: 

If your Bat-Caddy will not respond to your Remote-Control it may need to be resynchronized. 
A. Power off your Bat-Caddy for 5 seconds.
B. Turn on your Remote-Control
C. Press and hold down the STOP button on the Remote-Control
D. Press and hold down the ON/OFF button on the Control Panel until the green LED

 light

under the battery symbol begins to blink.

E. Release both buttons
F. Your Caddy and Remote-Control are now synched and ready to go.

Summary of Contents for X8 Pro

Page 1: ...X8 Pro X8R ATTENTION Please follow all assembly instructions READ the instructions carefully to understand the operating procedures BEFORE you operate your caddy X8 Series User Manual...

Page 2: ...structions 5 6 OperatingInstructions 7 Remote Control Operation X8R Remotesynchronization 8 Additional Instructions Free wheeling Tracking USB 9 Testing Your Caddy Efficient Safe Operation General Mai...

Page 3: ...ser Manual Warranty Terms Conditions NOTE This device complies with part 15 of the FCC Rules and with Industry Canada license exempt RSS standard s Operation is subject to the following two conditions...

Page 4: ...g Knob 7 Battery 8 Rear wheel 9 Rear Wheel Quick Release Catch 10 Dual Motors within housing tube 11 Lower Bag Support Strap 12 Battery Connection Plug 13 Front Wheel 14 Front Wheel Tracking Adjustmen...

Page 5: ...locked in the wheel will not be connected to the motor and will not be propelled Test the lock by trying to pull the wheel out Note the X8 caddy has a right R and a left L wheel seen from behind in dr...

Page 6: ...nsert the 3 prong battery plug into the caddy outlet so the notch aligns properly and attach T connector onto the battery Then attach Velcro strap Tightly fasten the Velcro strap underneath the batter...

Page 7: ...he cart at the current speed and then resume at the that same speed Set the desired speed with the speed control dial rheostat and then press the power button for one second when you want to stop Pres...

Page 8: ...is released 5 TURNING LEFT Press and hold the LEFT BUTTON and the Caddy will turn to the left from a stop and while in motion until the button is released LED LIGHT POWER UP LEFT STOP TIMER RIGHT DOWN...

Page 9: ...ing it on a level surface without the bag If changes are necessary you can adjust the tracking of your caddy by loosening the front wheel axle and the Adjustment bar on the right side of the from whee...

Page 10: ...n not in use General Maintenance All of these recommendations along with common sense will help keep your Bat Caddy in top condition and ensure that it remains your reliable partner both on and off th...

Page 11: ...rged Depress and hold power button for at least 5 seconds Make sure battery leads are connected to proper poles red on red black on black Make sure power button is engaging circuit board you should he...

Page 12: ...ding Battery Accessories 25 1 Lbs BC 81121 Series 8 Features X8 Pro X8R No Lock Euro Wove Frame Dual 200w Quiet Motor Simple Handle Operation Speed Recall Cruise Control Fully Directional Remote Contr...

Reviews:

Related manuals for X8 Pro