background image

GB


14 

|


a   gun  wil


2) (fig.13)


13


SPRAYING TECHNIQUE 

The spraying  result  depends  considerably on 

now smooth and  clean  the  surface  is before  spraying  is begun.  For 

this reason the  surface  should  be  carefully  prepared and  kept  free 

of dust. Surfaces  not  to  be sprayed  should  be covered  with  sticky 

tape and  newspaper . Cover threads and  the  like on  the  object  to 

be sprayed.  It is advisa-  ble  to  carry out  a trial  spraying  onto 

cardboard or a similar  surface


to  find the  most  suitable spray  gun  adjustments. 

11


Important: 

start spraying  outside the  surface  to be sprayed  and  avoid 

stopping on the  surface.


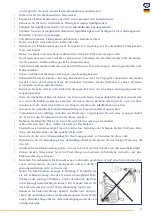
Right  (fig.11): 

Always hold the  spray gun at an even  distance 

of approx. 5-15 cm from the object to be sprayed. 

Move  the  spray  gun  evenly  across  or  up  and 

down,  depending on the  adjusted spraying  ef-


fect.  

12


Wrong (fig.12): 

Excessive paint mist formation. Uneven surface


finish. 

An even  movement of the  spr   y 

l


give a uniform  surface  quality.  

|

3


If coating  material builds  up on the  nozzle  (

|

1) and  air cap ( 

|


clean  both  parts  with  solvent  or water.  

|

1


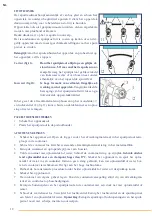
BREAKS IN WORK


•   Turn off device.  

|

2


•   Place spray  gun  in spray  gun  holder.


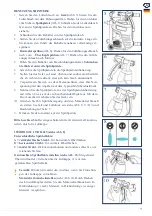
CLOSING DOWN  AND CLEANING


1.       Turn off device. Open  trigger  so that the  coating  material in spray  gun  runs  back into  the  container.


2.    Unscrew  the  container. Return remaining coating  material into  the  material can.


3.    Clean the  container and  ascending pipe  with  a brush.


4.    Fill the  container with  solvent  or water.


5.    Screw container back  in place. 

Only use  solvent  with  a flash point of over 21°C

. Turn on  device  and 

spray  the  solvent  or water  into  a container. If a tube  is not  used,  some  solvent  or water  will be  de- 

posited outside the  container. This is due  to  the  high  air volume.


6.    Repeat the  above  procedure until  clear  solvent  or water  comes  out  of the  nozzle.


7.    Turn off device.


8.    Then  completely empty  the  container. Always keep  the  container seal  free  of coating  material and 

check for damage.


9.    Clean the  outside of the  spray  gun  and  container with  a cloth  soaked  in solvent  or water.


10.   Unscrew  the  union  nut. Remove air cap .Clean the  air cap and  nozzle with  brush  and  solvent  or water.


Note: 

Never clean  the  nozzle  or air hole  of the  spray  gun  with  sharp  metallic  objects  .


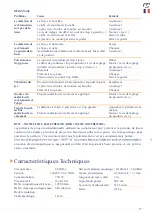
Summary of Contents for 7059652

Page 1: ...INSTRUCTION MANUAL GEBRUIKSAANWIJZING MODE D EMPLOI Elektrisches Farbspr hger t Electric Spray Gun Elektrische Verfspuit Pistolet de Peinture Electrique Artikel Nummer Item No 7059652 Mod BT PSG001 E...

Page 2: ...Ausschalter ON OFF Switch AAN UIT schakelaar Interrupteur d Alimentation 5 Verrieglung Handgriff Lock for Handle Vergrendelhendel Verrouillage de la Poign e 6 Handgriff Handle Hendel Poign e 7 Netzka...

Page 3: ...ning 14 Troubleshooting HVLP High Volume Low Pressure Technical Data 14 EC Declaration of Conformity Disposal 28 nederlands Veiligheidsinstructies 16 Systeembeschrijving Functiebeschrijving 18 Bruikba...

Page 4: ...en Sie bei Nichtgebrauch vor Wartungsarbeiten und vor dem Anbau von Zubeh rteilen stets den Netzstecker 7 Versehentliches Anlaufen vermeiden Tragen Sie angeschlossene Werkzeuge nicht mit dem Finger am...

Page 5: ...zeuge benutzen Benutzen Sie ein Elektrowerkzeug nicht wenn Sie ber m det sind oder unter dem Einfluss von Drogen Alkohol oder Medikamenten stehen Benutzen Sie pers nliche Sicherheitsausr stungen Trage...

Page 6: ...durchsatz durch den Luftschlauch zur Spr hpistole Der Luftdurchsatz zerst ubt das Beschichtungsmaterial an der D se und h lt den Beh lter unter Druck Der Druck dr ckt das Be schichtungsmaterial in die...

Page 7: ...spannung mit den Angaben auf dem Typenschild bereinstimmt 9 Nehmen Sie die Spr hpistole aus der Spr hpistolenhalterung 7 und richten Sie sie auf das zu bearbeitende Objekt aus Mit dem Ein Ausschalter...

Page 8: ...2 ARBEIT BEENDEN UND REINIGUNG 1 Schalten Sie das Ger t aus Dr cken Sie den Ausl ser sodass das Beschichtungsmaterial aus der Spr hpistole in den Beh lter zur ckl uft 2 SchraubenSie den Beh lter ab Gi...

Page 9: ...Luftfilter ist stark verschmutzt Austauschen L ufer im Be schichtungs material Zu viel Beschichtungsmaterial aufgetragen Einstellknopf f r Materialverbrauch Richtung drehen Zu viel Be schichtungs mat...

Page 10: ...ccessories 7 Avoid unintentional start Do not carry tools which are connected to the mains with your finger on the switch Make sure that the switch is off when connecting the unit to the mains 8 Outdo...

Page 11: ...eye protection Avoid accidental starting Ensure the switch is in the off position before plugging in Remove any adjusting key or wrench before turning the power tool on Do not overreach Keep proper fo...

Page 12: ...The air flow atomizes the coating material at the nozzle and also pressurizes the container This pressure pushes the coating material up the ascending pipe to the nozzle The air and pressure setting c...

Page 13: ...ponds the details on the rating plate 9 Remove the spray gun from the spray gun holder and point at object to be sprayed Turn on using ON OFFswitch on the device 10 Adjust the spraying pattern and amo...

Page 14: ...cap clean both parts with solvent or water 1 BREAKS IN WORK Turn off device 2 Place spray gun in spray gun holder CLOSING DOWN AND CLEANING 1 Turn off device Open trigger so that the coating material...

Page 15: ...hange Run in the coating material Too much coating material applied Turn the material adjust ment knob to the Too much coating material mist overspray The distance to the object to be sprayed is too l...

Page 16: ...tstekker loskoppelen Haal de netstekker uit het stopcontact wanneer het apparaat niet wordt gebruikt v r enig onder houd en tijdens het bevestigen van toebehoren 7 Vermijd onverwacht inschakelen Draag...

Page 17: ...k worden gebruikt Blijf alert let goed op waar u mee bezig bent en gebruik gezond verstand wanneer u met elektrisch gereedschap omgaat Gebruik elektrisch gereedschap nooit wanneer u moe of onder de in...

Page 18: ...G De motorblazer produceert een luchtstroom die door de luchtslang naar het spuitpistool stroomt De lucht stroom verstuift het afwerkingmateriaal bij het mondstuk en zet tevens de container onder druk...

Page 19: ...ale spanningsplaatje voordat u de stekker in het stop contact steekt 9 Haal het spuitpistool uit de pistoolhouder en richt het op het te spuiten voorwerp Gebruik de AAN UIT schakelaar om het ap paraat...

Page 20: ...ing of water reinigen PAUZES TIJDENS HETWERKEN Schakel het apparaat uit Plaats het spuitpistool in de pistoolhouder 3 13 1 2 AFSLUITEN EN REINIGEN 1 Schakel het apparaat uit Open de trigger zodat het...

Page 21: ...chtfilter Vervangen Gespoten afwerking materiaal druipt Teveel afwerkingmateriaal toegepast Draai afstelknop naar de Teveel afwerk ingmateriaal mist over spuiten Afstand tot het te spuiten voorwerp is...

Page 22: ...pareil n est pas utilis avant des travaux d entretien et lors de l installation d accessoires 7 Eviter tout d marrage non intentionnel Ne transportez pas des outils qui sont branch s au secteur tout e...

Page 23: ...utilisez une rallonge con ue pour une utilisa tion ext rieure Restez vigilent surveillez ce que vous faites et faites preuve de bon sens lorsque vous utilisez un outil lectrique N utilisez pas un outi...

Page 24: ...fait r sultat de pulv risation une conomie notable de mat riaux de re v tement ainsi qu une r duction de la pollution de l environnement DESCRIPTION FONCTIONNELLE Le jet d air produit par la turbine e...

Page 25: ...rtez le pistolet de son support et pointez le vers les objets pulv riser Mettez l appareil en marche l aide de l interrupteur 7 Marche Arr t 10 Effectuez les r glages du patron de pulv risation et du...

Page 26: ...et nettoyez les deux pi ces avec un solvant ou de l eau PAUSES PENDANT LE TRAVAIL Arr tez l appareil Placez le pistolet dans son support 3 13 1 2 ARR T ET NETTOYAGE 1 Arr tez l appareil D verrouillez...

Page 27: ...uttes du mat riau de rev tement sur l objet Trop de mat riau de rev tement appliqu Tourner la vis de r glage du produit vers Trop de brouil lard de mat riau de re v tement La distance l objet pulv ris...

Page 28: ...r Komponenten aus wertvollen Rohstoffen bestehen und wiederverwertet werden k nnen Entsorgen Sie ihn daher nicht in die M lltonne sondern f hren Sie ihn bitte Ihrer Sammelstelle f r Elektroaltger te z...

Page 29: ...componenten waardevolle grondstoffen zijn en hergebruikt kunnen worden Gooi dit product daarom niet weg maar lever het in bij uw lokale recycling instantie D claration de Conformit CE F Nous Batavia...

Page 30: ...r dit product niet correct functioneert wend u zich alstublieft altijd eerst tot onze klantenservice Bewaar altijd uw aankoopbewijs De garantieservice is alleen van toepassing op materiaal of producti...

Reviews: