English
12
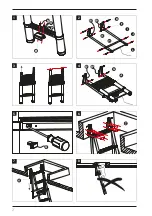
3. Continue opening section by
section, until the ladder is
opened to its full length.
4. Put the ladder on the mounting
position. Place the mount
brackets
(B1, B2)
against the
ceiling joist (See
Fig. 6
).
5. Adjust the position to make sure
the ladder is located on the
middle position of the hatch.
6. Mark the centre point of all
bracket holes.
7. Remove the ladder and drill
4 mm diameter holes at the
positions just marked.
8. Put the ladder back and fix the
brackets using the fixing screws
(C)
(See
Fig. 6
).
WARNING!
The ladder can fall over during the
mounting. It can lead to damage to
property or injury to persons. If
necessary ,get assistance from a
second person for assembly
WARNING!
Do not attempt to climb your loft
ladder until installation is complete.
(See
Fig. 8
).
Use a second ladder to gain access
to the loft while carrying out the
work. Ensure that this is stable.
Mounting the spring
(See
Fig. 7
)
There is groove at each end of the
frame tube spring bolt
(I)
to hold
the spring in place when installed:
1. Place the springs
(K)
in spring
bolt grooves.
2. Extend the spring so that the
free end of the spring can reach
the spring bolt and place the
spring into the groove.
3. Repeat for the other spring.
WARNING!
Be very careful when ,mounting the
spring, as there is not stop to
prevent the frame from swinging
forward with considerable force if it
is moved inadvertently. It can lead
to damage or injury to persons.
Opening the ladder
To open the telescopic loft ladder,
proceed as follows:
1. Hold the strap at the carrier tube
and pull it downwards (
Fig. 9
),
the spring will swivel the ladder
to vertical position (
Fig. 10
).
2. Grip the bottom stiles of the
ladder, push up to un-hook the
ladder stowage hook on the rear
of rung from the carrier tube
(
Fig. 11
).
Summary of Contents for 7063996
Page 2: ...2 N O P 1 2 Q 1 2 7 5 3 8 6 4 1 2...
Page 3: ...3 13 12 11 9 10 12a 13a 12b 13b...
Page 4: ...4 17 18 16 15 14...
Page 49: ......
Page 50: ......


