background image

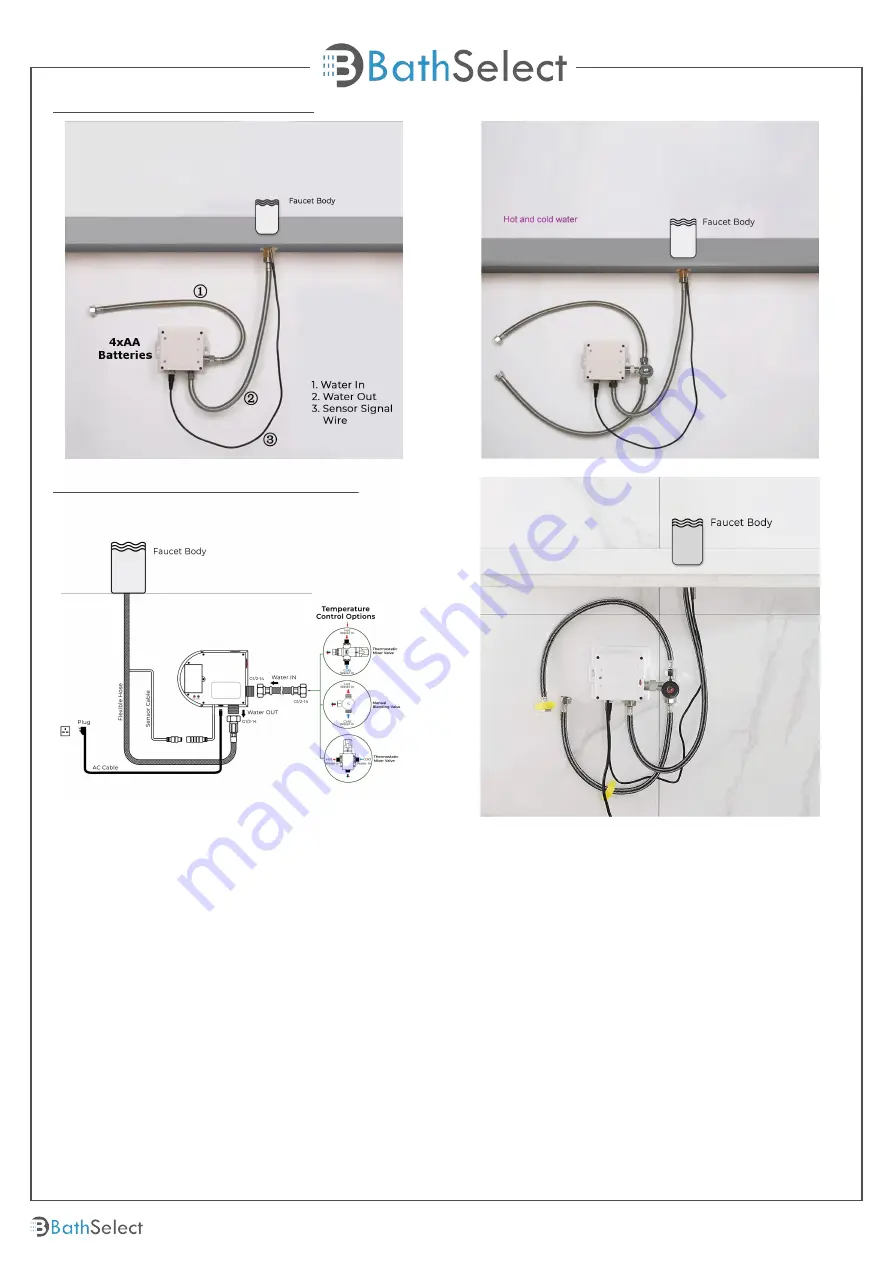
Battery (DC 6V) & AC 220V Control Box

Normal Water Connection

Hot & Cold Water Connection

Battery (DC 6V) Only Control Box

1. Screw the hose into the corresponding screw-hole of the faucet body. Fix the O-ring into the 

bottom groove of the faucet body.

2. Insert hose, threaded pipe, and sensor cable through the drilled hole of the countertop. Put 

rubber washer and metal washer onto the threaded pipe, screwing in mounting nut. Adjust the 

faucet body correctly and tighten the mounting nut with screws.

3. Install the control box to the faucet.

4. Then connect the battery cable to the control box.

5. Make Connections to water supplies. Turn on the water supply and flush water lines into a 

container for one minute.

Important: This flushes away any debris that could cause damage to faucet internal parts.

6. Connect waterlines to angle stops. Turn on the angle stops and check for leaks (DO NOT TURN 

FAUCET ON).

7. Turn the faucet on for 1 minute to flush any debris.

Customer Service: 800-500-9895

bathselect.com

5

Summary of Contents for BS10101

Page 1: ...in accordance with applicable building codes and regulations Unpack and inspect the items for any shipping damages If you nd damages do not install All products must be installed by a professional and...

Page 2: ...ucet Deck Mount Installation Washer Rubber Washer Nut and locking bolts Threaded Tube Faucet Body O ring Hole Size Chart Deck Mount Type 1 Middle Open Faucet Type Washer Rubber Washer Nut and locking...

Page 3: ...alignment arrows together Set the battery box back into the control box and re assemble the control box cover using the previously removed screws ensuring they are all fully tightened Cover Battery c...

Page 4: ...tlet Water Supply Inlet Please wait approximately 60 seconds after connecting the sensor cable for sensor calibration to complete and to begin using the faucet or Temp Control Thermostatic Mixer Many...

Page 5: ...rewing in mounting nut Adjust the faucet body correctly and tighten the mounting nut with screws 3 Install the control box to the faucet 4 Then connect the battery cable to the control box 5 Make Conn...

Page 6: ...pout This can only be done with optional remote control Installing electronic soap dispenser faucet with intersecting centerline might lead to accidental activation of either or both Faucet Faucet Soa...

Page 7: ...Inductive Closing Time 2 second Dia of inlet outlet pipe G1 2 Flux 0 07L S Power Supply Box Transformer BOX Temperature Mixer Below Deck Manual Mixing Valve BDM Factory Default Timeout 30s Factory De...

Reviews: