background image

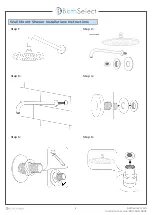
Wall Mount Shower Installations Instructions 

Step 1:

Step 2:

Step 3:

Step 4:

Step 5:

Step 6:

Customer Service: 800-500-9895

bathselect.com

2

Summary of Contents for BST6112L

Page 1: ...ed in accordance with applicable building codes and regulations Unpack and inspect the items for any shipping damages If you nd damages do not install All products must be installed by a professional...

Page 2: ...Wall Mount Shower Installations Instructions Step 1 Step 2 Step 3 Step 4 Step 5 Step 6 Customer Service 800 500 9895 bathselect com 2...

Page 3: ...by wrapping it around the threads go all the way around 3 or 4 times depending on the quality of the te on tape 4 Install the new shower arm by going clockwise by hand until it is tight then put paint...

Page 4: ...r mounting of bottom post Start with a smaller drill bit size 1 8 is recommended and drill hole If you hit a wall stud go to next step If you do not hit a wall stud change to a drill bit size suitable...

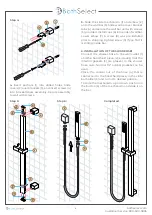
Page 5: ...1 and the hand held piece 2 ensuring that the internal gaskets 3 are present in the shower hose nuts Normal 1 2 rubber gaskets can be used Place the conical nut of the hose 4 that is connected to the...

Page 6: ...tightly into the female of water Supply Step 1 Attach the escutcheon to the body spray Pressure Balancing Loop If installing bodysprays in a bank of 3 or fewer a pressure balancing loop is not necess...

Page 7: ...ter Cold water Rough in Body Anchor Positioning Bar Tapping Screw 1 Tapping Screw 2 Plate Cover Button Screw 1 Diverter Handle Temp Handle On Off Handle Hex Wrench Hot Water In Cold Water In Function...

Page 8: ...clean the product 4 Avoid a vigorous cleaning action as this could contribute to denaturing and dulling 5 Abrasive or strong cleaning products containing ammonia bleaches alcohol dyes acids hydrochlo...

Reviews: