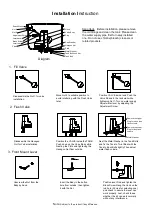
Diagram
Unscrew the Nut from the
Body by hand .
3. Front Mount Lever
Disassemble the Hexagon
Nut for Valve installation.
Brass Screw
Disassemble the Nut 1 for valve
installation.
2. Flush Valve
1. Fill Valve
Lever rod
Float
Adjustment Screw
Nut 2
Lever handle
Nut 1
Shank Washer
Position lever Rod and tighten the
Brass Screw.Hang the Hook on the
rod hole (5 holes for selecting one)
and check to assure the level can
work properly. Last, check to see
whether the kit can work normally
without any interference.
Insert the Body in the button
hole from outside, then tighten
it with the Nut.
Note
: Subject to the product if any difference.
Nest the Metal Washer in the Tank Bolts
and fix the Tank to Toilet Bowl with the
Tank to Bowl Bolts tightly.Then adjust
water flush volume.
Metal Washer
Remove the Lower
Plug for less flush
volume.
Remove the Upper
Plug for much less
flush volume.
Position the VALVE inside the TANK.
Push down on the Valve Body while
Nesting the Plate and tightening the
Hexagon Nut from outside.
Important
:
Before installation, please remove
the old fittings and clean the tank. Please clean
the water supply pipe first for newly installed
one. Do not use chlorine(bleach) cleaners or
related products.
Position VALVE inside tank. Push the
Valve Shank to the tank wall while
tightening Nut 1.Turn on water supply.
Adjust water level by adjusting the
Adjustment Screw.
Move Nut 2 to suitable position to
avoid interfering with the Flush Valve
later.
Tank Bolt
Tank Bolt Lock Nut
Metal Washer
Seal Washer
Hexagon Nut
Plate
Installation I
nstruction
Valve Body
Plug
Hook
Summary of Contents for Whitechapel 573272
Page 3: ...68 15 ...


