background image

Batronix programmer and experimental board manual – © 1998 - 2006 by Batronix, www.Batronix.com

This document is protected by German and international copyright laws. 

Dieses Werk ist durch das deutsche und internationale Urheberrecht geschützt.

28

Batronix programmer and experimental board manual

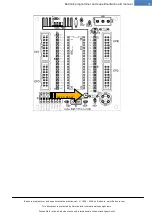
DIP SWITCH / DIP SCHALTER:

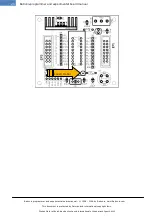
Below  the  DIP  switch,  you  see  a  short 
form  of  the  applicable  functions.  The 
functions  are  turned  on  in  the  above 
position (ON).

-  LED:  The  operation  LED  can  be 
switched  on  and  off  here.  The  standard 
setting is ON.

- P_RST: The reset pin can be set to the 
expansion  ports  here.  The  standard 
setting is ON.

-  P3-XT:  Sets  the  XTAL1  (clock)  pin  of 
the  microcontroller  onto  port  3.  The 
standard setting is OFF.

-  P1-XT:  Sets  the  XTAL1  (clock)  pin  of 
the  microcontroller  to  port  1.  The 
standard setting is OFF.

-  XTAL1:  The  connection  between  the 
quartz and the microcontroller input XTAL 
1 can (must) be set here. IMPORTANT: If 
you  use  no  external  clock  from  an 
expansion port, this switch should be set 
to ON. The standard setting is ON.

-  XTAL2:  The  connection  between  the 
quartz and the microcontroller input XTAL 
2 can (must) be set here. IMPORTANT: If 
you do not use an external clock from an 
expansion  port,  this  switch  should  be 
turned  ON.  The  standard  setting  is  ON.

Unter  dem  DIP-Schalter  können  Sie  ein 
Kürzel der jeweiligen Funktion sehen. Die 
Funktionen  sind  in  der  obigen  Position 
eingeschaltet (ON).

- LED: Die Betriebs-LED kann hiermit ein-
und 

ausgeschaltet 

werden. 

Die 

Standardeinstellung ist ON.

- P_RST: Damit kann die Resetleitung auf 
die  Expansionsports  gelegt  werden.  Die 
Standardeinstellung ist ON.

-  P3-XT:  Legt  die  XTAL1  (Takt)  Leitung 
des  Mikrocontrollers  auf  den  Port  3.  Die 
Standardeinstellung ist OFF.

-  P1-XT:  Legt  die  XTAL1  (Takt)  Leitung 
des  Mikrocontrollers  auf  den  Port  1.  Die 
Standardeinstellung ist OFF.

-  XTAL1:  Die  Verbindung  zwischen  dem 
Quarz  und  dem  Mikrocontrollereingang 
XTAL  1  kann  (muss)  hiermit  hergestellt 
werden.  WICHTIG:  Wenn  Sie  keinen 
externen  Takt  aus  einem  Expansionsport 
verwenden,  sollte  dieser  Schalter  auf  ON 
stehen. Die Standardeinstellung ist ON.

-  XTAL2:  Die  Verbindung  zwischen  dem 
Quarz  und  dem  Mikrocontrollereingang 
XTAL  2  kann  (muss)  hiermit  hergestellt 
werden.  WICHTIG:  Wenn  Sie  keinen 
externen  Takt  aus  einem  Expansionsport 
verwenden,  sollte  dieser  Schalter  auf  ON 
stehen. Die Standardeinstellung ist ON.

Summary of Contents for BX32 BATUPO

Page 1: ...Programmer Experimentalboards Manual Handbuch...

Page 2: ...3 X 4 EPROM BRENNER 3 X 4 9 CONSTRUCTION OF A BUILDING KIT AUFBAU EINES BAUSATZES 9 INSTALLATION AND OPERATION INSTALLATION UND BENUTZUNG 12 CONNECTIONS ANSCHL SSE 12 CORRECT PLACEMENT OF CHIPS KORRE...

Page 3: ...ight laws Dieses Werk ist durch das deutsche und internationale Urheberrecht gesch tzt 3 Batronix programmer and experimental board manual FLASH EXP BOARD II FLASH EXP BOARD II 29 CONSTRUCTION OF A BU...

Page 4: ...s will immediately detect the device as a new USB device and display the following message on the screen Installieren Sie bitte zun chst die Prog Express Software N here Details zur Installation und H...

Page 5: ...gram Files Batronix Prog Express driver BX32P Confirm this window with Next Setzen Sie die Checkbox Folgende Quelle ebenfalls durchsuchen und klicken Sie auf den Button Durchsuchen W hlen Sie den zum...

Page 6: ...ur PC is now searching for the indicated sources and will find the programmer The software will be installed Der PC sucht nun in der angegebenen Quelle und wird das Programmierger t erkennen Die Treib...

Page 7: ...plied cable A power adapter or batteries are not required since all programming voltages between 3 and 25 volts are provided internally by a voltage generator from the USB supply voltage Der USB Ansch...

Page 8: ...o 12 volts DC plug center positive outside ground is connected it will take over the power supply to the device this can save battery power at notebooks for example Der USB Anschluss erfolgt mit dem m...

Page 9: ...e longer connection pin Cathode the flattened side of the housing the larger metal surface in the LED Please take the time before construction to assign the parts supplied in the package to the items...

Page 10: ...LED low current gr n D3 2 BC548C BC548C T2 T3 1 BC558C BC558C T1 2 Socket 14 pole Fassung 14pol 2 Socket 16 pole Fassung 16pol 1 Socket 40 pole Brennfassung 1 74HC157 74HC157 IC4 2 74HC393 74HC393 IC...

Page 11: ...resistance measuring device available you can recognize the resistance values from the color rings see table The following abbreviations were used bk black br brown rd red or orange ye yellow gr green...

Page 12: ...ctor In rare cases the address of the parallel port must be adapted to your PC The address 378 h is to be entered as the initial setting This applies to most PCs In Windows you can find the address in...

Page 13: ...device The chips have to be flush at the bottom with the marking on the chip housing pin 1 pointing in the direction of the Batronix logo If the Prog Studio 6 software shows that a chip should be plac...

Page 14: ...e longer connection pin Cathode the flattened side of the housing the larger metal surface in the LED Please take the time before construction to assign the parts supplied in the package to the items...

Page 15: ...rstand 2 2 KOhm rt rt sw br br R1 R4 2 Resistor 10 KOhm br bk bk rd br Widerstand 10 KOhm br sw sw rt br R2 R3 2 Resistor 56 KOhm gr bl bk rd br Widerstand 56 KOhm gr bl sw rt br R5 R6 3 Capacitor 1nF...

Page 16: ...1998 2006 by Batronix www Batronix com This document is protected by German and international copyright laws Dieses Werk ist durch das deutsche und internationale Urheberrecht gesch tzt 16 Batronix pr...

Page 17: ...tor In rare cases the address of the parallel port must be adapted to your PC The address 378 h is to be entered as the initial setting This applies to most PCs In Windows you can find the address in...

Page 18: ...ottom is the side facing away from the parallel port plug Pin 1 the marking on the microcontroller housing must point in the direction of the parallel port plug The upper pins of the socket remain emp...

Page 19: ...he longer connection pin Cathode the flattened side of the housing the larger metal surface in the LED Please take the time before construction to assign the parts supplied in the package to the items...

Page 20: ...13 Volt 1 1 LED low current green LED low current gr n 1 2 BC548C BC548C 2 2 Socket 14 pole Quarz 6 MHz 2 2 Socket 16 pole Fassung 14pol 2 1 Socket 40 pole Fassung 16pol 1 1 74HC157 Brennfassung 1 2 7...

Page 21: ...resistance measuring device available you can recognize the resistance values from the color rings see table The following abbreviations were used bk black br brown rd red or orange ye yellow gr green...

Page 22: ...ctor In rare cases the address of the parallel port must be adapted to your PC The address 378 h is to be entered as the initial setting This applies to most PCs In Windows you can find the address in...

Page 23: ...wrongly the component or the device may be damaged Please place the microcontroller so that pin 1 the marking on the microcontroller housing point in the direction of the labelling Flash MC Brenner I...

Page 24: ...the longer connection pin Cathode the flattened side of the housing the larger metal surface in the LED Please take the time before construction to assign the parts supplied in the package to the item...

Page 25: ...5 KOhm br gr sw br br R1 1 Resistor 6 8 KOhm bl gy sw br br Widerstand 6 8 KOhm bl gy sw br br R2 2 Capacitor 33pF Kondensator 33pF C5 C6 1 Capacitor 100nF Kondensator 100nF C2 1 Capacitor 10uF Konden...

Page 26: ...1998 2006 by Batronix www Batronix com This document is protected by German and international copyright laws Dieses Werk ist durch das deutsche und internationale Urheberrecht gesch tzt 26 Batronix pr...

Page 27: ...nnung zwischen 7 und 18 Volt sein Der max ben tigte Strom betr gt 50 mA Bitte beachten Sie unbedingt die richtige Polung der Versorgungsspannung Neben der Schraubklemme k nnen Sie die Beschriftungen V...

Page 28: ...quartz and the microcontroller input XTAL 2 can must be set here IMPORTANT If you do not use an external clock from an expansion port this switch should be turned ON The standard setting is ON Unter d...

Page 29: ...the longer connection pin Cathode the flattened side of the housing the larger metal surface in the LED Please take the time before construction to assign the parts supplied in the package to the ite...

Page 30: ...br gr sw br br R1 2 Resistor 6 8 KOhm bl gy sw br br Widerstand 6 8 KOhm bl gy sw br br R2 2 Capacitor 33pF Kondensator 33pF C5 C6 1 Capacitor 100nF Kondensator 100nF C2 1 Capacitor 10uF Kondensator...

Page 31: ...1998 2006 by Batronix www Batronix com This document is protected by German and international copyright laws Dieses Werk ist durch das deutsche und internationale Urheberrecht gesch tzt 31 Batronix pr...

Page 32: ...nnung zwischen 7 und 18 Volt sein Der max ben tigte Strom betr gt 50 mA Bitte beachten Sie unbedingt die richtige Polung der Versorgungsspannung Neben der Schraubklemme k nnen Sie die Beschriftungen V...

Page 33: ...le back and forth between operations with the internal Flash and an external memory as the program memory IMPORTANT If no external memory is connected as a program memory this switch should be turned...

Reviews: