background image

Sole A – Sole A Vap 

19 

2016 


HOURS OF 

WORK 

Ok


TOTAL HOURS 


Cannot be zeroed


To return to 

previous 

menu press 


Esc


or wait for 

10 seconds


PARTIAL HOURS 

Zeroing of hours


Ok


Press for 5 

seconds 


Reset


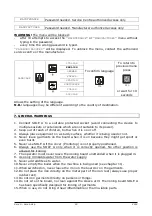
TOTAL HOURS: computation of the total hours the machine has worked for. This data 
cannot be zeroed.  

PARTIAL  HOURS:  computation  of  the  hours  the  machine  has  worked  for  since  last 
zeroing. This data can be zeroed (see table). To zero the data, follow instructions as 
per table. 


Reset is necessary in order to delete the warnings from the display once the cover has 
been changed.  

Example: WARNING!

 “CHANGE COVER”


is displayed.  


1.


Gain access to MENU 

2.


Find 

“RESET WARNINGS”

, press OK and find 

“CHANGE COVER”


3.


press 

RESET

 until you hear an acoustic signal 

4.


ESC

 to exit the 

SET

 menu 


KEY TONE 

Ok


KEY TONE ON 

To confirm 


Ok


To return to 

previous menu 

press 


Esc


or wait for 10 

seconds


KEY TONE 

OFF 


Used  to  activate  or  deactivate  the  acoustic  signal  when  keys  are  pressed. 
If you wish the acoustic signal to be activated, press 

KEY TONE ON. 

If you wish the acoustic signal to be deactivated, press 

KEY TONE OFF. 

RESET OF 
WARNINGS 

Ok


CHANGE COVER 

(the number of hours 
elapsed since the last 

change will be displayed)


To zero, press the 

key until you hear 

an acoustic signal   


Reset


To return to 

previous menu 

press 


Esc


or wait for 10 

seconds


Summary of Contents for SOLE A 2013

Page 1: ...0424 549027 39 0424 549007 www battistellag it info battistellag it Questo manuale di propriet della BATTISTELLA B G S r l Qualsiasi riproduzione vietata La Ditta si riserva il diritto di apportare m...

Page 2: ...ENZA FERRO 800 W 800 W POTENZA PIANO 200 W 200 W POTENZA MOTORE SOFFIAGGIO 23 W 23 W POTENZA CALDAIA 1300 W 1300 W POTENZA POMPA 48 W 48 W CAPACIT CALDAIA 1 9 L 1 9 L CAPACIT VASCHETTA ACQUA 1 1 L 1 1...

Page 3: ...cio stiro e bloccarlo avvitando il pomello per il fissaggio 4 ALLACCIAMENTO E ACCENSIONE Con il SOLE A spento e spina disinserita 1 Posizionare l asse in verticale con la caldaia verso il basso 2 Tene...

Page 4: ...gnimento della caldaia Tasto per l accensione o lo spegnimento del ferro da stiro Tasto per attivare e disattivare il vapore dal tavolo funziona solo su modelli vaporizzanti NOTA in automatico per una...

Page 5: ...e lo stiro l icona inizi a lampeggiare Segnala che la scheda sta provvedendo a ristabilire la pressione ottimale in caldaia ogni volta che si fatto fuoriuscire del vapore L accensione di tanto in tant...

Page 6: ...dopo aver effettuato il cambio della tela si vuole eliminare l avviso che compare sul display Esempio interviene l avviso CAMBIO TELA 1 Accedere al menu 2 Individuare RESET AVVISI premere OK ed indivi...

Page 7: ...be variare in base al paese in cui venduta la macchina 7 AVVERTENZE GENERALI 1 Allacciare il SOLE A ad una presa di corrente adeguata e protetta evitare di collegare l apparecchio a prese multiple e a...

Page 8: ...a stiratura 1 Passare il ferro da stiro sui capi da stirare premendo ad intervalli il microinterruttore del ferro fig 5 per far uscire il vapore L aspirazione evita ristagni d acqua sul tavolo e perme...

Page 9: ...lare la macchina da personale qualificato 10 RICARICA ACQUA NELLA VASCHETTA possibile rifornire d acqua il SOLE A in qualsiasi momento durante la stiratura anche quando in pressione Rimuovere la spina...

Page 10: ...TTENZIONE SCARICARE L ACQUA SOLO CON CALDAIA FREDDA E SPINA STACCATA 12 CAMBIO TELA PRONTOTOP La scheda programmata per segnalare dopo un certo intervallo di ore di lavoro che necessario la sostituzio...

Page 11: ...necessarie Una volta eseguita la manutenzione verr tolto l avviso di manutenzione che compare sul display inoltre obbligatorio far sostituire il tubo vapore e il filo del ferro quando sono danneggiati...

Page 12: ...Sole A Sole A Vap 11 2016 ATTENZIONE Riporre il SOLE solo in verticale come da illustrazione fig 10 Mai riporlo con il piano stiro rivolto verso terra fig 11 Fig 9 Fig 8 Fig 10 Fig 11...

Page 13: ...ui si accende l apparecchio 2 quando si usa il SOLE A durante un temporale 3 quando si usa il SOLE A senza adeguate protezioni ai piedi senza scarpe o con i piedi bagnati 4 quando risultano danneggiat...

Page 14: ...pu essere capovolta Non essendo un imballo rigido poco resistente agli urti Materiale fragile porre quindi la massima attenzione nel maneggiare l apparecchio imballato non usarlo come sgabello o come...

Page 15: ...ragione di uno a uno L adeguata raccolta differenziata per l avvio successivo dell apparecchiatura dismessa al riciclaggio al trattamento e o allo smaltimento ambientalmente compatibile contribuisce...

Page 16: ...CUUM BLOWING POWER 23 W 23 W BOILER POWER 1300 W 1300 W PUMP POWER 48 W 48 W BOILER CAPACITY 1 9 L 1 9 L WATER TANK CAPACITY 1 1 L 1 1 L IRONING ENDURANCE CONTINUOUS CONTINUOUS OPERATING STEAM PRESSUR...

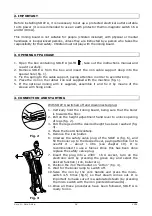
Page 17: ...g knob 4 CONNECTION AND STARTING With SOLE A switched off and disconnected plug 1 Vertically hold the ironing board being sure that the boiler is towards the floor 2 Pull on the height adjustment hand...

Page 18: ...rd on off key Ok Boiler on off key Iron on off key Key to activate deactivate steaming function only on steaming models NOTE for better performance the motor also automatically blows when using the st...

Page 19: ...equires technical assistance or that the maximum number of hours set for the cover changing has been exceeded NOTE During ironing the icon will start flashing This is normal and indicates that the ele...

Page 20: ...een changed Example WARNING CHANGE COVER is displayed 1 Gain access to MENU 2 Find RESET WARNINGS press OK and find CHANGE COVER 3 press RESET until you hear an acoustic signal 4 ESC to exit the SET m...

Page 21: ...2 Keep out of reach of children both when it is on or off 3 Always place equipment on a sturdy surface whether it is being used or not 4 Never leave garments on the board when it is on because they m...

Page 22: ...lack or blue garments we suggest to use the anti sheen shoe 3 During ironing always put the iron on its rubber rest fig 1 4 For dry ironing it is possible to adjust the thermostat fig 4 on various pos...

Page 23: ...ion not to spill it onto the machine fig 6 Water is required when the intermittent warning WATER appears and the sound alarm signal switches on chapter 9 It is suggested to immediately add water once...

Page 24: ...g board However amongst other factors the wear and tear also depends on how ironing is done It may therefore be necessary to replace the cover even earlier especially if vacuum blowing performances ha...

Page 25: ...t the board upwards and completely pull the specific lever fig 8 ATTENTION the board must be lifted upwards otherwise it will not be possible to pull the lever and close the ironing board SOLE A is eq...

Page 26: ...oard To do this proceed as follows 1 disconnect the plug which connects the boiler to the ironing board 2 loosen the two knobs and pull the boiler outwards fig 12 SOLE A VAP on the steaming model SOLE...

Page 27: ...different purposes other than ironing 20 THERMIC RISKS The ironing board can become extremely hot when in function use it very carefully and disconnect plug when not in use The following situations ar...

Page 28: ...dicated in the instructions see WATER CONNECTION chapter when using the machine for a purpose different than the one specified in this manual when using non genuine spare parts or accessories modified...

Page 29: ...lination of responsibility for consequential damages BATTISTELLA B G S r l will never take the responsibility for any damage included without any limitation consequential damages due to loss or no pro...

Reviews: