CALL TOLL FREE
1
-
877
-
592
-
0033
(250-592-0033)
23
Email: info@accesspanelsolutions.com
Web: www.accesspanelsolutions.com
Installation Instructions
bauco-plus II
TM
Introduction and Key Concepts
Installation Methods
Access Panel Outer Frame
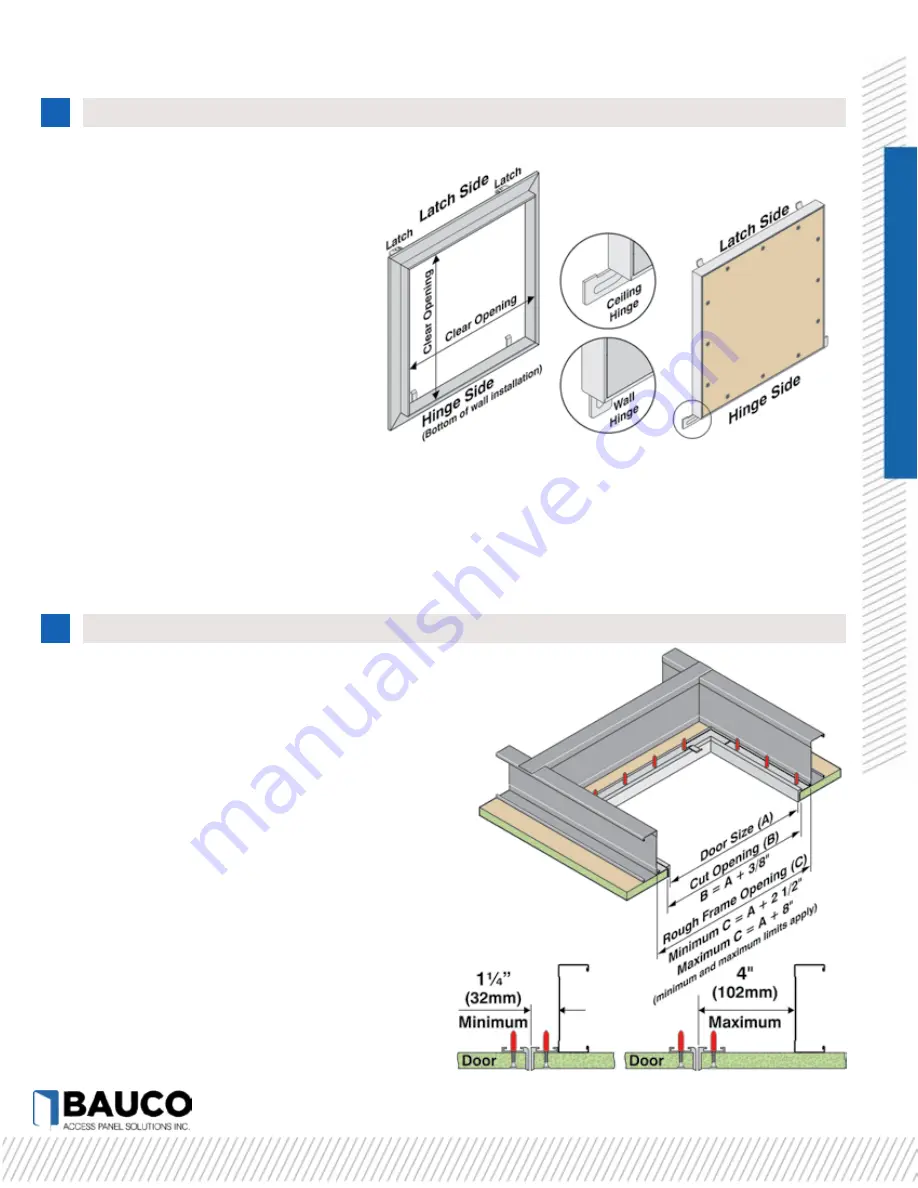
The dimensions of the Clear Opening in the frame are used to
determine the Cut Opening (opening in drywall) and the
minimum Rough Frame Opening (spacing of framing
members).
The number group following the first 4 digits in the
model number is the clear opening dimensions.
Ex: access panel with the Model Number
20-58-
1212
has a
12” x 12”
clear opening.
The outer frame mounts to the back of the drywall
and is attached with self-drilling drywall screws
through the face of the drywall.
Standard Installation
The framing members must be positioned correctly around the opening in the
drywall for the access panel. Drywall is attached to the studs as usual but
overlaps to create a lip to acceps the access panel outer frame. The cut
opening required for the access panel is cut and the frame angled
through the opening and attached according to the information on
the next page. Alternative methods for locating outer frame are
outlined on next page.
Ex: For a Model Number 20-58-1212 with a 12” x 12” clear
opening, the minimum spacing of the framing is 14 1/2” with 1 1/4”
on either side of the opening. The maximum spacing is 20” with 4”
maximum on either side of the opening. The distance to the studs
does not have to be the same as long as the framing is within the
maximum and minimum dimensions.
Size of the Cut Opening (B)
Door Size (A)
number group following first 4 digits in the model number.
The
Cut Opening (B)
is the Door Size (A) + 3/8” (drywall opening size).
Size of the Minimum Rough Framed Opening (C)
The minimum distance from the framing to a stud is 1 1/4”. The maximum is 4”
Access Panel Door Leaf
The door leaf is opened by pressing on
the panel on the latch side.
When released, the panel
springs open.
For trouble-free installation and operation,
please observe the following:
|
The access panel outer frame must be screwed to the drywall every 4” or less with more precise attachment
at the corners and through the base of all latch brackets.
|
The outer frame must be attached to the drywall square and straight. Frame is flexible; attach straight.
|
The wall or ceiling must be rigid. Blocking and/or rigid hangers must ensure no flexibility or movement in drywall.
|
The drywall surrounding the outer frame should be flat. If screw heads protrude above the face of the framing, it is
recommended that drywall shims are used to make a flat surface.


