ImVT 120 II Mini Verticus
Page 22
1st Edition, Rev. 0 Chg. 10
3.1.9.4
IK120 II 2nd Stage Valves
3.1.9.4.1
Removing the Valves of the 2nd Stage
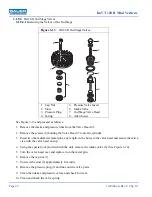
See Figure 3-13 and proceed as follows:
1. Remove the intake and pressure lines from the Valve Head (7).
2. Remove the screws (8) holding the Valve Head (7) onto the cylinder.
3. Insert two 8mm diameter metal pins, any length, in the holes in the valve head and secure them in a
vise with the valve head on top.
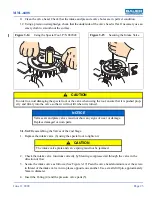
4. Using the special tool provided with the unit, remove the intake valve (6) (See Figure 3-14).
5. Turn the valve head over and replace it on the metal pins.
6. Remove the cap nut (1).
7. Unscrew the stud (2) approximately five turns.
8. Remove the pressure plug (3) and take out the valve parts.
9. Clean the intake and pressure valves and check for wear.
10. Clean and check the valve spring.
Figure 3-13
IK120 II 2nd Stage Valves
1. Cap Nut
2. Stud
3. Pressure Plug
4. O-ring
5. Pressure Valve Insert
6. Intake Valve
7. 2nd Stage Valve Head
8. Allen Screw
1
2
3
4
5
6
7
8


